5.2: Direction of Light
- Page ID
- 3121
\( \newcommand{\vecs}[1]{\overset { \scriptstyle \rightharpoonup} {\mathbf{#1}} } \)
\( \newcommand{\vecd}[1]{\overset{-\!-\!\rightharpoonup}{\vphantom{a}\smash {#1}}} \)
\( \newcommand{\id}{\mathrm{id}}\) \( \newcommand{\Span}{\mathrm{span}}\)
( \newcommand{\kernel}{\mathrm{null}\,}\) \( \newcommand{\range}{\mathrm{range}\,}\)
\( \newcommand{\RealPart}{\mathrm{Re}}\) \( \newcommand{\ImaginaryPart}{\mathrm{Im}}\)
\( \newcommand{\Argument}{\mathrm{Arg}}\) \( \newcommand{\norm}[1]{\| #1 \|}\)
\( \newcommand{\inner}[2]{\langle #1, #2 \rangle}\)
\( \newcommand{\Span}{\mathrm{span}}\)
\( \newcommand{\id}{\mathrm{id}}\)
\( \newcommand{\Span}{\mathrm{span}}\)
\( \newcommand{\kernel}{\mathrm{null}\,}\)
\( \newcommand{\range}{\mathrm{range}\,}\)
\( \newcommand{\RealPart}{\mathrm{Re}}\)
\( \newcommand{\ImaginaryPart}{\mathrm{Im}}\)
\( \newcommand{\Argument}{\mathrm{Arg}}\)
\( \newcommand{\norm}[1]{\| #1 \|}\)
\( \newcommand{\inner}[2]{\langle #1, #2 \rangle}\)
\( \newcommand{\Span}{\mathrm{span}}\) \( \newcommand{\AA}{\unicode[.8,0]{x212B}}\)
\( \newcommand{\vectorA}[1]{\vec{#1}} % arrow\)
\( \newcommand{\vectorAt}[1]{\vec{\text{#1}}} % arrow\)
\( \newcommand{\vectorB}[1]{\overset { \scriptstyle \rightharpoonup} {\mathbf{#1}} } \)
\( \newcommand{\vectorC}[1]{\textbf{#1}} \)
\( \newcommand{\vectorD}[1]{\overrightarrow{#1}} \)
\( \newcommand{\vectorDt}[1]{\overrightarrow{\text{#1}}} \)
\( \newcommand{\vectE}[1]{\overset{-\!-\!\rightharpoonup}{\vphantom{a}\smash{\mathbf {#1}}}} \)
\( \newcommand{\vecs}[1]{\overset { \scriptstyle \rightharpoonup} {\mathbf{#1}} } \)
\( \newcommand{\vecd}[1]{\overset{-\!-\!\rightharpoonup}{\vphantom{a}\smash {#1}}} \)
\(\newcommand{\avec}{\mathbf a}\) \(\newcommand{\bvec}{\mathbf b}\) \(\newcommand{\cvec}{\mathbf c}\) \(\newcommand{\dvec}{\mathbf d}\) \(\newcommand{\dtil}{\widetilde{\mathbf d}}\) \(\newcommand{\evec}{\mathbf e}\) \(\newcommand{\fvec}{\mathbf f}\) \(\newcommand{\nvec}{\mathbf n}\) \(\newcommand{\pvec}{\mathbf p}\) \(\newcommand{\qvec}{\mathbf q}\) \(\newcommand{\svec}{\mathbf s}\) \(\newcommand{\tvec}{\mathbf t}\) \(\newcommand{\uvec}{\mathbf u}\) \(\newcommand{\vvec}{\mathbf v}\) \(\newcommand{\wvec}{\mathbf w}\) \(\newcommand{\xvec}{\mathbf x}\) \(\newcommand{\yvec}{\mathbf y}\) \(\newcommand{\zvec}{\mathbf z}\) \(\newcommand{\rvec}{\mathbf r}\) \(\newcommand{\mvec}{\mathbf m}\) \(\newcommand{\zerovec}{\mathbf 0}\) \(\newcommand{\onevec}{\mathbf 1}\) \(\newcommand{\real}{\mathbb R}\) \(\newcommand{\twovec}[2]{\left[\begin{array}{r}#1 \\ #2 \end{array}\right]}\) \(\newcommand{\ctwovec}[2]{\left[\begin{array}{c}#1 \\ #2 \end{array}\right]}\) \(\newcommand{\threevec}[3]{\left[\begin{array}{r}#1 \\ #2 \\ #3 \end{array}\right]}\) \(\newcommand{\cthreevec}[3]{\left[\begin{array}{c}#1 \\ #2 \\ #3 \end{array}\right]}\) \(\newcommand{\fourvec}[4]{\left[\begin{array}{r}#1 \\ #2 \\ #3 \\ #4 \end{array}\right]}\) \(\newcommand{\cfourvec}[4]{\left[\begin{array}{c}#1 \\ #2 \\ #3 \\ #4 \end{array}\right]}\) \(\newcommand{\fivevec}[5]{\left[\begin{array}{r}#1 \\ #2 \\ #3 \\ #4 \\ #5 \\ \end{array}\right]}\) \(\newcommand{\cfivevec}[5]{\left[\begin{array}{c}#1 \\ #2 \\ #3 \\ #4 \\ #5 \\ \end{array}\right]}\) \(\newcommand{\mattwo}[4]{\left[\begin{array}{rr}#1 \amp #2 \\ #3 \amp #4 \\ \end{array}\right]}\) \(\newcommand{\laspan}[1]{\text{Span}\{#1\}}\) \(\newcommand{\bcal}{\cal B}\) \(\newcommand{\ccal}{\cal C}\) \(\newcommand{\scal}{\cal S}\) \(\newcommand{\wcal}{\cal W}\) \(\newcommand{\ecal}{\cal E}\) \(\newcommand{\coords}[2]{\left\{#1\right\}_{#2}}\) \(\newcommand{\gray}[1]{\color{gray}{#1}}\) \(\newcommand{\lgray}[1]{\color{lightgray}{#1}}\) \(\newcommand{\rank}{\operatorname{rank}}\) \(\newcommand{\row}{\text{Row}}\) \(\newcommand{\col}{\text{Col}}\) \(\renewcommand{\row}{\text{Row}}\) \(\newcommand{\nul}{\text{Nul}}\) \(\newcommand{\var}{\text{Var}}\) \(\newcommand{\corr}{\text{corr}}\) \(\newcommand{\len}[1]{\left|#1\right|}\) \(\newcommand{\bbar}{\overline{\bvec}}\) \(\newcommand{\bhat}{\widehat{\bvec}}\) \(\newcommand{\bperp}{\bvec^\perp}\) \(\newcommand{\xhat}{\widehat{\xvec}}\) \(\newcommand{\vhat}{\widehat{\vvec}}\) \(\newcommand{\uhat}{\widehat{\uvec}}\) \(\newcommand{\what}{\widehat{\wvec}}\) \(\newcommand{\Sighat}{\widehat{\Sigma}}\) \(\newcommand{\lt}{<}\) \(\newcommand{\gt}{>}\) \(\newcommand{\amp}{&}\) \(\definecolor{fillinmathshade}{gray}{0.9}\)This lesson will help you learn and practice Direction of Light. In Get the Basics, you'll get explanations and photos to build understanding. In Explore, you'll find additional online resources to learn more. It's important to review and learn from these resources also! You'll have opportunities to practice in Build Your Skills. Finally, answer the questions in Record Your Findings at the end of this topic. Be sure to include information you learned from the Explore resources.
Get the Basics
You've learned that light is essential to photos. Too little light...your photos will be dark or black. Too much light...they could be blown out white. So just make sure that there's enough light, right? No, there’s actually a lot more to it!
Let's start with your eyes. Your eyes are offset from each other, so each eye sees things from a slightly different angle. When your brain combines the signals from both eyes, the result is seeing the world as 3-dimensional (3D) - not just vertically and horizontally in one plane (remember planes from geometry?) but closer and further away as well. This is called depth.
A photo, on the other hand, is 2-dimensional (2D). It is all in one plane, so there is no depth. So, how can you make your photos look 3D? You've already learned about how a larger aperture setting creates a narrower depth of field. Your subject can be in focus while the foreground and background is out of focus. This is one way to create a 3D look.
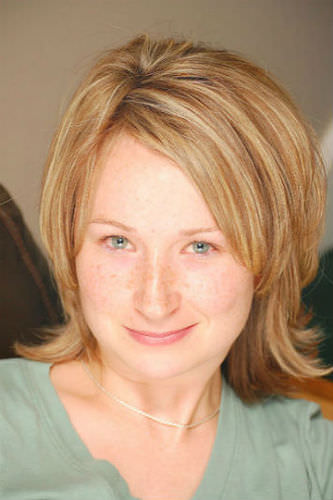
Another way is by controlling the direction of light. When light hits something solid, a shadow is created by blocking the light. Shadows give the appearance of 3D. Here's a photo with light coming from the front of the subject. There are few or no shadows, so the photo looks 2D.
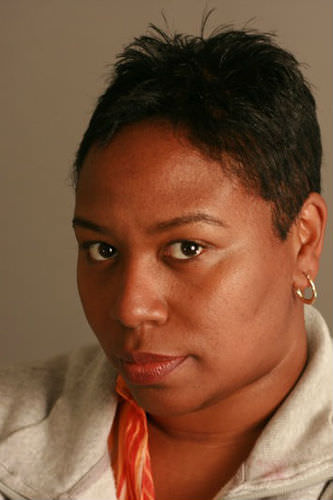
What if the light comes from the left of the subject, creating shadows on the right? This photo looks 3D! The difference is the direction of light.
Light from the right of the subject creates shadows on the left. Again, giving a 3D appearance.
Light from overhead can also create shadows and 3D.
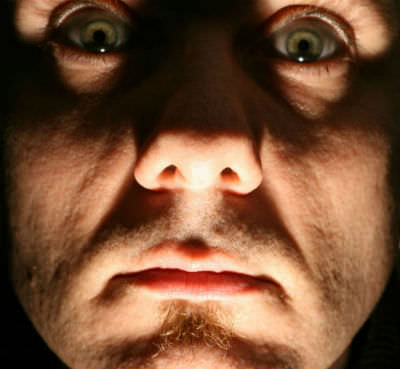
When you were little, did you ever hold a flashlight under your chin to try and look scary? Well, you were using light from below the subject to create shadows and 3D.
You can see that the direction of light in photos is extremely important. It can create shadows, a 3D appearance, and even affect the mood of the photo.
Explore
Learn more about the direction of light at The direction (position) of light from Kodak. [Don't worry about the references to using a flash. That will be addressed in the next chapter.]:
www.kodak.com/ek/US/en/Home_Main/Tips_Projects_Exchange/Learn/Photo_Tips_Techniques/Advanced_Techniques/Direction_of_light.htm
Now play with an interactive direction of light tool at Light Direction from PhotoMatters:
http://www.photomatters.org/light-direction
Build Your Skills
To build your direction of light skills, you're going to shoot examples of subjects with light from the front, left, right, overhead, and below - two photos for each direction.
Review your direction of light photos. Select ONE photo for EACH direction of light - front, left, right, overhead, and below. Share your photos with your teacher, and be prepared to discuss how they show what you’ve learned. Download your photos to a computer to keep them for the portfolio you’ll create in the end-of-course final project.
Record Your Findings
- When it comes to depth, how are photos different from seeing things with your own eyes?
- How does the direction of light affect photos?
- Describe how the direction of light in each of your selected photos creates a 3D appearance.
References
Image | Reference | Attributions |
---|---|---|
[Figure 1] |
Credit: Nathan Marx; October 2, 2007 Source: http://www.flickr.com/photos/nateperro/1479462477/ |
|
[Figure 2] |
Credit: Luigi Anzivino; February 15, 2007 Source: http://www.flickr.com/photos/ilmungo/397673947/ |
|
[Figure 3] |
Credit: Puck90; January 26, 2008 Source: https://www.flickr.com/photos/puck90/2221437771/ |
|
[Figure 4] |
Credit: Yu-Cheng Hsiao; December 23, 2006 Source: https://www.flickr.com/photos/swanky-hsiao/332336262/ |
|
[Figure 5] |
Credit: Dave Rutt; January 3, 2007 Source: https://www.flickr.com/photos/rutty/344321806/ |