1.7: VII. Developing Additional Central Ideas Based on Evidence
- Page ID
- 15107
7
VII. Developing Additional Central Ideas Based on Evidence
Emily van Zee and Elizabeth Gire
When you look in a mirror, swim in a pool, or enjoy playing with a prism, you are experiencing a variety of light phenomena. In this section, you will develop additional central ideas about reflection, refraction, and dispersion. Then you will use these central ideas to explain an intriguing phenomenon: seeing rainbows in the sky.
A. Exploring reflection phenomena
The word reflection has many meanings in many different contexts. In physics, the word reflection has a specific meaning. Reflection refers to one aspect of what happens when light shines on smooth or rough surfaces.
Question 1.18 What happens when light shines upon a smooth surface?
Equipment: To explore reflection phenomena, obtain a flashlight, flat mirror, table, two straight sticks such as meter sticks, yard sticks, rulers or pencils, a dark room and at least three people with whom to collaborate. Clean the surface of the mirror so that the light reflects from the mirror rather than from dust on the surface.[In a remote learning situation, a student working alone with a clear mirror and two rulers, can place the mirror on a table next to a wall, lean one end of a ruler against the wall, place the other end of that ruler on or next to the mirror, place one end of the other ruler next to the first ruler on or next to the mirror, and hold the flashlight so that it is shining on the mirror at the same angle as the ruler. Move that ruler (and flashlight) at different angles to see how the reflection of the light moves up and down on the wall. Note the angle of the ruler when the reflection on the wall is on the top of the first ruler.]
- Record the Topic of this exploration on your physics notebook page.
- What happens when a flashlight shines on a flat mirror in a dark room?
Note your initial ideas in the Before section of the physics notebook page documenting your exploration of reflection phenomena.
- What can you find out about reflection phenomena by playing with the flashlight and mirror? Keep track of your explorations in the During section of your notebook page.
- Next explore reflection in a particular way: place the flat mirror on the table. Ask group members to each stand on one side of the table as shown in Fig. 1.26
Person 1 is the person holding the flashlight.
Person 2 is the person standing at the other end of the table.
Person 3 is standing at one side of the table. (If there is a fourth person, Person 4 is standing at the other side of the table.)
- Persons 1 and 2 start the activity while Persons 3 and 4 report what happens. After a while switch positions so that everyone experiences what happens in each location.
- How can Person 1 aim the flashlight at the mirror so that light shines on Person 2’s face at the other end of the table?
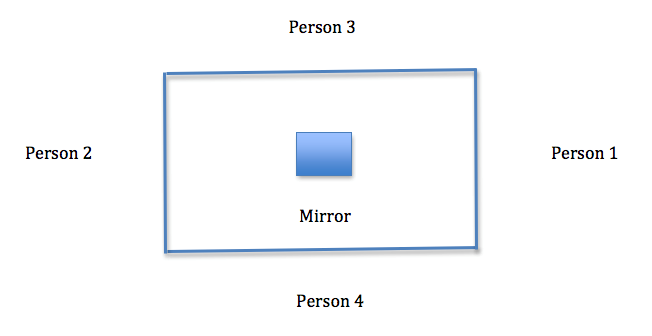
- When Person 2’s face is lit, who can see light from the flashlight shining on the mirror?
Person 1 with the flashlight?
Person 2 at the other end of the table?
Person 3 at one side of the table
Person 4 at the other side of the table?
- If Person 2 goes up on tiptoes or crouches down low, what does Person 1 need to do to keep the light reflecting off the mirror onto Person 2’s face?
- Can you see light rays traveling from the flashlight to the mirror?
Can you see light rays traveling from the mirror to Person 2’s face?
- To envision light rays traveling from the flashlight to the mirror and from the mirror to Person 2’s face, use a physical model for light rays:
- Hold one meter stick so that it models light rays traveling from the flashlight down to the mirror.
- Hold the other meter stick so that it models light rays traveling from the mirror up to Person 2’s face.
- Make sure the two meter sticks are meeting on the mirror at the spot where Person 2 sees the beam of light reflected in the mirror.
- The meter sticks make angles with the flat mirror. How do these angles compare?
- Make a sketch showing one meter stick modeling light rays traveling from flashlight to mirror and the other meter stick modeling light rays traveling from the mirror to Person 2’s face.
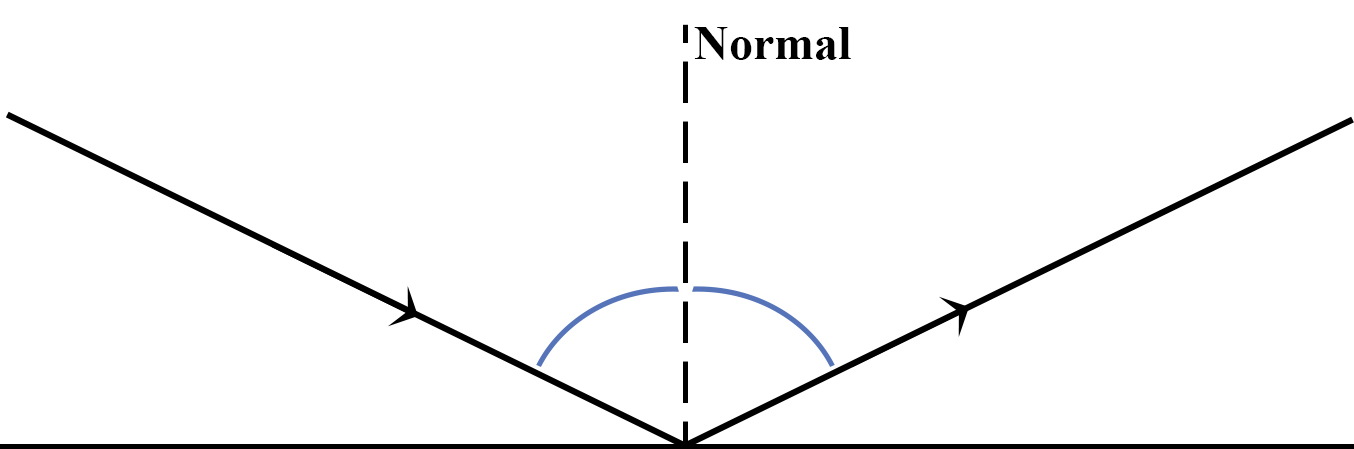
- Focus first on the meter stick modeling light rays traveling from the flashlight to the mirror. The meter stick and the mirror on the table are modeling the angle that one can envision incident light rays making with the mirror. This angle is called the angle of incidence.
About how big is this angle of incidence? (about 15°? 30°? 45°? 60°? 75°? )
- Now look at the meter stick modeling light rays traveling from the mirror to Person 2’s face. This meter stick and mirror on the table are modeling the angle that one can envision reflected light rays making with the mirror. This angle is called the angle of reflection.
About how big is this angle of reflection? (about 15°? 30°? 45°? 60°? 75°? )
- Draw a ray diagram that represents what you infer is happening when light from the flashlight reflects off the mirror into Person 2’s face.
- Label the angle of incidence and the angle of reflection. How are these angles related?
Question 1.19 What happens when light shines upon a rough surface?
- Now shine the flashlight on the table rather than on the mirror.
Who can see the light from the flashlight shining on the table?
Person 1 with the flashlight?
Person 2 at the other end of the table?
Person 3 at one side of the table
Person 4 at the other side of the table?
- How does what you see here or do not see here compare with what you saw or did not see when the flash light was aimed at the mirror rather than the table?
- Although the table may seem smooth, it is a rough surface compared to the mirror. What are the similarities and differences in what you observe when a flashlight is aimed at the mirror or at the table?
- Under the During section of your physics notebook page, record your observations and interpret these results.
- Use sketches of light rays reflecting from smooth and rough surfaces to explain these differences.
- Discuss your findings and formulate central ideas about how light is reflected from smooth and rough surfaces. In the After section of the physics notebook page, report these ideas, the evidence on which they are based, and the rationale that connects the evidence to these claims and notes their importance.
To complete this exploration of reflection phenomena:
- Using the everyday meaning of the word, reflect upon your experiences in exploring the nature of reflection phenomena.
- What are you still wondering?
- Add the central ideas about reflection from smooth and rough surfaces to Table I.1:
| TABLE I.1 (continued) Explorations of light phenomena: Reflection | |||
|---|---|---|---|
| Sketch of set up Ray diagram |
Evidence | Central Idea | Vocabulary |
|
Light rays reflect from smooth surfaces in a regular way, where the angle of reflection equals the angle of incidence. Light rays bounce from rough surfaces in many different directions.: |
|||
Complete entries on your physics notebook page and Table I.1. Then write a summary of what you have learned about reflection phenomena before reading an example of student work in response to questions 1.18 and 1.19.
1. Example of student work about reflection phenomena
As shown in Fig. 1.27, a student added to Table 1.1 about reflection phenomena ray diagrams for reflection from smooth and rough surfaces. For evidence to support the two new central ideas stated, the student wrote: “Using the meter sticks to show where the light rays are going we can see that the light hits the mirror and then reflects off of it at the same angle it hits at.”
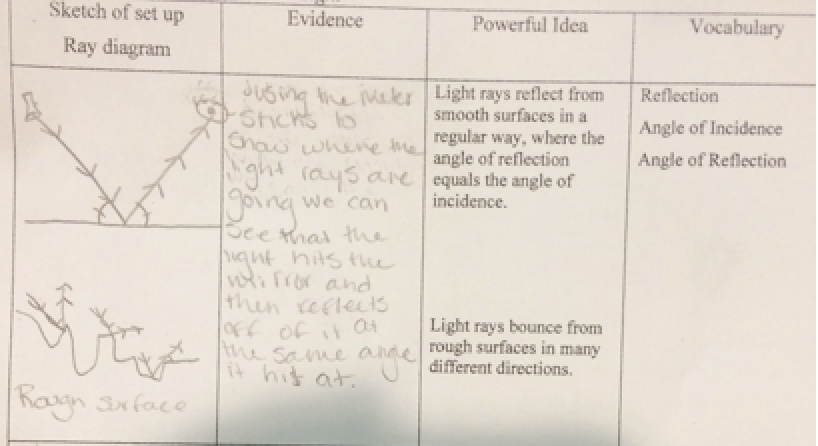
Light rays reflect from smooth surfaces in a regular way, where the angle of reflection equals the angle of incidence. In this experiment we used two surfaces; the smooth surface of a mirror; and the rough wood surface of the table. We found that when the light rays traveling in straight lines from the flashlight to the mirror hit the mirror’s surface, the light is reflected. We can see this when looking at the face of the person on the opposite side of the table; light is hitting her face. The angles of the line of incidence and the line of reflection appear to be the same. For any one particular light ray the angle of incidence equals the angle of reflection.
Light rays bounce from rough surfaces in many directions. As demonstrated in the ray diagram, any one single ray of light that hits the rough surface will still have an equal angle of incidence and angle of reflection but individual rays of light hit the surface at a different angle.
Physics student, Fall 2015
When shining on a rough surface, the light from a flashlight can be envisioned as rays traveling in the same direction but that direction will form different angles of incidence with different parts of a bumpy surface, so that the rays bounce off at many different angles of reflection.
2. Some nuances in explaining reflection phenomena
Defining the angles of incidence and reflection with respect to the mirror is a choice made here because the angle between the meter stick representing the light rays and the mirror is visually easy for children to perceive and compare.
Physics texts typically define a different set of angles, however, for the angle of incidence and angle of reflection. Draw a line perpendicular to the mirror at the point that the light beam shines on the mirror. This perpendicular line is called the normal line. As shown in Fig. 1.28, physicists define the angle of incidence as the angle between the incident beam and the normal to the surface. Physicists define the angle of reflection as the angle between the reflected beam and the normal to the surface.
If the surface of the flat mirror were clean, only Person 2 should have been able to see the light from the flashlight in the mirror. Persons 1, 3, and 4 would not have been able to see light in the mirror if all of the light rays incident on the mirror were being reflected at the same angle toward Person 2’s face.
If the surface of the mirror were dusty, however, some of the light rays may have bounced off the dust in directions toward the other members of the group and they may have reported seeing the light in the mirror. If the classroom still uses chalk on a blackboard, one can clap an eraser near the mirror and “see” a beam of light from the flashlight to the mirror and from the mirror to Person 2’s face as some light bounces off the chalk dust in many directions and makes such beams visible.
When the flashlight was aimed at the table surface, all members of the group should have been able to see light on the table as some light rays were being reflected in many directions by the rough surface of the table as shown in Fig. 1.29.
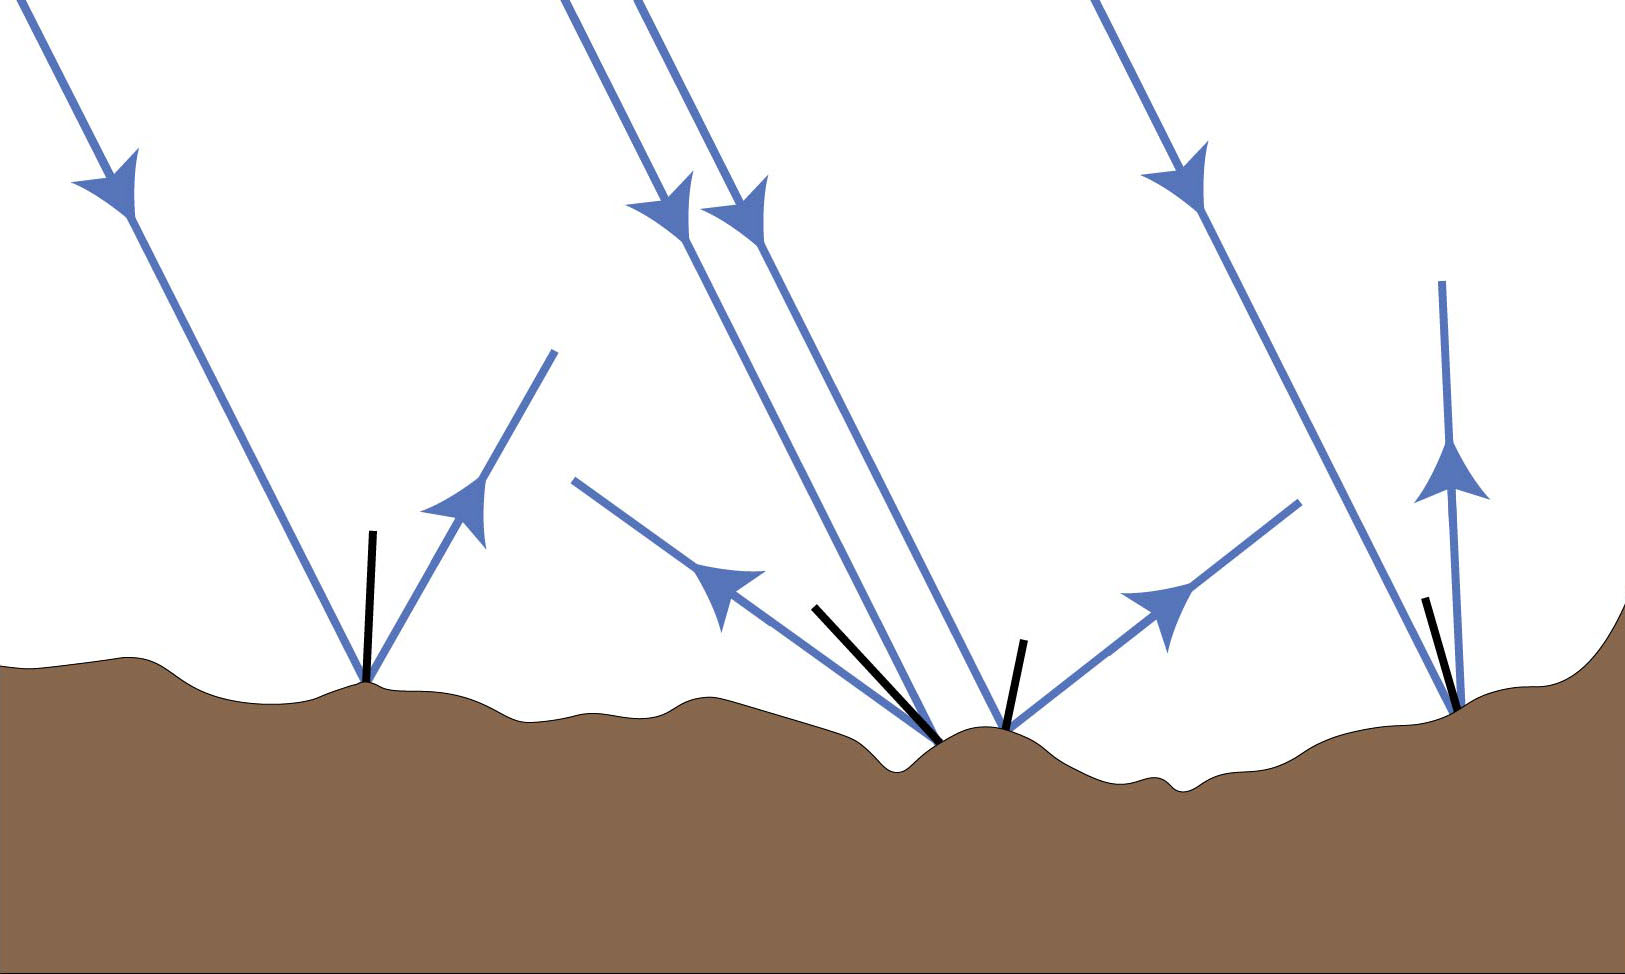
There are several ways to think about what happens when light shines on rough surfaces. One way is to notice what happens when a group of people look at someone speaking in a room. Who can see that person’s nose? Can someone by the window see the speaker’s nose? What about someone over in a corner? Someone on the other side of the room? One can infer that light is bouncing off that person’s nose in many different directions if all of these people can see that person’s nose,
This visual representation of a model of light in which light rays bounce off a surface with the angle of incidence equal to the angle of reflection suggests a visual experience you may have had:
- What happens when a basketball player dribbles a ball down a court? How does the ball bounce off the floor? Or when a tennis player practices by hitting a ball hard against a wall with a forehand shot and the ball rebounds to be hit again backhand?
- Try this by rolling a basketball at an angle toward a wall. How does the basketball rebound from the wall?
Make a sketch of how balls rebound when bouncing at an angle off a floor or wall.
- If such a sketch is analogous to a diagram showing how light rays reflect from a mirror, what does this suggest about the nature of light?
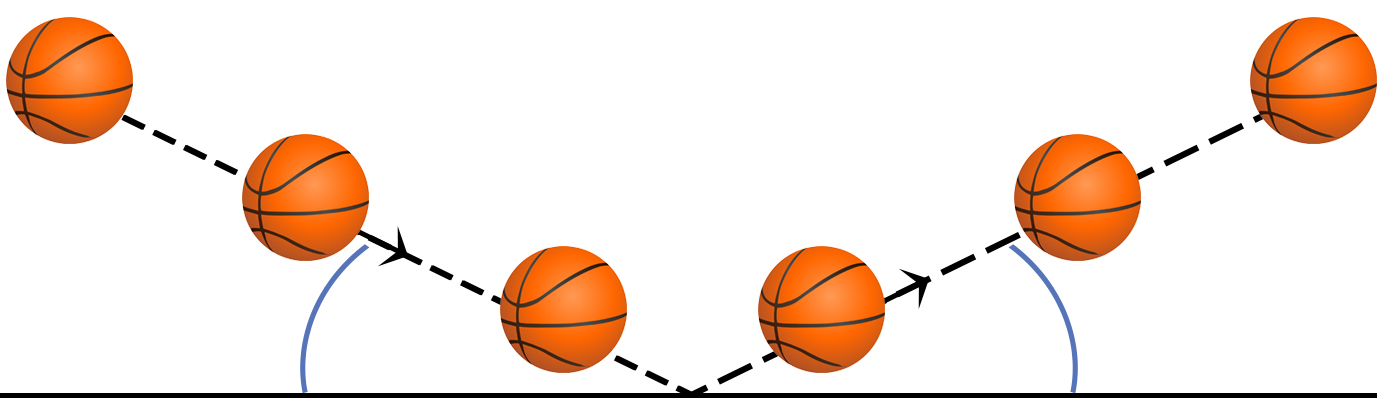
As shown in Fig. 1.30, a ball thrown against a wall rebounds in a way that suggests another physical model for light: envision light rays as streams of particles traveling in straight lines and reflecting from a surface with angle of incidence equal to angle of reflection. When this physical model for light is used, the particles are called photons. Such streams of photons can be envisioned as rays of light reflecting from a surface with the angle of reflection equal to the angle of incidence. Thus our initial physical model for light rays traveling in straight lines, a meter or yard stick, can now be elaborated as a stream of photons traveling in straight lines from a source.
Question 1.20 How well do different materials reflect light?
Sunlight shines on many different materials such as water, sand, soil, asphalt pavement, grass, trees, people… How each material responds depends upon the material’s properties. Such properties include how well the material reflects light, its reflectivity.
Equipment: Use a digital light probe connected to a computer or calculator to show a graph of light intensity versus time as you move the probe over various materials. Or use a free app on a cell phone, search for LUX light meter.
Try whatever is nearby as well as white paper and various colors including black, wax paper, aluminum foil, paper towel, cardboard, and dark cloth.
- What can you find out about materials’ reflectivity with the light probe or light meter? In the Before section of a physics notebook page, record your questions and your predictions.
- Begin by playing with the light probe or light meter to see what you can find out with this device.
If using a light probe: you may need to reduce the highest value on the vertical axis of the graph on the computer screen if you do not have very bright lights in the room. Click on the top number on the vertical axis and reduce it until the signals from the probe are high enough on the graph to be seen easily.
How can you use it and the various materials to make a graph that looks like the letter W? a sharp W? a rounded one? a letter M ? sharp or rounded M’s ? What other letters can you make on the graph on the screen?
Trace one of the graphs with your finger and tell the story of making a line that rises steeply or not so steeply. How do you make a line that descends steeply? Not so steeply?
- Compare how light reflects from a variety of materials, such as paper of different colors, aluminum foil, wax paper, cardboard, dark and light cloth…
- How does the distance from the material affect the intensity reading?
- If using a light probe: one way to keep it the same distance away from each material is to use a rubber band to hold a ruler next to the light probe. Attach the ruler so that it is extending a certain distance (say 5 cm) beyond the end of the light probe as shown in Fig. 1.31.

- In the During section of your physics notebook page, record your findings. If using a light probe: draw a picture of the graph and indicate the parts of the graph that represent the different materials that you tested. Note any vocabulary that is new to you.
- Discuss your findings and formulate relevant central ideas. In the After section of the physics notebook page, report these ideas and the evidence on which they are based.
- Write a rationale that explains how the evidence supports the ideas and why these are important.
- Also reflect upon this exploration such as what connections can you make to other experiences? How might you use what you learned in your own classroom?
- What have you learned and what are you still wondering?
- Complete documenting your exploration and writing a summary before looking at an example of student work and nuances about exploring the property of reflectivity.
3. Example of student work about the property of reflectivity
Materials differ in the property of reflectivity, how well they reflect light. Corollary: Materials differ in how well they absorb light. To measure the light reflectivity of different materials we took a light sensor to the surface of different materials and recorded them on a computer. We used the program LoggerLite which records and graphs the amount of light being reflected off any particular surface. We used different materials like foil, dark cloth, white paper, and even our clothing and nothing at all; we tried just pointing the sensor directly at the light.
In Figure (1.32) below you can see the different levels of reflectivity of light. The furthest point to the left that I circled represents when we were covering the end of the sensor with our hand; it was reflecting no light at all.
The next point is circled in close to the top of the graph; this spot in the graph represents us pointing the sensor straight at the lights above us. There was quite a bit of reaction because we were pointing the sensor at the direct light.
The next circle that I circled to focus on is close to the bottom of the graph. This spot isn’t as low as when we were covering the end of the sensor, but we were shining the sensor at our hand, which wasn’t very reflective.
The next circled spot in the graph represents when we shined the sensor at a piece of tin foil. The graph went very high telling us that this material was very reflective.
The last circled section of the graph represents when we shined the sensor on a piece of navy blue fabric. We held it here for a few seconds and the line leveled out, telling us that the material wasn’t reflective and that this was a consistent reading.
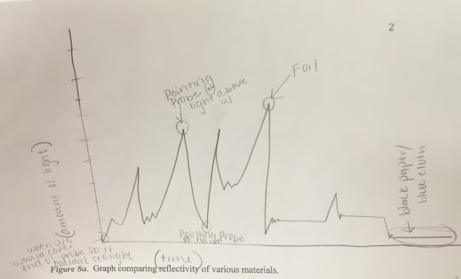
This student labeled both axes: “amount of light” on the vertical axis and “time” on the horizontal axis. The student used small circles to direct attention to different parts of the sketched graph, based on the graph produced by the computer as the students moved the light probe from one material to another. The student described the circle at the origin as “when we would cover end of probe so it couldn’t see light.” The first labeled peak was “pointing probe at light above us;” the second labeled peak as “foil;” and the low horizontal line as “black paper/blue cloth.”
4. Some nuances about exploring the property of reflectivity
Taking a photograph of the graph on the computer screen is helpful for retaining accurate information. Sketching the graph is helpful for noting important aspects, as this student did, such as the meaning of peaks and flat lines.
The peaks in Fig. 1.32 represent pointing the probe briefly at a reflective material; the flat lines represent pointing the probe at a material for more than a moment. A more careful graph would have perpendicular axes, with the same labels as those used by the computer program and with the values represented by the vertical marks noted. One is puzzled by how the intensity of light reflected by the foil could have been more than the intensity of the incoming light, perhaps identification of these peaks was switched later during preparation of this report. Or perhaps this group was near a window and additional light from the Sun was shining on the foil. However, this graph clearly conveys the information that the intensity of reflected light varies with materials.
• How can you use your knowledge of reflectivity to design a solar oven? Which two of the above materials would you choose to use?
See http://static.lawrencehallofscience.org/diy_sun_science/downloads/diy_ss_cook_solar_oven.pdf and https://climatekids.nasa.gov/smores/ for examples.
This is a context within which students can participate in engineering design as advocated in the Next Generation Science Standards (NGSS Lead States, 2013). See Appendix I at https://www.nextgenscience.org/resources/ngss-appendices . Engineering design involves defining a problem, developing solutions, and optimizing the solution (see pages 3-6).
B. Exploring refraction phenomena
When light shines on a surface, light reflects from the surface as just discussed but sometimes some of the light does not. Some of the light refracts instead as it keeps on traveling through the surface into a new medium. The word medium refers to the substance through which the light is traveling, such as air or water.
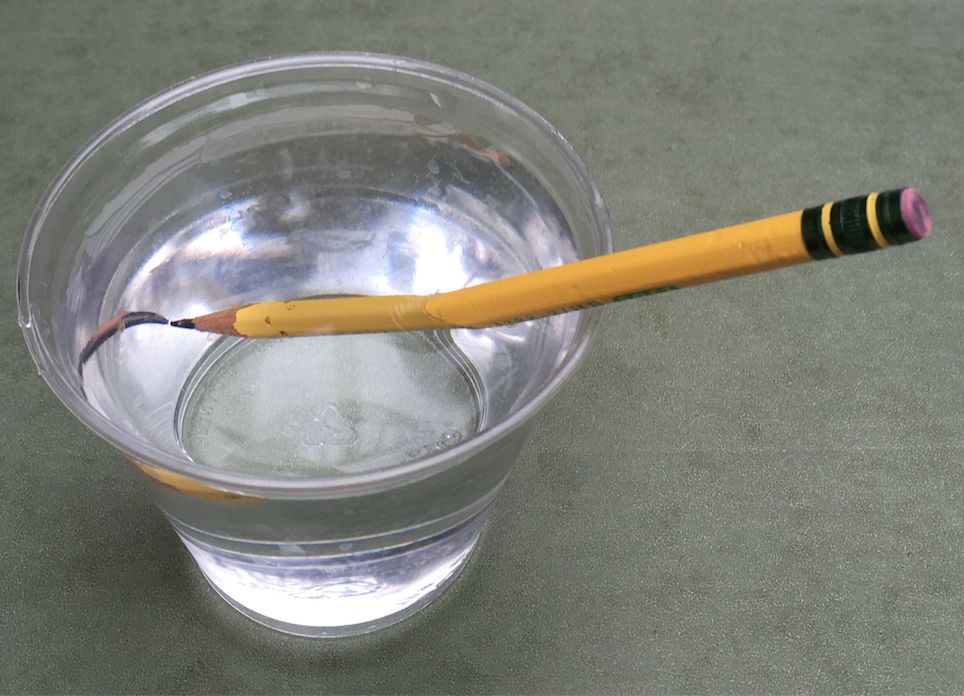
Question 1.21 What happens when light travels from one medium into another medium, such as from air into water or from water into air?
Equipment: To explore refraction phenomena, use a pencil or stirring rod, a tray, two paper cups, a pen, and access to some water.
- What happens if you drop something into a pail of water? How does it look different if at all? What if you are swimming under water and look up through the water at something overhead?
Note some of your experiences with looking at objects in water in the Before section of the physics notebook page documenting your exploration of refraction phenomena.
- Make a large dot in a paper cup about a third of the way down from the top. Place the cup with the dot on a tray. Fill the other cup with water and put it on the tray.
- Bend down until you can just see the dot in the cup. Then bend a little more so that you can no longer see the dot as shown in Figure 1.33. What do you think will happen when water is poured into the cup and covers the dot?
Light rays bouncing off the dot in the direction toward the eye are blocked from reaching the eye by the side of the cup near its rim.
- Have someone pour water into the cup until the water flows above the dot.
What happens?
Record what you observe in the During section of your physics notebook page.
- Why do you see what you see? Discuss with your group members some ideas about why someone would see the dot appear to move in the way it does when water is poured into the cup and covers the dot.
- Sometimes when one is puzzled by a phenomenon, it helps to think about a similar phenomenon. Put a pencil or stirrer in a glass or tub of water as in Fig. 1.34. What do you see?
Does the pencil appear higher or lower in the water? Does the dot appear to be higher or lower in the water in the cup?
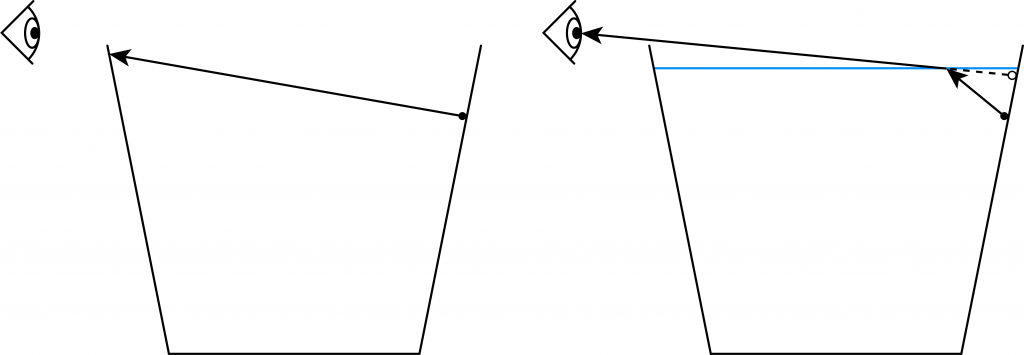
- How could you draw rays representing light traveling from the dot to the eye so that the eye would perceive the light coming from the “apparent dot” rather than from the real dot?
- Discuss various possibilities with your group members. How can you use the technique of drawing rays to represent a straight line path of light in this scenario?
- As you work together generating ways to think about explaining why the dot appears to be moving up as you pour water into the cup, step back occasionally and ask yourselves,
- What are we doing?
- Why are we doing this?
- How is this helping us?
- One way to think about something puzzling is to make a sketch of what is happening. On a large white board, draw an outline of the cup without water, dot, and observer’s eye just below where the observer could see the dot as in Fig. 1.33
Also draw an outline of the cup with water, dot, and observer’s eye in the same position. Use a dashed line to outline where the dot appears to be in the cup with water.
- How is light apparently traveling from the apparent dot to the observer’s eye?
- Place a physical model of light rays, a ruler, on your drawing in a way that represents the path of light rays appearing to travel from the apparent dot toward the eye.
- Which part of that path would represent light rays apparently traveling from the apparent dot toward the observer’s eye?
- Draw a dashed line to represent the apparent path of light rays from the apparent dot.
- Which part of that path would represent light rays actually traveling to the observer’s eye?
- Draw a solid line to represent the actual path of light rays to the eye from the end of the apparent path from the apparent dot.
- Interpret the point where the dashed line and solid line meet. What is happening at that point? How do the actual light rays get to that point?
- Draw a solid line from the actual dot to the point where the dashed line representing the apparent path of light from the apparent dot meets the solid line representing the actual path of light to the eye.
- Where is this point?
- Describe in words this envisioned path of light rays when they travel from the actual dot to the surface of the water and then to the observer’s eye.
- Note any vocabulary that is new to you.
- Discuss your findings and formulate a relevant central idea. In the After section of the physics notebook page, report this idea and the evidence on which it is based.
- Write a rationale that explains how the evidence supports this central idea and why this is important
- Also reflect upon this exploration such as what helped you learn during this exploration and how might you use this in your own classroom?
- What are you still wondering?
- Write a summary of what you have learned about refraction phenomena that states a central idea about refraction and explains why the dot seems to move up in the cup when covered with water.
- Add this idea about refraction to Table I.1:
| TABLE I.1 (continued) Explorations of light phenomena: Refraction | |||
|---|---|---|---|
|
Sketch of set up |
Evidence | Central Idea | Vocabulary |
| Light rays refract (bend, change direction) at the surface when light moves from one medium into another such as from air to water or from water to air | Refraction | ||
- Complete your entries on your physics notebook page and the continuation of Table I.1. Write a summary of what you have learned about refraction phenomena before reading an example of student work. Then:
- Share what you have learned about refraction by engaging a friend or family member in the dot-in-the-cup activity. Describe what your learner asked, said, did and found in exploring this example of refraction phenomena. Also reflect upon what you learned from this experience in learning and teaching science.
- In addition, read a student’s description of engaging a friend in exploring refraction phenomena as well as some thoughts about the nature of science exemplified by these explorations.
1. Example of student work about exploring refraction phenomena
A student added to Table 1.1 about explorations of refraction phenomena as shown in Fig. 1.35. The sketch is labeled “can’t see dot” before the water covers it and “can see dot” after the water is up to the top of the cup. The ray diagram shows the “original” dot with a solid line showing the path the light traveled and the “perceived dot” with a dotted line to show the light’s apparent path.
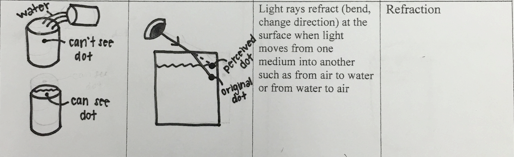
Note that in Fig. 1.35, the bend is shown occurring at the top of the cup rather than at the top of the water line. Figure 1.36 presents a diagram of a dot in a cup without and with water where the bend is drawn at the water line.
A student stated a central idea about refraction phenomena and used it to explain this phenomenon as follows:
Light rays refract (bend, change direction) at the surface when light moves from one medium into another such as from air to water or from water to air. In this experiment students had two cups. One cup was filled with water, the second cup was empty and had a dot drawn on one inside wall. Students were asked to crouch in front of the cup to where they could just see the dot; then they were told to go just lower than that. A second student poured the water from cup 1 into cup 2 and asked the students what they saw. As the student watched the cup being filled, water rose to the top. When the water rose above the dot on the wall of the cup, the crouching student could see the dot once more, even though the student had not moved.
The dot gave the appearance of moving up the wall of the cup. Light was traveling to the dot the entire time it was in the cup. That is why the students could see the dot when they were standing up and looking in the cup and when they first crouched down…However when the student crouched down farther the light leaving the dot was not able to reach the student’s eyes. As water rose over the dot, the light that was leaving the dot was refracted, meaning that the light ray traveled in a straight line under the water, but when it reached the surface of the water and moved into another medium (from water to air) the light rays bent traveling in many directions, one of which happened to be to the student’s eyes.
Physics student, Fall 2015
What the student seemed to mean in the last sentence is that light rays traveling from the dot to the surface of the water bend as they move from the water into the air; each ray bends in a particular direction, depending upon the direction and angle at which the ray had been traveling in the water when it moved through the surface of the water to the air; some of these rays happen to bend in just the right way that they travel from the dot to the surface of the water and then, as they enter the air, bend in the direction toward the student’s eyes.
2. Nuances about exploring refraction phenomena
A good place to start in thinking about why the dot seems to be moving up when covered with water in the cup is with the conceptual model of light developed so far: the central ideas that light can be envisioned as rays moving in straight lines and that for someone to see something, light has to get to the person’s eyes. Also relevant is the central idea that light rays bounce off a rough surface in many directions.
It is important to remember that thinking about light rays is simply a way to envision how light could be moving through the water and the air to get to the observer’s eye when the dot appears to be moving up as water is covering the dot in the cup.
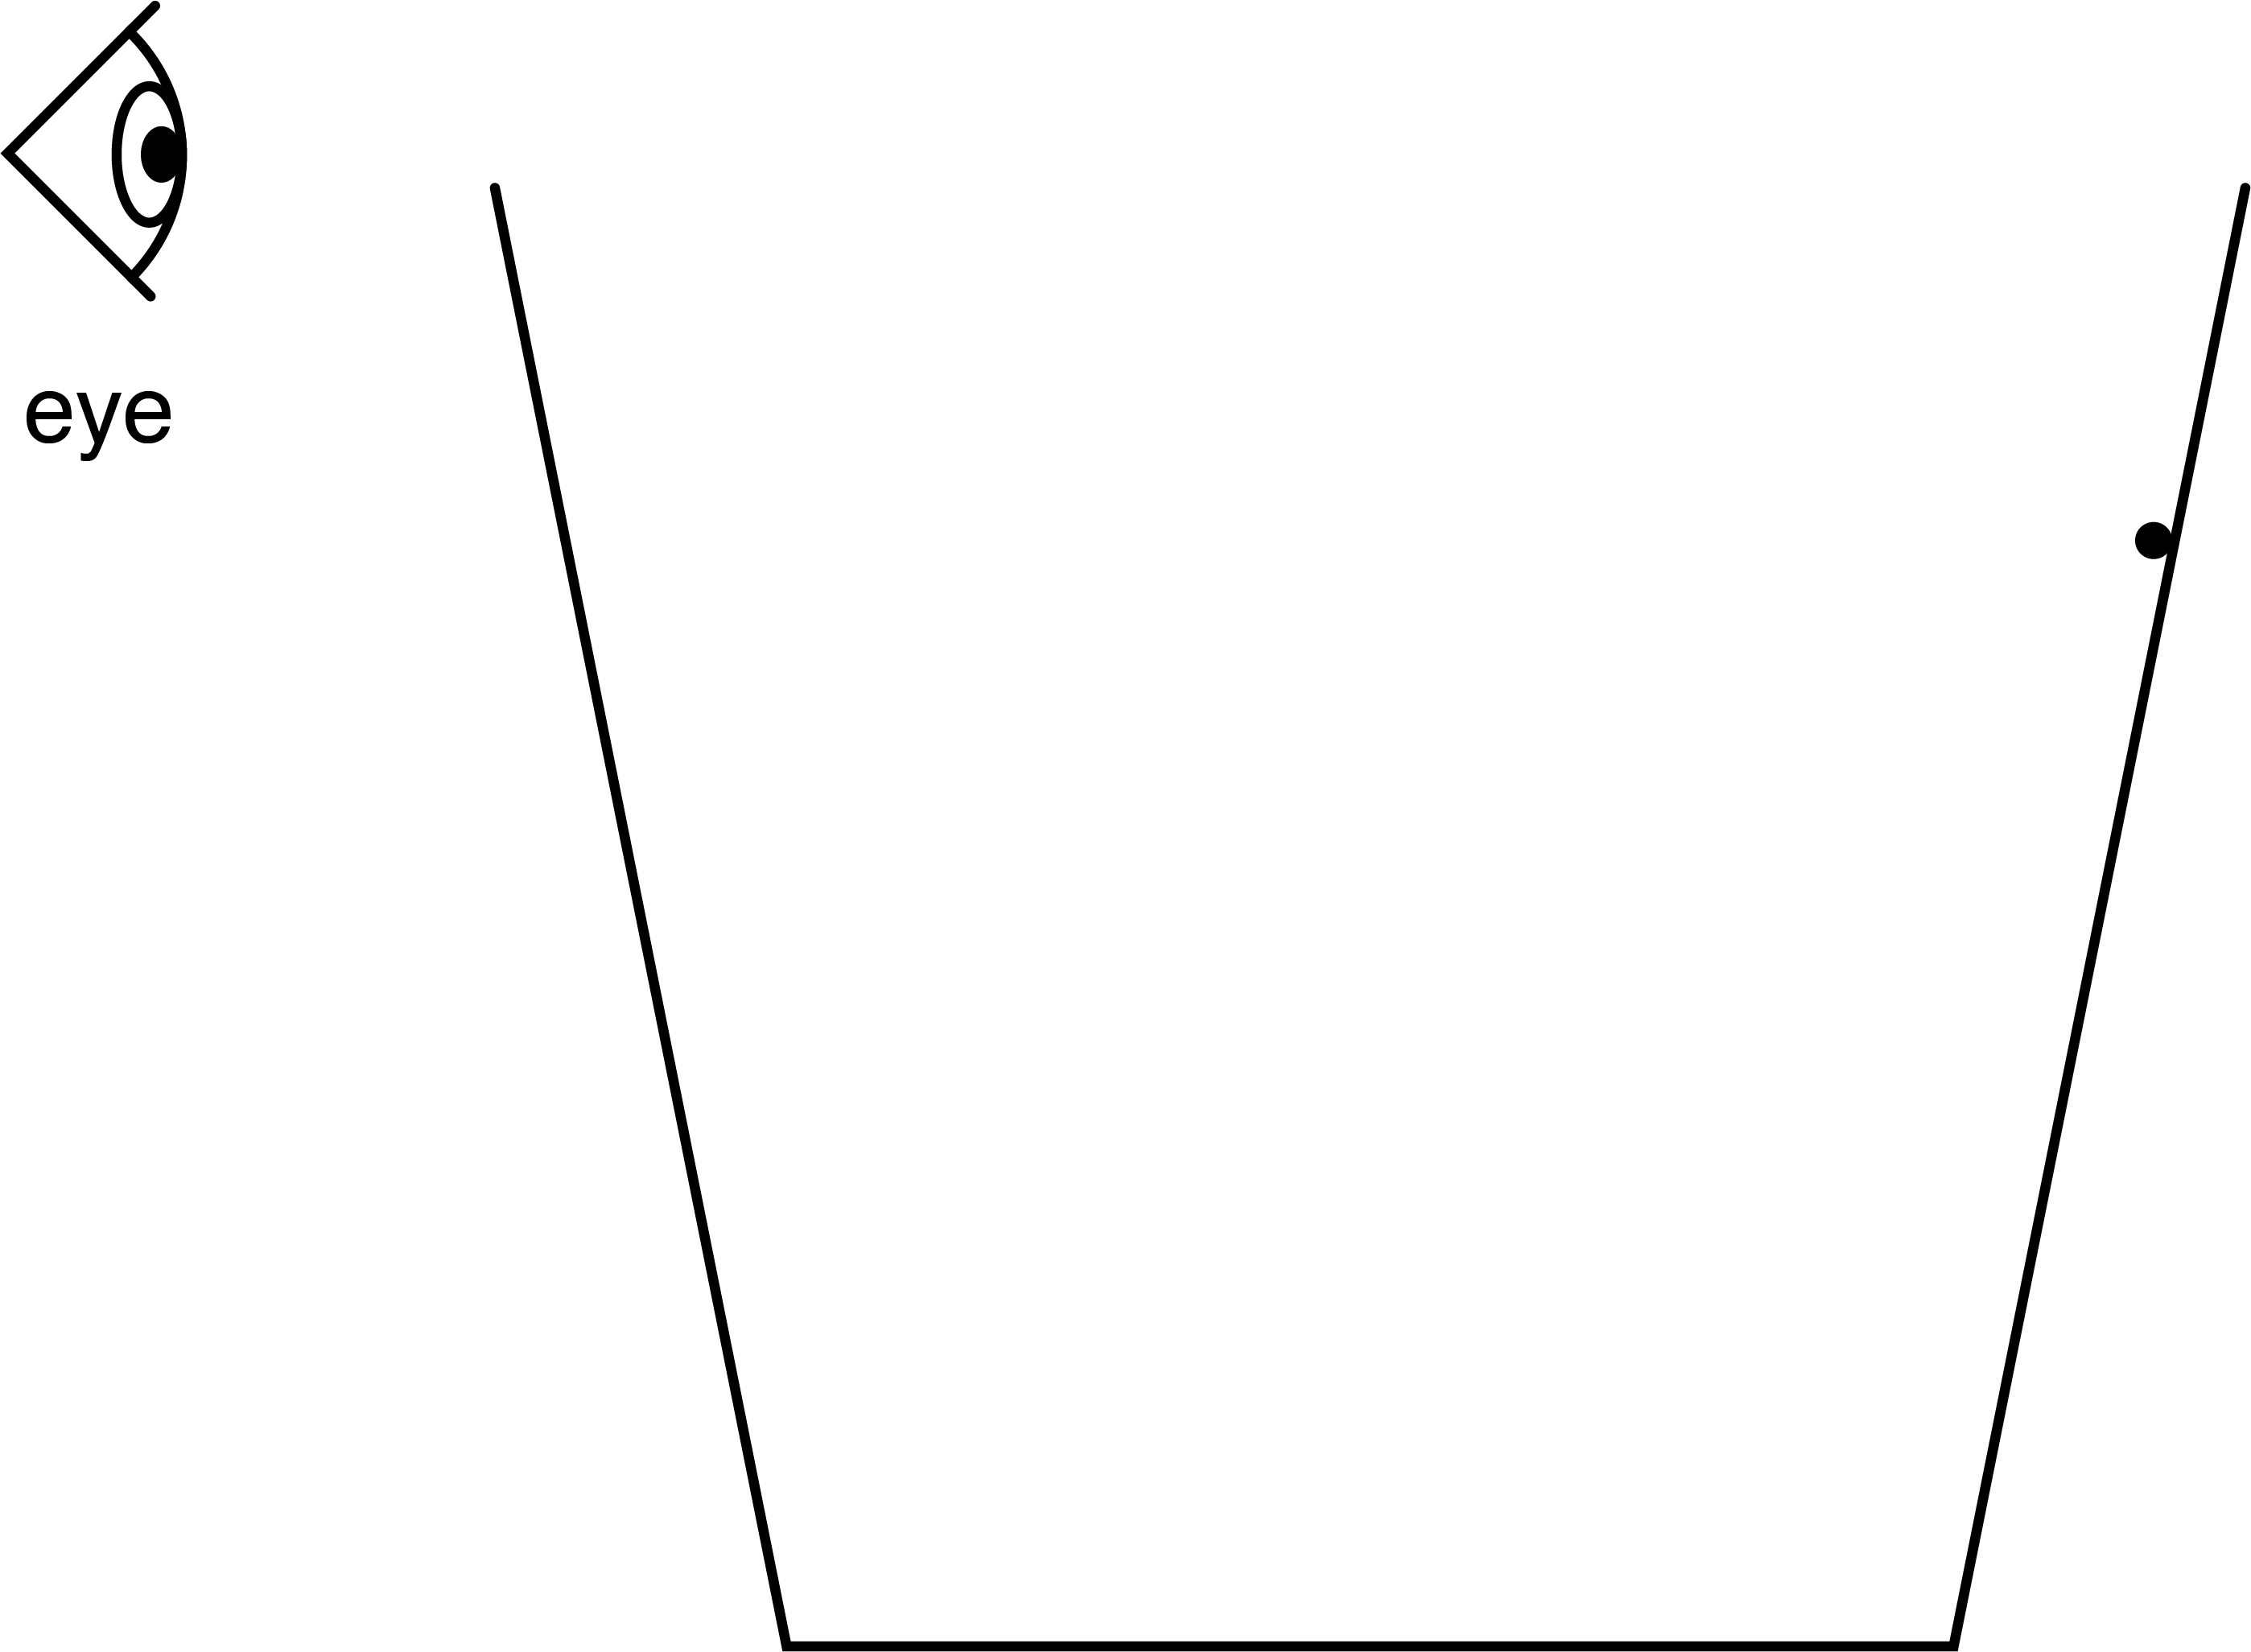
Because the dot can be seen from many different positions when looking down at the dot in the water, the dot can be considered a rough surface. Note that the source of the light somewhere up in the air above the cup of water has not been included here. Thinking about what happens has been limited to envisioning what happens after incoming light rays bounce off the dot in many directions as shown in Fig. 1.37.

Envision many light rays, after bouncing off the dot, traveling at many different angles to the surface of the water. Choose to focus only on those light rays that happen to be traveling at an angle in the water such that when they bend at the surface of the water they are headed in the direction of the observer’s eye.
The phrase bend at the surface of the water does not refer to a curving path for the rays of light from the dot to the eye; this phrase refers instead to a path represented by one straight line, from the dot to a point on the surface, that changes direction at that point, and continues as another straight line, representing light rays traveling from that point on the surface of the water to the eye.
A ruler can provide a physical model of how light rays appear to be moving in a straight line from the apparent dot to the eye as shown in Fig. 1.38.
This ruler represents, however, both the actual path of light rays that get to the eye and an apparent path from the apparent dot.
Where does the apparent path of light rays from the apparent dot turn into the actual path of light rays to the eye?
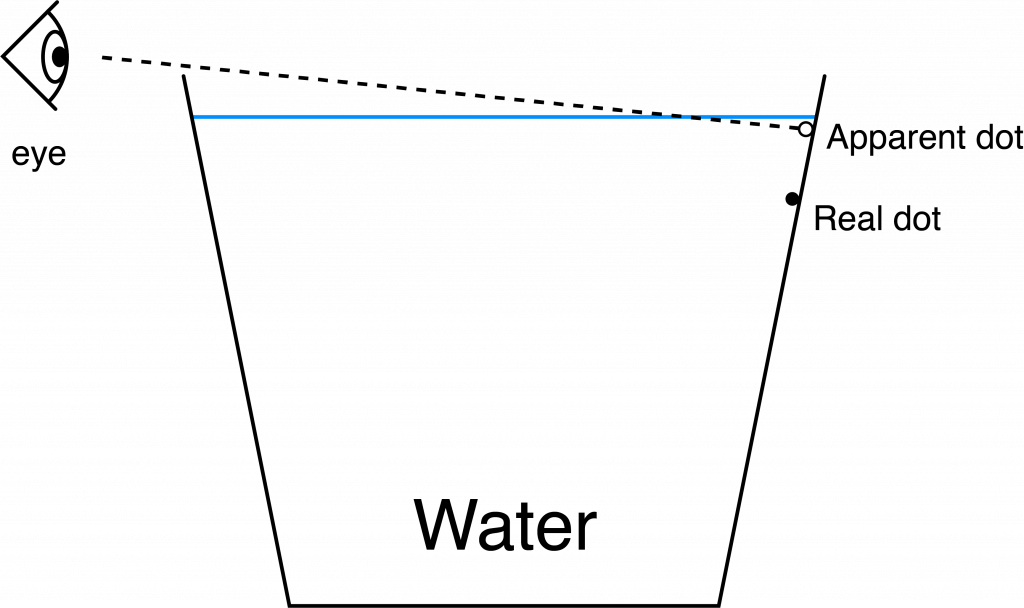
Consider the point that represents envisioning where light from the apparent dot crosses the surface of the water. A solid line from the real dot to this point represents some light rays bouncing off the real dot and traveling straight to this point in the water as shown in Fig. 1.39 where the point is labeled as the location that “Refraction” occurs.
Making the dashed line into a solid line from this point on the surface of the water to the eye represents envisioning light rays bending at this point and traveling to the eye. The dotted dot at the end of the dotted line represents the illusion of where the dot is.
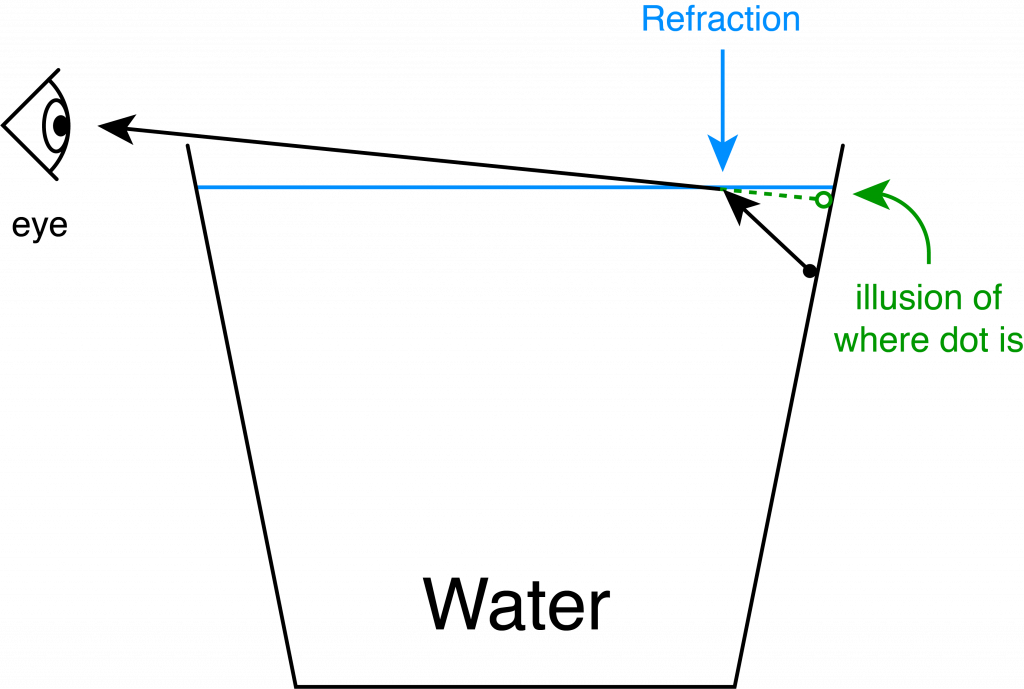
The dotted line on this ray diagram represents envisioning the apparent path of light rays from the apparent dot to the point where the actual light rays bend at the surface.
The solid line with arrows on this ray diagram represents envisioning the actual path of light rays from the dot to the surface of the water, the sharp bend at the surface, and the solid line from that point at the surface to the eye.
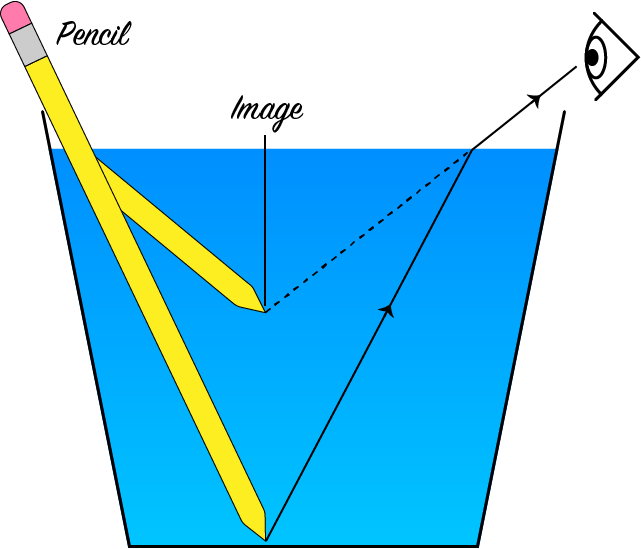
It is helpful to think about examples of refraction in a variety of contexts. In some positions, for example, a pencil or a stick looks like it is bending at the surface of the water as in Fig. 1.40. Why does it look bent?
As shown in Fig 1.40, light is envisioned as shining on a pencil in the water and bouncing off in many directions. Some of the rays are envisioned as bouncing off the pencil and traveling in straight lines toward the surface of the water. At the surface, these rays are envisioned as bending as they move into air. Some of the rays are envisioned to be bending in such a way that they travel straight to the observer’s eye. The observer perceives the rays as if they had traveled in a straight line from a location different from where the actual pencil is located so the person perceives the pencil to be bent.
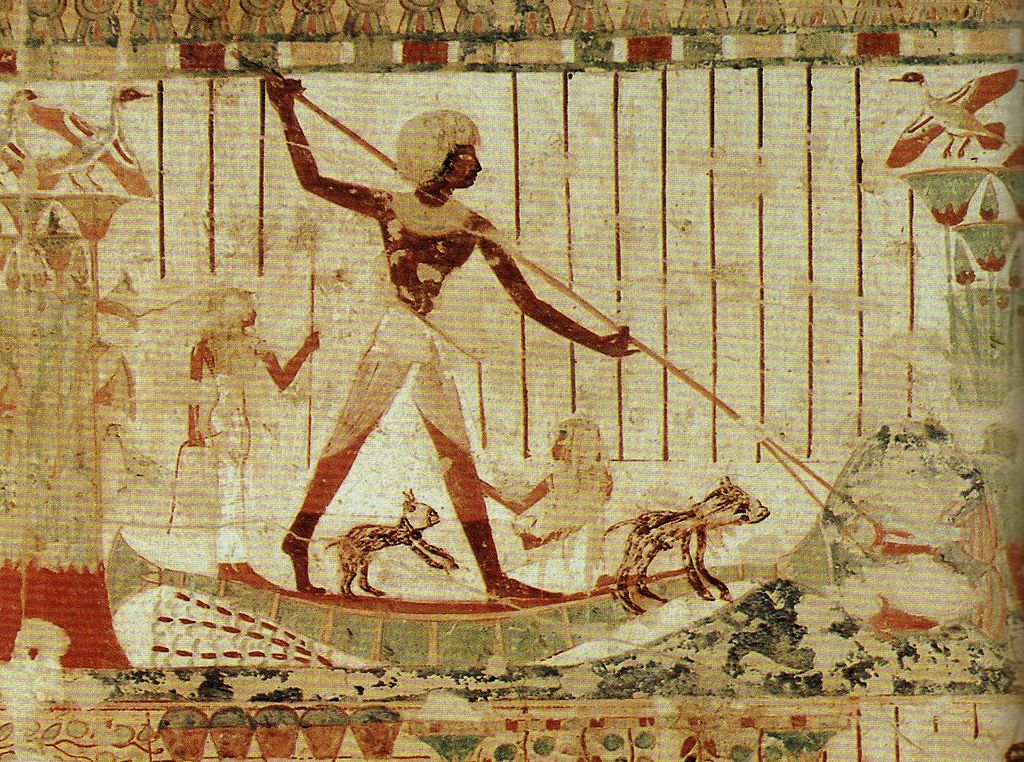
Another example of refraction occurs in a different context, spear fishing, as shown in Fig. 1.41. Where should you aim when spear fishing? (See: http://www.schoolphysics.co.uk/age14-16/Light/text/Refraction_and_fishermen/index.html)
Question 1.22 What happens when exploring refraction with friends and/or family members?
3. Exploring refraction phenomena with a friend or family member
After class, our students have explored refraction phenomena with friends and/or family members and reflected upon this experience by describing details about what their learners ask, say, do, and find. They also have commented upon what they learn about learning and teaching science through this experience. A student, for example, wrote:
When I originally showed the phenomena to my roommate L, she said “whoa, when did you start doing magic tricks!” I laughed and told her that I was not doing magic but merely working with the phenomena of refractions.
She asked “what is refraction?” I told her it was what allowed her to see the dot. I then showed her the experiment again. Afterwards I had her stand and asked if she could see the dot, she said “yes.” I asked why, and she said because she was standing high enough. So, I turned off the lights and asked if she could see it. She said “No!” I turned back on the lights and asked what she must have to see the dot and she said “I need light to see the dot.” So I kept the lights on and covered the dot so only I could look into the cup and see it. I asked if she could see the dot, the light was there so she should be able to. L then told me that the “light needs to hit the dot and then come to my eyes, I can’t see it if you block the light from getting to my eyes.”
So I asked L what must have happened for the light to travel from the dot, which was below her line of sight and go to her eyes. “Well,” said L “the dot didn’t move, cause that is impossible. So the light must have moved in the water to get to my eyes. Cause I only saw the dot look like it moved up after the water covered it.”
At this point L was so close that it was very hard for me to not just tell her the answer. I refrained, but only barely. I asked L how she thought the light was moving; she said she didn’t know.
So I drew out the flat ray diagram with the image of the dot on the side of the cup and her eye where it could not see the dot, but I did not draw the rays of light. I asked L to draw what she thought was happening. L drew a curved line from the dot to her eye.
Once again L was so close that it was hard not to give the answer away. So I asked L how light travels, she said “in rays, like the rays of the sun”. I was surprised that she knew this but I was glad. So I asked her to show me a ray, a straight line leaving the dot and going to the surface of the water. She did so.
I asked if she thought this was how the light might have moved; she said, “well maybe, because the water going over the dot was what bent the light, so maybe the light only bends when it leaves the surface of the water.” I was thrilled! She had figured it out! I then showed L the ray diagram of how light refracts and bends towards our eyes when leaving the surface of the water and going into the air.
The experience was hard for me. It was difficult for me to try and explain a concept to someone that was a new concept for me as well. However, it was rewarding to see that if I was patient, and continued to ask questions and only give small supplementary bits of information that L was able to understand the phenomena.
It was hard to try and think in a way that would foster L’s own thinking about how the light rays traveled and to try and form questions that would help L to think in a certain way about light. I believe this will be much of what I feel as a teacher later. I will need to think of many different approaches for my students. Not all of them will understand instantly why a phenomena works; they will need more guidance or more questions, they may even need to experiment on their own to see if they can understand. I as a teacher must learn not to rush this process and to allow them to learn about the subjects themselves. This is in the hopes that the students will remember more about the information as well as be more interested in the learning process.
Physics student, Fall 2015
4. Thoughts about the nature of science exemplified by these explorations
The explorations of light phenomena so far exemplify the nature of science in that students developed central ideas based on evidence and modified those ideas as necessary after observing new phenomena. Initially, for example, explorations of light and shadow phenomena provided the basis for development of a conceptual model of light that included the central ideas that (a) light leaves a source in all directions, which, after discussion and additional exploration, was modified to light leaves a point on most sources in many directions. Additional explorations provided evidence for the central ideas that (b) light can be envisioned as rays traveling in straight lines, and (c) for someone to see something, light has to get to the person’s eye. A ray diagram representing how rays seemed to travel in straight lines was useful in developing an explanation of an intriguing observation, that the projection of an object in a pinhole camera was upside down. A straight meter or yard stick provided a physical model for thinking about light as behaving like rays traveling in straight lines.
Additional explorations of reflection and refraction phenomena, however, provided evidence that this conceptual model needed further revision. Observations of these phenomena provided evidence for development of three additional central ideas that refer to what happens when light shines on surfaces: c) that light rays can be envisioned as being reflected from smooth surfaces with the angle of reflection equaling the angle of incidence, d) that light rays can be envisioned as bouncing off of rough surfaces in many directions, and e) that light rays can be envisioned as refracting (bending, changing direction) at the surface when traveling through a surface from one medium to another. These are examples of the on-going nature of scientific knowledge, which is open to revision in light of new evidence and can change when new information is found (NGSS, Lead States, 2013, Appendix H).https://www.nextgenscience.org/resources/ngss-appendices
A bouncing ball also provided an elaborated physical model for light as rays composed of particles (photons) traveling in straight lines until interacting with a surface. More complex ray diagrams were useful in explaining another intriguing phenomenon, the apparent upward movement of a dot on the inside of a cup as water is poured into the cup. Additional modifications of this conceptual model for light may become necessary after exploring more phenomena. Meanwhile we turn next to elaborating experience with refraction phenomena in a new context.
C. Exploring dispersion phenomena
In this section, we explore light phenomena known as dispersion.
Question 1.23 What happens when light from the Sun passes from air into a prism or water droplet?
Equipment: To explore dispersion phenomena on a sunny day, use a piece of white paper and a prism, a glass or quartz crystal, or a hose and sprinkles of water; inside use a prism or crystal with a bright lamp.- What have you seen when light from the Sun passes through a glass or quartz crystal? Old-fashioned window panes? A prism? Water droplets when sprinkling with a hose?
Note some of these experiences in the Before section of the physics notebook page documenting your exploration of dispersion phenomena.
- On a sunny day, take a prism or crystal outside and enjoy displaying what you see against a white wall or a piece of white paper on the ground. (Do not look directly at the Sun!)
- Or spray water with a hose and stand in such a way that you can admire making your own rainbow.
- Or play with a prism or crystal near a very bright light inside. What do you see? (Do not look directly at the bright light.)
- In the During section of your physics notebook page, record your findings. Draw a picture of what you did and saw. Note any vocabulary that is new to you.
- Discuss your findings and formulate a relevant central idea. In the After section of the physics notebook page, report this idea and the evidence on which is based.
- Write a rationale that explains how the evidence supports the central idea and why this is important.
- Also reflect upon what you have learned during this exploration
- What are you still wondering?
- Add this central idea about dispersion to Table I.1:
| TABLE I.1 (continued) Explorations of light phenomena: Dispersion | |||
|---|---|---|---|
| Sketch of set up Ray diagram |
Evidence | Central Idea | Vocabulary |
| White light disperses into its component colors when moving from one medium to another such as from air into a glass prism or water | Dispersion | ||
Complete your entries on your physics notebook page and Table I.1. Summarize what you have learned about dispersion phenomena before reading an example of student work and nuances about exploring dispersion phenomena.
1. Example of student work about exploring dispersion phenomena
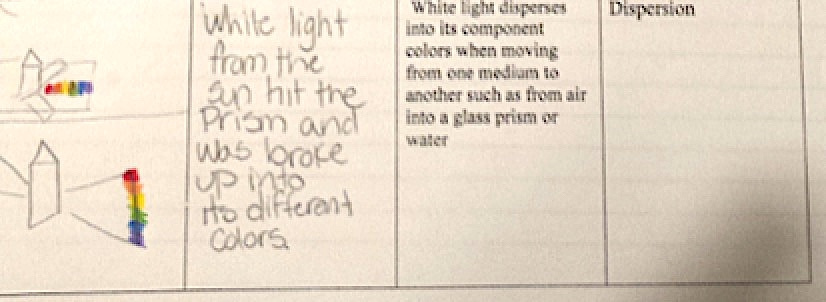
As shown in Fig. 1.42, a student added to Table 1.1 about explorations of light phenomena and stated as evidence, “White light from the Sun hit the prism and was broken up into its different colors.”
The student summarized this new central idea about dispersion phenomena as follows:
White light disperses into its component colors when moving from one medium into another such as from air into a prism or water.For this experiment, students were given triangular prisms made of a clear material that may have been glass. We were then taken outside into the sunshine and told to move our prisms around and see what happened.
It took a moment before someone exclaimed, “Hey I see a rainbow!” Soon many students began to really watch what happened when they tilted the prisms one way or another. Some students placed a piece of white paper on the ground and tried to project the “rainbows” onto the paper. When students set the prisms onto the paper facing the sun we were able to see two figures that looked like shadows but much lighter. It was light being dispersed through the prism onto the paper.
When we moved the prism slightly we were able to see the light on the paper change from a slight white color to the rainbow of colors Red Orange Yellow Green Blue and Violet (ROYGBIV).
The students then talked about what must be happening and our TA’s told us that the sun sends out a kind of light called white light that holds all of the colors of the rainbow in it. The students decided that what must happen is that as the light passes through the prism it is broken up into the different colors when it is sent back out of the prism. This experiment is represented in a picture on (Fig. 1.41) as well as a ray diagram. In the ray diagram light goes into one side of the prism, where it is broken up into the many colors, and then dispersed on the other side into the different colors that were seen by the students.
Physics student, Fall 2015
2. Nuances about exploring dispersion phenomena
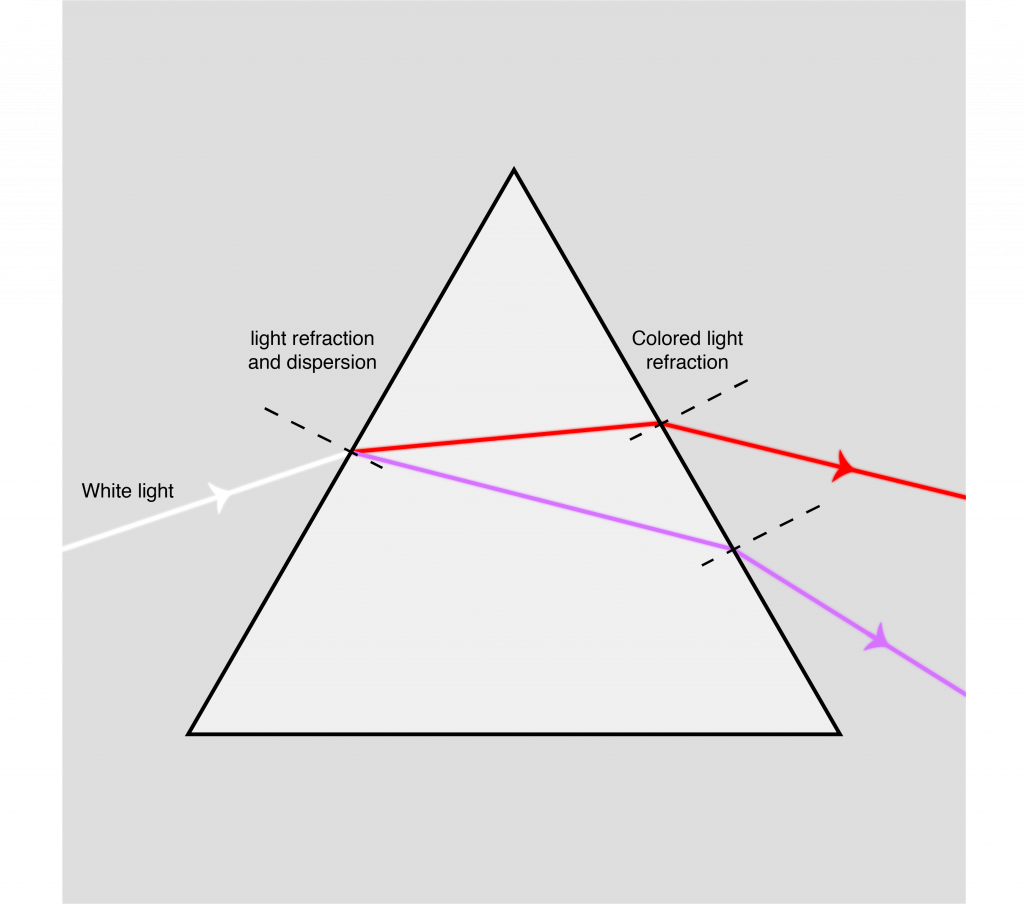
Figure 1.43 shows red and violet rays bending as they move from air into a prism and bending again as they move from the prism back into air. The violet rays bend more than the red rays and this difference separates the white light into its component colors. The colors between red and violet bend intermediate amounts.
Note that the orientation of the two surfaces of the prism differ, one side slants toward the left, the other side slants toward the right. If one draws a line perpendicular to the surface of the prism (a normal line) at the point where the white light enters the prism, the rays bend toward this normal as they move from air into the prism.
If one draws a line perpendicular to the surface of the prism at the point where each ray leaves the prism, the rays are bending away from the normal as they move from the prism back out to the air. The result of the different orientations of these surfaces is that the rays keep bending “down” as they enter and then leave the prism.
The drawing shows rays of light as they are inferred to be traveling. One can not actually “see” these colored rays as represented in the drawing. What one sees is the spectrum of colors when the rays land on some kind of screen such as a wall or piece of paper, or in the case of a rainbow, on the retina of an eye. This is a model of what seems to be happening. The next section uses this model to develop an explanation for an amazing natural event, the formation of a rainbow.