2.5: Resolution and Compression
- Page ID
- 3150
\( \newcommand{\vecs}[1]{\overset { \scriptstyle \rightharpoonup} {\mathbf{#1}} } \)
\( \newcommand{\vecd}[1]{\overset{-\!-\!\rightharpoonup}{\vphantom{a}\smash {#1}}} \)
\( \newcommand{\id}{\mathrm{id}}\) \( \newcommand{\Span}{\mathrm{span}}\)
( \newcommand{\kernel}{\mathrm{null}\,}\) \( \newcommand{\range}{\mathrm{range}\,}\)
\( \newcommand{\RealPart}{\mathrm{Re}}\) \( \newcommand{\ImaginaryPart}{\mathrm{Im}}\)
\( \newcommand{\Argument}{\mathrm{Arg}}\) \( \newcommand{\norm}[1]{\| #1 \|}\)
\( \newcommand{\inner}[2]{\langle #1, #2 \rangle}\)
\( \newcommand{\Span}{\mathrm{span}}\)
\( \newcommand{\id}{\mathrm{id}}\)
\( \newcommand{\Span}{\mathrm{span}}\)
\( \newcommand{\kernel}{\mathrm{null}\,}\)
\( \newcommand{\range}{\mathrm{range}\,}\)
\( \newcommand{\RealPart}{\mathrm{Re}}\)
\( \newcommand{\ImaginaryPart}{\mathrm{Im}}\)
\( \newcommand{\Argument}{\mathrm{Arg}}\)
\( \newcommand{\norm}[1]{\| #1 \|}\)
\( \newcommand{\inner}[2]{\langle #1, #2 \rangle}\)
\( \newcommand{\Span}{\mathrm{span}}\) \( \newcommand{\AA}{\unicode[.8,0]{x212B}}\)
\( \newcommand{\vectorA}[1]{\vec{#1}} % arrow\)
\( \newcommand{\vectorAt}[1]{\vec{\text{#1}}} % arrow\)
\( \newcommand{\vectorB}[1]{\overset { \scriptstyle \rightharpoonup} {\mathbf{#1}} } \)
\( \newcommand{\vectorC}[1]{\textbf{#1}} \)
\( \newcommand{\vectorD}[1]{\overrightarrow{#1}} \)
\( \newcommand{\vectorDt}[1]{\overrightarrow{\text{#1}}} \)
\( \newcommand{\vectE}[1]{\overset{-\!-\!\rightharpoonup}{\vphantom{a}\smash{\mathbf {#1}}}} \)
\( \newcommand{\vecs}[1]{\overset { \scriptstyle \rightharpoonup} {\mathbf{#1}} } \)
\( \newcommand{\vecd}[1]{\overset{-\!-\!\rightharpoonup}{\vphantom{a}\smash {#1}}} \)
\(\newcommand{\avec}{\mathbf a}\) \(\newcommand{\bvec}{\mathbf b}\) \(\newcommand{\cvec}{\mathbf c}\) \(\newcommand{\dvec}{\mathbf d}\) \(\newcommand{\dtil}{\widetilde{\mathbf d}}\) \(\newcommand{\evec}{\mathbf e}\) \(\newcommand{\fvec}{\mathbf f}\) \(\newcommand{\nvec}{\mathbf n}\) \(\newcommand{\pvec}{\mathbf p}\) \(\newcommand{\qvec}{\mathbf q}\) \(\newcommand{\svec}{\mathbf s}\) \(\newcommand{\tvec}{\mathbf t}\) \(\newcommand{\uvec}{\mathbf u}\) \(\newcommand{\vvec}{\mathbf v}\) \(\newcommand{\wvec}{\mathbf w}\) \(\newcommand{\xvec}{\mathbf x}\) \(\newcommand{\yvec}{\mathbf y}\) \(\newcommand{\zvec}{\mathbf z}\) \(\newcommand{\rvec}{\mathbf r}\) \(\newcommand{\mvec}{\mathbf m}\) \(\newcommand{\zerovec}{\mathbf 0}\) \(\newcommand{\onevec}{\mathbf 1}\) \(\newcommand{\real}{\mathbb R}\) \(\newcommand{\twovec}[2]{\left[\begin{array}{r}#1 \\ #2 \end{array}\right]}\) \(\newcommand{\ctwovec}[2]{\left[\begin{array}{c}#1 \\ #2 \end{array}\right]}\) \(\newcommand{\threevec}[3]{\left[\begin{array}{r}#1 \\ #2 \\ #3 \end{array}\right]}\) \(\newcommand{\cthreevec}[3]{\left[\begin{array}{c}#1 \\ #2 \\ #3 \end{array}\right]}\) \(\newcommand{\fourvec}[4]{\left[\begin{array}{r}#1 \\ #2 \\ #3 \\ #4 \end{array}\right]}\) \(\newcommand{\cfourvec}[4]{\left[\begin{array}{c}#1 \\ #2 \\ #3 \\ #4 \end{array}\right]}\) \(\newcommand{\fivevec}[5]{\left[\begin{array}{r}#1 \\ #2 \\ #3 \\ #4 \\ #5 \\ \end{array}\right]}\) \(\newcommand{\cfivevec}[5]{\left[\begin{array}{c}#1 \\ #2 \\ #3 \\ #4 \\ #5 \\ \end{array}\right]}\) \(\newcommand{\mattwo}[4]{\left[\begin{array}{rr}#1 \amp #2 \\ #3 \amp #4 \\ \end{array}\right]}\) \(\newcommand{\laspan}[1]{\text{Span}\{#1\}}\) \(\newcommand{\bcal}{\cal B}\) \(\newcommand{\ccal}{\cal C}\) \(\newcommand{\scal}{\cal S}\) \(\newcommand{\wcal}{\cal W}\) \(\newcommand{\ecal}{\cal E}\) \(\newcommand{\coords}[2]{\left\{#1\right\}_{#2}}\) \(\newcommand{\gray}[1]{\color{gray}{#1}}\) \(\newcommand{\lgray}[1]{\color{lightgray}{#1}}\) \(\newcommand{\rank}{\operatorname{rank}}\) \(\newcommand{\row}{\text{Row}}\) \(\newcommand{\col}{\text{Col}}\) \(\renewcommand{\row}{\text{Row}}\) \(\newcommand{\nul}{\text{Nul}}\) \(\newcommand{\var}{\text{Var}}\) \(\newcommand{\corr}{\text{corr}}\) \(\newcommand{\len}[1]{\left|#1\right|}\) \(\newcommand{\bbar}{\overline{\bvec}}\) \(\newcommand{\bhat}{\widehat{\bvec}}\) \(\newcommand{\bperp}{\bvec^\perp}\) \(\newcommand{\xhat}{\widehat{\xvec}}\) \(\newcommand{\vhat}{\widehat{\vvec}}\) \(\newcommand{\uhat}{\widehat{\uvec}}\) \(\newcommand{\what}{\widehat{\wvec}}\) \(\newcommand{\Sighat}{\widehat{\Sigma}}\) \(\newcommand{\lt}{<}\) \(\newcommand{\gt}{>}\) \(\newcommand{\amp}{&}\) \(\definecolor{fillinmathshade}{gray}{0.9}\)This lesson will help you understand Resolution and Compression and how these two are related. Start with the explanations in Get the Basics to build understanding. Then, deepen your learning with additional online resources in Explore. The additional online resources are essential to understanding shutter speed & aperture! When you respond to the questions and prompts in Record Your Findings, be sure to include information you learned from the additional online resources.
Get the Basics
There are two main factors that contribute to the file size and quality of a digital photo: resolution and compression.
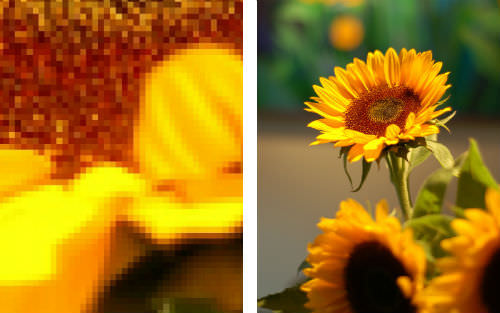
Resolution is a measure of the number of pixels (dots) used to make a photo. Think of this as a picture you make with tiny dots of color. If you look at the picture with a magnifying glass, you can see the dots, but when you back away and look at the picture from a distance, the dots disappear and the picture emerges.
Photo size is calculated in megapixels (millions of pixels, MP). To calculate photo size in megapixels, multiply the photo's pixel width by the pixel height and divide by one million. In the diagram below, the green photo has a resolution of 0.3 MP (640 x 480 = 307,200 ÷ 1,000,000 = 0.3072). The black photo has four times the width and height and a resolution of 5 MP (2560 x 1920 = 4,915,920 ÷ 1,000,000 = 4.9152). That's 16 times the number of pixels, and it's hard to find a digital camera on the market that has fewer than 12 MP.
You might think that the more pixels the better, that more pixels provide more clarity and detail. This is actually true - up to a point. Beware, though, there is a point when too many megapixels actually creates poorer photos. This happens with low- to mid-priced digital cameras with small sensors that can't handle all of those megapixels.
You can adjust your digital camera's resolution when shooting photos. The determining factor for how many MP to use is how the photos will be used. Printers can handle higher MP counts, and with 8 MP, your printed photos will be clear and sharp (unless you're trying to print large posters). To be honest, the maximum number of megapixels you'll probably need for printing is 8 MP.
Screen display is totally different. Computer screens don't act like printers. Photos you'll use for presentations or web display can have lower resolutions and still look fine. And, since the resolutions are smaller, the file sizes of the photos are smaller and load faster over the Internet. For screen display, you'll need to experiment with different MP settings, but probably won't need anything larger than 1-2 MP.
Learn more about pixel resolution at Geek.com:
www.geek.com/digital-camera-buyers-guide/megapixels/
Compression is a function of how much information is kept or discarded to make an photo file smaller when storing it. Photos can have millions of colors. The JPEG compression process attempts to compare colors of pixels that are near each other and determine if a color is actually needed. If not, that color is discarded. If sufficient numbers of colors are discarded, there's less information to store and the file size is reduced (compressed). The more compression, the smaller the file size. The downside of compression is that removing colors lowers photo quality. If you apply too much compression, the photo doesn't look as good.
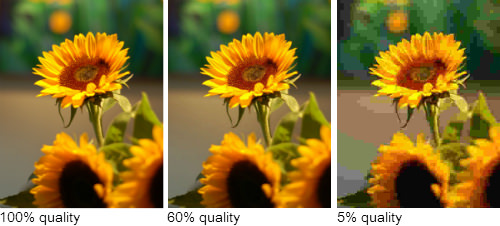
Different digital cameras use different terms for compression. Some use size terms like large, medium, and small to describe the file sizes resulting from compression. A large photo would have little or no compression, while a small photo would be highly compressed. Other digital cameras use quality terms like high, medium, and low. A high quality photo would have little or no compression, while a low quality photo would be highly compressed. Still others use percentages of quality like 100% for uncompressed and lower percentages for more compression. For example, a photo with a quality of 60% would be 40% compressed. Here's sample of the effects of compression:
Compared to the 100% version on the left, the middle photo at 60% looks almost as good - and the saved file is only about 1/4 the size. On the other hand the 5% photo on the right - at about 1/8 the saved file size - has so many colors removed that it looks blotchy.
Learn more about digital photo (JPEG) compression at JPEG Compression from the Sheridian Group:
http://learnmem.cshlp.org/site/misc/tsg_JPEG_instructions.pdf
[Optional] For more than you’ll ever need to know about compression, check out Everything You Need To Know About Image Compression from Noupe.com:
http://www.noupe.com/design/everything-you-need-to-know-about-image-compression.html
Most digital cameras have settings for resolution and compression. In combination, these determine the size of digital photo files. Setting your camera to use higher resolution and less compression can result in better photos for printing but, because the file sizes are larger, will decrease the number of photos your memory card will hold. Setting your camera to use moderate or lower resolution and more compression will result in photos that will display well on a computer screen but may appear pixelated (blocky) when printed. However, since these photo file sizes are smaller, the number of photos your memory card will hold will increase.
Locate the resolution and compression menu options for your digital camera. (1) One way of thinking is to set the combination that reflects how you will be using your photos: printing or screen display. (2) Another way of thinking is to use no compression when shooting photos to get the best quality possible. Then, if you need to compress to decrease file size, you can edit the photos with a program like PhotoShop or Pixlr Editor (see Digital Image Editing for LOTS more about editing photos). If you don't have access to edit your photos - or don't want to edit them - go with option 1 above. If you want choices after shooting photos, go with option 2 above.
Record Your Findings
- Describe resolution in your own words.
- Describe compression in your own words.
- How do you set the resolution and compression options for your digital camera?
- Set your digital camera’s resolution to its highest setting. View your screen display and record how many photos you can take at this setting. Then, set your digital camera’s resolution to its lowest setting. Record how many photos you can take at this setting.
- Which resolution/compression options are better for printing and which are better for screen display?
References
| Image | Reference | Attributions |
|---|---|---|
 |
[Figure 1] |
Credit: Kent Quirk; September 22, 2007 Source: https://www.flickr.com/photos/kentquirk/1753437003/ |
 |
[Figure 2] |
Credit: Stephen Politzer; August 1, 2014 Source: created by course author |
 |
[Figure 3] |
Credit: Kent Quirk; September 22, 2007 Source: https://www.flickr.com/photos/kentquirk/1753437003/ |


