3.1: Steady Camera
- Page ID
- 3127
\( \newcommand{\vecs}[1]{\overset { \scriptstyle \rightharpoonup} {\mathbf{#1}} } \)
\( \newcommand{\vecd}[1]{\overset{-\!-\!\rightharpoonup}{\vphantom{a}\smash {#1}}} \)
\( \newcommand{\dsum}{\displaystyle\sum\limits} \)
\( \newcommand{\dint}{\displaystyle\int\limits} \)
\( \newcommand{\dlim}{\displaystyle\lim\limits} \)
\( \newcommand{\id}{\mathrm{id}}\) \( \newcommand{\Span}{\mathrm{span}}\)
( \newcommand{\kernel}{\mathrm{null}\,}\) \( \newcommand{\range}{\mathrm{range}\,}\)
\( \newcommand{\RealPart}{\mathrm{Re}}\) \( \newcommand{\ImaginaryPart}{\mathrm{Im}}\)
\( \newcommand{\Argument}{\mathrm{Arg}}\) \( \newcommand{\norm}[1]{\| #1 \|}\)
\( \newcommand{\inner}[2]{\langle #1, #2 \rangle}\)
\( \newcommand{\Span}{\mathrm{span}}\)
\( \newcommand{\id}{\mathrm{id}}\)
\( \newcommand{\Span}{\mathrm{span}}\)
\( \newcommand{\kernel}{\mathrm{null}\,}\)
\( \newcommand{\range}{\mathrm{range}\,}\)
\( \newcommand{\RealPart}{\mathrm{Re}}\)
\( \newcommand{\ImaginaryPart}{\mathrm{Im}}\)
\( \newcommand{\Argument}{\mathrm{Arg}}\)
\( \newcommand{\norm}[1]{\| #1 \|}\)
\( \newcommand{\inner}[2]{\langle #1, #2 \rangle}\)
\( \newcommand{\Span}{\mathrm{span}}\) \( \newcommand{\AA}{\unicode[.8,0]{x212B}}\)
\( \newcommand{\vectorA}[1]{\vec{#1}} % arrow\)
\( \newcommand{\vectorAt}[1]{\vec{\text{#1}}} % arrow\)
\( \newcommand{\vectorB}[1]{\overset { \scriptstyle \rightharpoonup} {\mathbf{#1}} } \)
\( \newcommand{\vectorC}[1]{\textbf{#1}} \)
\( \newcommand{\vectorD}[1]{\overrightarrow{#1}} \)
\( \newcommand{\vectorDt}[1]{\overrightarrow{\text{#1}}} \)
\( \newcommand{\vectE}[1]{\overset{-\!-\!\rightharpoonup}{\vphantom{a}\smash{\mathbf {#1}}}} \)
\( \newcommand{\vecs}[1]{\overset { \scriptstyle \rightharpoonup} {\mathbf{#1}} } \)
\(\newcommand{\longvect}{\overrightarrow}\)
\( \newcommand{\vecd}[1]{\overset{-\!-\!\rightharpoonup}{\vphantom{a}\smash {#1}}} \)
\(\newcommand{\avec}{\mathbf a}\) \(\newcommand{\bvec}{\mathbf b}\) \(\newcommand{\cvec}{\mathbf c}\) \(\newcommand{\dvec}{\mathbf d}\) \(\newcommand{\dtil}{\widetilde{\mathbf d}}\) \(\newcommand{\evec}{\mathbf e}\) \(\newcommand{\fvec}{\mathbf f}\) \(\newcommand{\nvec}{\mathbf n}\) \(\newcommand{\pvec}{\mathbf p}\) \(\newcommand{\qvec}{\mathbf q}\) \(\newcommand{\svec}{\mathbf s}\) \(\newcommand{\tvec}{\mathbf t}\) \(\newcommand{\uvec}{\mathbf u}\) \(\newcommand{\vvec}{\mathbf v}\) \(\newcommand{\wvec}{\mathbf w}\) \(\newcommand{\xvec}{\mathbf x}\) \(\newcommand{\yvec}{\mathbf y}\) \(\newcommand{\zvec}{\mathbf z}\) \(\newcommand{\rvec}{\mathbf r}\) \(\newcommand{\mvec}{\mathbf m}\) \(\newcommand{\zerovec}{\mathbf 0}\) \(\newcommand{\onevec}{\mathbf 1}\) \(\newcommand{\real}{\mathbb R}\) \(\newcommand{\twovec}[2]{\left[\begin{array}{r}#1 \\ #2 \end{array}\right]}\) \(\newcommand{\ctwovec}[2]{\left[\begin{array}{c}#1 \\ #2 \end{array}\right]}\) \(\newcommand{\threevec}[3]{\left[\begin{array}{r}#1 \\ #2 \\ #3 \end{array}\right]}\) \(\newcommand{\cthreevec}[3]{\left[\begin{array}{c}#1 \\ #2 \\ #3 \end{array}\right]}\) \(\newcommand{\fourvec}[4]{\left[\begin{array}{r}#1 \\ #2 \\ #3 \\ #4 \end{array}\right]}\) \(\newcommand{\cfourvec}[4]{\left[\begin{array}{c}#1 \\ #2 \\ #3 \\ #4 \end{array}\right]}\) \(\newcommand{\fivevec}[5]{\left[\begin{array}{r}#1 \\ #2 \\ #3 \\ #4 \\ #5 \\ \end{array}\right]}\) \(\newcommand{\cfivevec}[5]{\left[\begin{array}{c}#1 \\ #2 \\ #3 \\ #4 \\ #5 \\ \end{array}\right]}\) \(\newcommand{\mattwo}[4]{\left[\begin{array}{rr}#1 \amp #2 \\ #3 \amp #4 \\ \end{array}\right]}\) \(\newcommand{\laspan}[1]{\text{Span}\{#1\}}\) \(\newcommand{\bcal}{\cal B}\) \(\newcommand{\ccal}{\cal C}\) \(\newcommand{\scal}{\cal S}\) \(\newcommand{\wcal}{\cal W}\) \(\newcommand{\ecal}{\cal E}\) \(\newcommand{\coords}[2]{\left\{#1\right\}_{#2}}\) \(\newcommand{\gray}[1]{\color{gray}{#1}}\) \(\newcommand{\lgray}[1]{\color{lightgray}{#1}}\) \(\newcommand{\rank}{\operatorname{rank}}\) \(\newcommand{\row}{\text{Row}}\) \(\newcommand{\col}{\text{Col}}\) \(\renewcommand{\row}{\text{Row}}\) \(\newcommand{\nul}{\text{Nul}}\) \(\newcommand{\var}{\text{Var}}\) \(\newcommand{\corr}{\text{corr}}\) \(\newcommand{\len}[1]{\left|#1\right|}\) \(\newcommand{\bbar}{\overline{\bvec}}\) \(\newcommand{\bhat}{\widehat{\bvec}}\) \(\newcommand{\bperp}{\bvec^\perp}\) \(\newcommand{\xhat}{\widehat{\xvec}}\) \(\newcommand{\vhat}{\widehat{\vvec}}\) \(\newcommand{\uhat}{\widehat{\uvec}}\) \(\newcommand{\what}{\widehat{\wvec}}\) \(\newcommand{\Sighat}{\widehat{\Sigma}}\) \(\newcommand{\lt}{<}\) \(\newcommand{\gt}{>}\) \(\newcommand{\amp}{&}\) \(\definecolor{fillinmathshade}{gray}{0.9}\)This lesson will help you learn and practice Steady Camera. In Get the Basics, you'll get explanations and photos to build understanding. In Explore, you'll find additional online resources to learn more. It's important to review and learn from these resources also! You'll have opportunities to practice in Build Your Skills. Finally, answer the questions in Record Your Findings at the end of this topic. Be sure to include information you learned from the Explore resources.
Get the Basics
There are many things to learn about taking good photos. The first and most important of these is keeping the camera steady. A steady camera captures clear and sharp photos. Moving the camera makes the photos blurry and is one of the most common mistake beginners make. So how can you keep the camera steady?
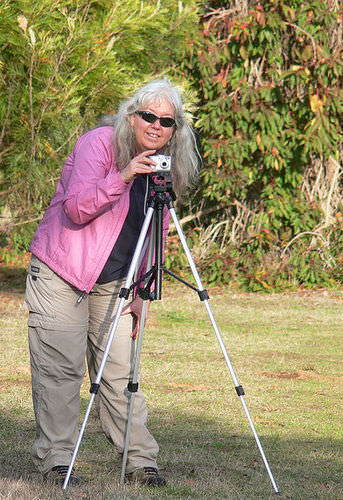
One way to keep the camera steady is to use a tripod. A tripod is a stand with three legs. Many photographers also use a monopod. Like it sounds, a monopod is a stand with only one leg. Tripods and monopods allow you to hold the camera on something solid, so it's easier to keep the camera steady.
If you don't have a tripod or monopod, try setting the camera on a solid surface, like a table, chair back, a fence, a railing...
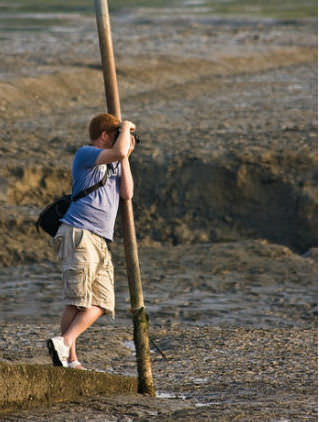
... or even a pole.
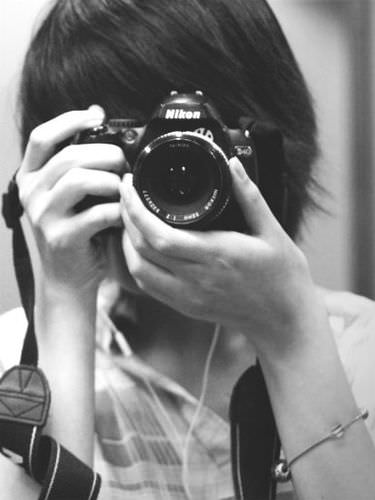
Even without something else to steady the camera, it’s possible to hold the camera very steady - if you know how. Stand with your feet firmly on the ground, shoulder width apart, and weight evenly distributed. Hold the camera with both hands and pull your elbows in to brace them against your body.
Variations include sitting or kneeling. In this example, notice how the photographer braces her arm and elbow on her knee.
Explore
Before shooting your own steady camera photos, learn more about steadying your camera at Eliminating Camera Movement from Short Courses:
http://www.shortcourses.com/use/using2-1.html
Also look at More ways to hold a camera steady when a tripod isn’t possible:
http://www.digitalcameraworld.com/2012/07/25/more-ways-to-hold-a-camera-steady-when-a-tripod-isnt-possible/
For even more information on how to steady your camera, including pictures of hand placement, see Sharp Pictures with Your Digital Camera, Part 1: Camera Shake from Ritz Interactive. You’ll even learn how to hold a cell phone camera steady:
www.ritzcamera.com/static/articles/tips/nyip2006a.html
Build Your Skills
Shoot four or more pairs of photos. For each pair, choose a subject. For the first photo in a pair, try a steady camera technique. Press the shutter button smoothly halfway down to let your camera auto focus. Then press smoothly the rest of the way. Taking your time is better than rushing and jiggling the camera. For the second photo in the pair, try shooting without using a steady camera technique.
Compare your steady/not-steady photo pairs. Share your photo pairs with your teacher, and be prepared to discuss how they show what you’ve learned. Download your photos to a computer to keep them for the portfolio you’ll create in the end-of-course final project.
Record Your Findings
- Why is the skill of Steady Camera important?
- How do the Steady Camera 1 and 2 photo pairs compare? Are the photos without steadying the camera as clear and sharp as the Steady Camera
References
| Image | Reference | Attributions |
|---|---|---|
 |
[Figure 1] |
Credit: Vicki & Chuck Rogers, February 4, 2006 Source: https://www.flickr.com/photos/two-wrongs/95881906/ |
 |
[Figure 2] |
Credit: Trey Ratcliff, June 4, 2009 Source: https://www.flickr.com/photos/stuckincustoms/3596653059/ |
 |
[Figure 3] |
Credit: Garry Knight; August 30, 2008 Source: http://www.flickr.com/photos/garryknight/2817872603/ |
 |
[Figure 4] |
Credit: Cee Cee, June 23, 2012 Source: https://www.flickr.com/photos/cherry-yeu-quai/7455117322/ |
 |
[Figure 5] |
Credit: Joe Schlabotnik; May 1, 2010 Source: https://www.flickr.com/photos/joeshlabotnik/4582653571/ |


