4.3: Point of View
- Page ID
- 3140
\( \newcommand{\vecs}[1]{\overset { \scriptstyle \rightharpoonup} {\mathbf{#1}} } \)
\( \newcommand{\vecd}[1]{\overset{-\!-\!\rightharpoonup}{\vphantom{a}\smash {#1}}} \)
\( \newcommand{\id}{\mathrm{id}}\) \( \newcommand{\Span}{\mathrm{span}}\)
( \newcommand{\kernel}{\mathrm{null}\,}\) \( \newcommand{\range}{\mathrm{range}\,}\)
\( \newcommand{\RealPart}{\mathrm{Re}}\) \( \newcommand{\ImaginaryPart}{\mathrm{Im}}\)
\( \newcommand{\Argument}{\mathrm{Arg}}\) \( \newcommand{\norm}[1]{\| #1 \|}\)
\( \newcommand{\inner}[2]{\langle #1, #2 \rangle}\)
\( \newcommand{\Span}{\mathrm{span}}\)
\( \newcommand{\id}{\mathrm{id}}\)
\( \newcommand{\Span}{\mathrm{span}}\)
\( \newcommand{\kernel}{\mathrm{null}\,}\)
\( \newcommand{\range}{\mathrm{range}\,}\)
\( \newcommand{\RealPart}{\mathrm{Re}}\)
\( \newcommand{\ImaginaryPart}{\mathrm{Im}}\)
\( \newcommand{\Argument}{\mathrm{Arg}}\)
\( \newcommand{\norm}[1]{\| #1 \|}\)
\( \newcommand{\inner}[2]{\langle #1, #2 \rangle}\)
\( \newcommand{\Span}{\mathrm{span}}\) \( \newcommand{\AA}{\unicode[.8,0]{x212B}}\)
\( \newcommand{\vectorA}[1]{\vec{#1}} % arrow\)
\( \newcommand{\vectorAt}[1]{\vec{\text{#1}}} % arrow\)
\( \newcommand{\vectorB}[1]{\overset { \scriptstyle \rightharpoonup} {\mathbf{#1}} } \)
\( \newcommand{\vectorC}[1]{\textbf{#1}} \)
\( \newcommand{\vectorD}[1]{\overrightarrow{#1}} \)
\( \newcommand{\vectorDt}[1]{\overrightarrow{\text{#1}}} \)
\( \newcommand{\vectE}[1]{\overset{-\!-\!\rightharpoonup}{\vphantom{a}\smash{\mathbf {#1}}}} \)
\( \newcommand{\vecs}[1]{\overset { \scriptstyle \rightharpoonup} {\mathbf{#1}} } \)
\( \newcommand{\vecd}[1]{\overset{-\!-\!\rightharpoonup}{\vphantom{a}\smash {#1}}} \)
\(\newcommand{\avec}{\mathbf a}\) \(\newcommand{\bvec}{\mathbf b}\) \(\newcommand{\cvec}{\mathbf c}\) \(\newcommand{\dvec}{\mathbf d}\) \(\newcommand{\dtil}{\widetilde{\mathbf d}}\) \(\newcommand{\evec}{\mathbf e}\) \(\newcommand{\fvec}{\mathbf f}\) \(\newcommand{\nvec}{\mathbf n}\) \(\newcommand{\pvec}{\mathbf p}\) \(\newcommand{\qvec}{\mathbf q}\) \(\newcommand{\svec}{\mathbf s}\) \(\newcommand{\tvec}{\mathbf t}\) \(\newcommand{\uvec}{\mathbf u}\) \(\newcommand{\vvec}{\mathbf v}\) \(\newcommand{\wvec}{\mathbf w}\) \(\newcommand{\xvec}{\mathbf x}\) \(\newcommand{\yvec}{\mathbf y}\) \(\newcommand{\zvec}{\mathbf z}\) \(\newcommand{\rvec}{\mathbf r}\) \(\newcommand{\mvec}{\mathbf m}\) \(\newcommand{\zerovec}{\mathbf 0}\) \(\newcommand{\onevec}{\mathbf 1}\) \(\newcommand{\real}{\mathbb R}\) \(\newcommand{\twovec}[2]{\left[\begin{array}{r}#1 \\ #2 \end{array}\right]}\) \(\newcommand{\ctwovec}[2]{\left[\begin{array}{c}#1 \\ #2 \end{array}\right]}\) \(\newcommand{\threevec}[3]{\left[\begin{array}{r}#1 \\ #2 \\ #3 \end{array}\right]}\) \(\newcommand{\cthreevec}[3]{\left[\begin{array}{c}#1 \\ #2 \\ #3 \end{array}\right]}\) \(\newcommand{\fourvec}[4]{\left[\begin{array}{r}#1 \\ #2 \\ #3 \\ #4 \end{array}\right]}\) \(\newcommand{\cfourvec}[4]{\left[\begin{array}{c}#1 \\ #2 \\ #3 \\ #4 \end{array}\right]}\) \(\newcommand{\fivevec}[5]{\left[\begin{array}{r}#1 \\ #2 \\ #3 \\ #4 \\ #5 \\ \end{array}\right]}\) \(\newcommand{\cfivevec}[5]{\left[\begin{array}{c}#1 \\ #2 \\ #3 \\ #4 \\ #5 \\ \end{array}\right]}\) \(\newcommand{\mattwo}[4]{\left[\begin{array}{rr}#1 \amp #2 \\ #3 \amp #4 \\ \end{array}\right]}\) \(\newcommand{\laspan}[1]{\text{Span}\{#1\}}\) \(\newcommand{\bcal}{\cal B}\) \(\newcommand{\ccal}{\cal C}\) \(\newcommand{\scal}{\cal S}\) \(\newcommand{\wcal}{\cal W}\) \(\newcommand{\ecal}{\cal E}\) \(\newcommand{\coords}[2]{\left\{#1\right\}_{#2}}\) \(\newcommand{\gray}[1]{\color{gray}{#1}}\) \(\newcommand{\lgray}[1]{\color{lightgray}{#1}}\) \(\newcommand{\rank}{\operatorname{rank}}\) \(\newcommand{\row}{\text{Row}}\) \(\newcommand{\col}{\text{Col}}\) \(\renewcommand{\row}{\text{Row}}\) \(\newcommand{\nul}{\text{Nul}}\) \(\newcommand{\var}{\text{Var}}\) \(\newcommand{\corr}{\text{corr}}\) \(\newcommand{\len}[1]{\left|#1\right|}\) \(\newcommand{\bbar}{\overline{\bvec}}\) \(\newcommand{\bhat}{\widehat{\bvec}}\) \(\newcommand{\bperp}{\bvec^\perp}\) \(\newcommand{\xhat}{\widehat{\xvec}}\) \(\newcommand{\vhat}{\widehat{\vvec}}\) \(\newcommand{\uhat}{\widehat{\uvec}}\) \(\newcommand{\what}{\widehat{\wvec}}\) \(\newcommand{\Sighat}{\widehat{\Sigma}}\) \(\newcommand{\lt}{<}\) \(\newcommand{\gt}{>}\) \(\newcommand{\amp}{&}\) \(\definecolor{fillinmathshade}{gray}{0.9}\)This lesson will help you learn and practice Point of View. In Get the Basics, you'll get explanations and photos to build understanding. In Explore, you'll find additional online resources to learn more. It's important to review and learn from these resources also! You'll have opportunities to practice in Build Your Skills. Finally, answer the questions in Record Your Findings at the end of this topic. Be sure to include information you learned from the Explore resources.
Get the Basics
So far, Your photos have been from your point of view - how you see things with your eyes. However, you don’t have to take pictures only from your eye level. Shooting from different heights and angles can result in some amazing photos from different points of view...as if you are looking through someone or something else's eyes. Other lessons in this chapter have been about creating movement. This one is about you moving to different spots and changing directions as you capture different points of view.
A photo from a different position can draw your eye into a subject, change the way the viewer sees the world, or even affect the way the viewer feels about the subject of the photo. Here are some examples to demonstrate how point of view can change a photo.
1. In this example, a dog is taking a well-earned nap. Since you are down at the dog's level, your eye is quickly drawn to the dog's face and nose, giving the feeling that you're taking a nap with the dog.
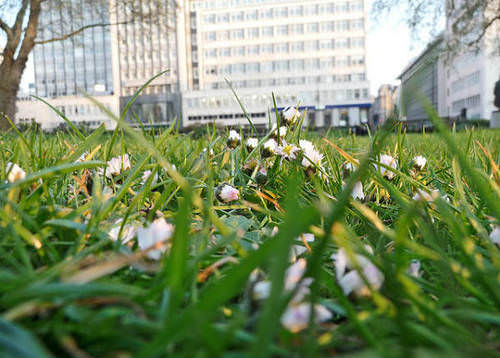
2. What if you were as small as a bug? What would the world look like to you? In this case the building's slant makes it feel like you are tilting from side to side as you move through the grass jungle.
3. Even a flower can look huge and threatening when seen close up from underneath.
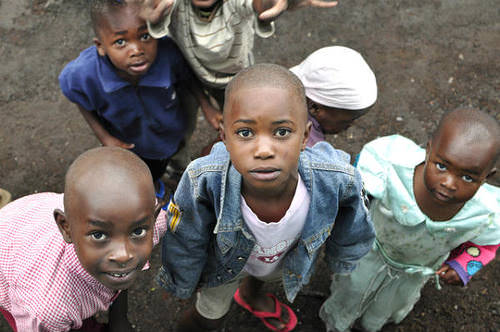
4. Looking down at these children from above makes them appear small and weak. Would they still appear small and weak if you took the photo from ground level looking up at them?
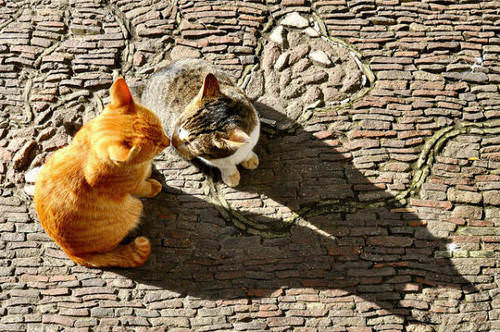
5. Here's an intimate moment you might miss from a different point of view.
Explore
Before shooting your own point of view photos, get more detail about point of view at Point of View in Photography from About.com:
http://photography.about.com/library/pointofview/blpointofview.htm
Now enjoy amazing examples of point of view photography at Photography 101: Establishing a Point of View from The Daily Post:
http://dailypost.wordpress.com/2013/09/03/photography-pov/
Build Your Skills
Shoot four or more pairs of photos. For the first photo in each pair, don't try to change the point of view. Just shoot the photo with the skills you've been learning before point of view. For the second photo in each pair, apply the concept of point of view by changing the angle and/or distance or by taking the photo from above or below.
Compare your point of view photo pairs. Select FOUR pairs. Share your photo pairs with your teacher, and be prepared to discuss how they show what you’ve learned. Download your photos to a computer to keep them for the portfolio you’ll create in the end-of-course final project.
Record Your Findings
- How does point of view change the way you view the subjects and their locations?
- How is the effect of a low point of view different from the effect of a high point of view?
- Describe how how a different point of view changed the second photos in your pairs when compared to the first photos in the pairs.
References
Image | Reference | Attributions |
---|---|---|
[Figure 1] |
Credit: Ed Costello; March 22. 2011 Source: https://www.flickr.com/photos/epc/5551672432/ |
|
[Figure 2] |
Credit: gorgeoux; July 14, 2008 Source: https://www.flickr.com/photos/gorgeoux/2668862164/ |
|
[Figure 3] |
Credit: Jean-Christophe; May 24, 2009 Source: https://www.flickr.com/photos/jean_christophe/3560516534/ |
|
[Figure 4] |
Credit: Brad Ruggles; March 8, 2010 Source: https://www.flickr.com/photos/bradruggles/4499930825/ |
|
[Figure 5] |
Credit: Shreyans Bhansali; January 2, 2011 Source: https://www.flickr.com/photos/thebigdurian/5316129041/ |