
5.3: III. Developing Central Ideas Based on Evidence
- Page ID
- 15144
\( \newcommand{\vecs}[1]{\overset { \scriptstyle \rightharpoonup} {\mathbf{#1}} } \)
\( \newcommand{\vecd}[1]{\overset{-\!-\!\rightharpoonup}{\vphantom{a}\smash {#1}}} \)
\( \newcommand{\id}{\mathrm{id}}\) \( \newcommand{\Span}{\mathrm{span}}\)
( \newcommand{\kernel}{\mathrm{null}\,}\) \( \newcommand{\range}{\mathrm{range}\,}\)
\( \newcommand{\RealPart}{\mathrm{Re}}\) \( \newcommand{\ImaginaryPart}{\mathrm{Im}}\)
\( \newcommand{\Argument}{\mathrm{Arg}}\) \( \newcommand{\norm}[1]{\| #1 \|}\)
\( \newcommand{\inner}[2]{\langle #1, #2 \rangle}\)
\( \newcommand{\Span}{\mathrm{span}}\)
\( \newcommand{\id}{\mathrm{id}}\)
\( \newcommand{\Span}{\mathrm{span}}\)
\( \newcommand{\kernel}{\mathrm{null}\,}\)
\( \newcommand{\range}{\mathrm{range}\,}\)
\( \newcommand{\RealPart}{\mathrm{Re}}\)
\( \newcommand{\ImaginaryPart}{\mathrm{Im}}\)
\( \newcommand{\Argument}{\mathrm{Arg}}\)
\( \newcommand{\norm}[1]{\| #1 \|}\)
\( \newcommand{\inner}[2]{\langle #1, #2 \rangle}\)
\( \newcommand{\Span}{\mathrm{span}}\) \( \newcommand{\AA}{\unicode[.8,0]{x212B}}\)
\( \newcommand{\vectorA}[1]{\vec{#1}} % arrow\)
\( \newcommand{\vectorAt}[1]{\vec{\text{#1}}} % arrow\)
\( \newcommand{\vectorB}[1]{\overset { \scriptstyle \rightharpoonup} {\mathbf{#1}} } \)
\( \newcommand{\vectorC}[1]{\textbf{#1}} \)
\( \newcommand{\vectorD}[1]{\overrightarrow{#1}} \)
\( \newcommand{\vectorDt}[1]{\overrightarrow{\text{#1}}} \)
\( \newcommand{\vectE}[1]{\overset{-\!-\!\rightharpoonup}{\vphantom{a}\smash{\mathbf {#1}}}} \)
\( \newcommand{\vecs}[1]{\overset { \scriptstyle \rightharpoonup} {\mathbf{#1}} } \)
\( \newcommand{\vecd}[1]{\overset{-\!-\!\rightharpoonup}{\vphantom{a}\smash {#1}}} \)
\(\newcommand{\avec}{\mathbf a}\) \(\newcommand{\bvec}{\mathbf b}\) \(\newcommand{\cvec}{\mathbf c}\) \(\newcommand{\dvec}{\mathbf d}\) \(\newcommand{\dtil}{\widetilde{\mathbf d}}\) \(\newcommand{\evec}{\mathbf e}\) \(\newcommand{\fvec}{\mathbf f}\) \(\newcommand{\nvec}{\mathbf n}\) \(\newcommand{\pvec}{\mathbf p}\) \(\newcommand{\qvec}{\mathbf q}\) \(\newcommand{\svec}{\mathbf s}\) \(\newcommand{\tvec}{\mathbf t}\) \(\newcommand{\uvec}{\mathbf u}\) \(\newcommand{\vvec}{\mathbf v}\) \(\newcommand{\wvec}{\mathbf w}\) \(\newcommand{\xvec}{\mathbf x}\) \(\newcommand{\yvec}{\mathbf y}\) \(\newcommand{\zvec}{\mathbf z}\) \(\newcommand{\rvec}{\mathbf r}\) \(\newcommand{\mvec}{\mathbf m}\) \(\newcommand{\zerovec}{\mathbf 0}\) \(\newcommand{\onevec}{\mathbf 1}\) \(\newcommand{\real}{\mathbb R}\) \(\newcommand{\twovec}[2]{\left[\begin{array}{r}#1 \\ #2 \end{array}\right]}\) \(\newcommand{\ctwovec}[2]{\left[\begin{array}{c}#1 \\ #2 \end{array}\right]}\) \(\newcommand{\threevec}[3]{\left[\begin{array}{r}#1 \\ #2 \\ #3 \end{array}\right]}\) \(\newcommand{\cthreevec}[3]{\left[\begin{array}{c}#1 \\ #2 \\ #3 \end{array}\right]}\) \(\newcommand{\fourvec}[4]{\left[\begin{array}{r}#1 \\ #2 \\ #3 \\ #4 \end{array}\right]}\) \(\newcommand{\cfourvec}[4]{\left[\begin{array}{c}#1 \\ #2 \\ #3 \\ #4 \end{array}\right]}\) \(\newcommand{\fivevec}[5]{\left[\begin{array}{r}#1 \\ #2 \\ #3 \\ #4 \\ #5 \\ \end{array}\right]}\) \(\newcommand{\cfivevec}[5]{\left[\begin{array}{c}#1 \\ #2 \\ #3 \\ #4 \\ #5 \\ \end{array}\right]}\) \(\newcommand{\mattwo}[4]{\left[\begin{array}{rr}#1 \amp #2 \\ #3 \amp #4 \\ \end{array}\right]}\) \(\newcommand{\laspan}[1]{\text{Span}\{#1\}}\) \(\newcommand{\bcal}{\cal B}\) \(\newcommand{\ccal}{\cal C}\) \(\newcommand{\scal}{\cal S}\) \(\newcommand{\wcal}{\cal W}\) \(\newcommand{\ecal}{\cal E}\) \(\newcommand{\coords}[2]{\left\{#1\right\}_{#2}}\) \(\newcommand{\gray}[1]{\color{gray}{#1}}\) \(\newcommand{\lgray}[1]{\color{lightgray}{#1}}\) \(\newcommand{\rank}{\operatorname{rank}}\) \(\newcommand{\row}{\text{Row}}\) \(\newcommand{\col}{\text{Col}}\) \(\renewcommand{\row}{\text{Row}}\) \(\newcommand{\nul}{\text{Nul}}\) \(\newcommand{\var}{\text{Var}}\) \(\newcommand{\corr}{\text{corr}}\) \(\newcommand{\len}[1]{\left|#1\right|}\) \(\newcommand{\bbar}{\overline{\bvec}}\) \(\newcommand{\bhat}{\widehat{\bvec}}\) \(\newcommand{\bperp}{\bvec^\perp}\) \(\newcommand{\xhat}{\widehat{\xvec}}\) \(\newcommand{\vhat}{\widehat{\vvec}}\) \(\newcommand{\uhat}{\widehat{\uvec}}\) \(\newcommand{\what}{\widehat{\wvec}}\) \(\newcommand{\Sighat}{\widehat{\Sigma}}\) \(\newcommand{\lt}{<}\) \(\newcommand{\gt}{>}\) \(\newcommand{\amp}{&}\) \(\definecolor{fillinmathshade}{gray}{0.9}\)40
III. Developing Central Ideas Based on Evidence
Emily van Zee and Elizabeth Gire
Ongoing observations of the Sun and the Moon can provide evidence on which to base development of a set of central ideas about the Sun/Earth/Moon system. This process starts with looking up and making observations of the sky on a regular basis. Also important is recording those observations systematically in a sky journal.
A. Observing the shape and location of the Sun and the Moon in the sky
During this course, try to look up whenever you are outside and check out what is happening in the sky.
Question 5.6 Where is the Sun in the sky right now? How does the Sun seem to move across the sky?
- Make a sky journal in which to keep track of what you see.
- The best way to start observing the sky is to go outside and have a look!
DO NOT LOOK DIRECTLY AT THE SUN! A direct stare at the Sun can damage eyes. - What do you expect to see in the sky?
- Orient yourself with the cardinal directions: Where is North? East? South? West?
- If not sure, where does the Sun seem to rise? That’s East.
- Where does the Sun seem to be high in the sky in the middle of the day?
(Where we live, that’s South.) - Where does the Sun seem to set? That’s West.
- What’s left? (Where we live, that’s North.)
You also can use a compass or think about how you get from where you are to somewhere else that is in a known direction. Where we live, for example, a freeway goes many miles directly north or directly south. One can think about North as being the direction one would drive on this freeway toward a major city north of us and about South as being the direction one would drive on this freeway toward a smaller city south of us.
- Face North. Point East
(Where we live, use your right arm, horizontal to the ground, to point East)
Point West
(Where we live, use your left arm, horizontal to the ground, to point West)
- Look up at the sky. What do you see?
(Where we live, maybe some clouds, airplanes, birds) - Keep your arms pointing horizontally away from your body.
Turn around to face South.- Where is your right arm pointing horizontally now?
(Where we live, right arm is now pointing West) - Where is your left arm pointing horizontally now?
(Where we live, left arm is now pointing East) - Notice that these directions are the opposite used on many maps. On maps for which North points “UP”, East is to the right, West to the left.
- Where is your right arm pointing horizontally now?
- While facing South, look up at the sky. What do you see?
(Where we live, maybe some clouds, airplanes, birds and during the day usually the Sun and sometimes the Moon!) DO NOT LOOK DIRECTLY AT THE SUN! This can damage eyes.
- WITHOUT LOOKING DIRECTLY AT THE SUN, where is the Sun?
- Low, middle, high in the sky?
- North? Northeast? East? Southeast? South? Southwest? West? Northwest?
- To create a template for recording your observation:
- Near the bottom of the page in your sky journal, draw a horizontal line.
- Label the left end East, the middle South, and the right end West.
- In the middle, draw a stick figure as shown in Fig. 5.7.

(If you live in the Southern hemisphere, label the line (West North East)
- To record what you are seeing, WITHOUT LOOKING DIRECTLY AT THE SUN, point an arm at the Sun and try to estimate the angle your arm is making with the ground.
- Add an arm to your stick figure at an angle that matches the angle of the arm you pointed at the Sun. Also add a sketch of the Sun to your observation.
- Add another sketch of the Sun on your journal page to predict where the Sun will be in the sky at a later time such as an hour or more later in the day.
- Check at that later time that day and record again!
- How does the Sun seem to move across the sky?
Question 5.7 Where is the Moon in the sky right now? How does the Moon seem to move across the sky?
- Keep checking the sky for the Moon. When the Moon is visible, where in the sky is it?
- Low, middle, high in the sky?
- North? Northeast? East? Southeast? South? Southwest? West? Northwest?
- What does the Moon look like? Describe in words.
- If you are observing the Moon at night, draw a template for recording your observation in your sky journal as shown in Fig. 5.7. If you are observing the Moon during the day, also record where the Sun is in the sky as discussed above.
- To record where the Moon is in the sky, point an arm at the Moon and try to estimate the angle your arm is making with the ground.
- Add an arm to your stick figure at an angle that matches the angle of the arm you pointed at the Moon.
If the Sun is also visible, add the stick-figure arm pointing at the Moon so that it connects to a stick-figure-arm pointing at the Sun. DO NOT LOOK DIRECTLY AT THE SUN! The angle formed by the stick-arm pointing at the Sun and the stick-arm pointing at the Moon should match the angle formed by your arms when pointing at the Sun and the Moon in the sky.
- What kind of angle do your arms make when pointing at the Moon and the Sun? (Acute, less than 90°? Right, 90°? Obtuse, more than 90° but less than 180°? Straight, 180°?)
What kind of angle do the stick-figure arms make? The angle the stick-figure arms make should match the angle your arms make when pointing at the Moon and the Sun.
- Add a sketch of the Moon to where the stick-arm is pointing. Outline the shape of the lit side of the Moon that you see and let the white of the page inside the outline represent the lit portion of the Moon.
- Hold your sky journal up so that your drawing of the Moon seems to be next to the Moon in the sky. Compare your sketch of the Moon with the Moon in the sky:
- Is the lit side of your Moon sketch the same as the lit side of the Moon in the sky?
- Is the curve of the lit edge of your sketch of the Moon the same as the curve of the lit edge of the Moon in the sky?
- Is the size of the lit portion of your sketch of the Moon the same as the size of the lit portion of the Moon in the sky?
- Revise as necessary to make your sketch of the Moon more accurate.
- Record the date and time on the same page as your observation. Include a.m. or p.m.
- If both the Sun and Moon are visible, the two stick-figure-arms should make an angle that matches the angle your arms are making when pointing at the Sun and Moon. Do they? If not, revise the stick-figure arms to match the angle your arms are making.
- Sketch on your journal page where you predict the Moon will be in the sky at a later time. Do you think the Moon’s shape will be the same or different then?
- Check your prediction at that later time. Record what you see.
- How does the Moon seem to move across the sky?
Complete your first observations of the Sun and the Moon before looking at an example of student work and reading about nuances to consider in observing the sky.
1. Example of a student’s initial observation of the sky
Figure 5.8 shows a student’s first observation, made in class during a morning field trip outside to look up at the sky. This sky journal observation includes:
Line across the bottom of the page that represents the horizon,
Label E for east on the left, S for south in the middle, and W for west on the right
Sketch of the Sun in the southeastern sky
Sketch of the Moon, shown as about half lit on the left, in the southwestern sky
Stick figure with one arm pointing at the Sun and the other arm pointing at the Moon
Angle formed by the arms labeled, as 90º
Time, hour : minute, with a.m. noted
Date, with month, day, and year included
Sketch of prediction for where the Sun would be later at the end of class, about noon
Sketch of prediction for where the Moon would be later at the end of class, about noon.

Physics student, Fall 2016
2. Nuances about observing the sky
Although the weather is often cloudy and rainy where we live, we have clear skies during class time occasionally in the term. When this occurs, we go outside, orient ourselves with respect to North, East, South, and West, and make the first sky observation together, at least of the Sun, and if we are fortunate, of the Moon as well. We think it is important to model going on short field trips outside the classroom as a normal part of learning experiences. Although it is best to do the first observation outside as a class, one can discuss inside how to use the sky journal if going outside is not feasible.
On the first sunny class day, we go outside to make an observation together while looking at the sky. We act out estimating the angle that an arm pointing at the Sun makes with the ground, without looking directly at the Sun! and discuss placing a sketch of the Sun in the appropriate area of the page with respect to its location in the sky. The student who made the observation shown in Fig. 5.8 has not quite drawn the stick-figure-arm pointing directly at the drawn Sun but is close. The arm pointing at the Moon also is not shown pointing directly at the Moon. The student has labeled the angle formed by pointing arms at the Sun and the Moon as 90 degrees, a right angle, although the angle drawn is slightly bigger; if the arms had been drawn pointing directly at the Sun and the Moon, the angle would have been closer to 90 degrees. Although the sketch of the half-lit Moon looks a bit more than half lit, all the necessary information is there. Students’ accuracy in making sketches usually improves considerably with practice.
We start right away having students use this somewhat complex format for recording observations in a systematic way. With a 15-week semester, one can afford to say simply ‘look for the Moon and record what you see.’ With this very general instruction, students likely will experience the bewilderment of not finding the Moon very easily for a month before starting a more systematic observation process. With only a 10-week quarter term, however, we have shifted to this more structured approach immediately. We also provide explicit suggestions for a good time to look at the sky so that the students can start assembling a series of observations of the Sun and the Moon within the first month of the term.
If poor weather interferes, we sometimes use a computer program to simulate what would be seen if we could see beyond clouds and/or rain. (see: http://stellarium.org for an open source version.) It is important for students to become aware of changes in the shape of the moon on at least a weekly basis.
B. Observing the Sun
This section introduces several methods for documenting the Sun’s apparent motions and estimating its size.
Question 5.8 How does the Sun seem to move across the sky?
There are several ways to document how the Sun seems to move across the sky. As noted above, one can make multiple observations of the Sun’s position in the sky during the same day on a sky journal page. Be sure, however, to avoid looking directly at the Sun! If feasible, observing where the Sun seems to rise and set documents the beginning and end of the Sun’s apparent daily journey across the sky. There also are several ways, based upon observing how the tip of the shadow of a vertical gnomon changes during the day. The gnomon, such as a person, post, vertical long leg of a paper clip or nail, should be perpendicular to flat ground in an area likely to be sunny during the middle of the day.
1. Observing where and when the Sun appears to rise and set.
To the extent possible, begin noticing where the Sun seems to be rising and setting where you live:
Equipment: Use a pencil and piece of paper on a clipboard or cardboard.
- Try to observe sunrise at least once a week. Face east and draw a profile of trees and buildings. For each observation at this location, indicate on the sunrise profile where and when the Sun seems to be rising along that profile.
- Also try to observe sunset at least once a week. Face west and draw a similar profile of trees and buildings. For each observation at this location, indicate on the sunset profile where and when the Sun seems to be setting along that profile. Record the date and time for each observation.
- How do rising and setting positions on the profile change over a week? Over several weeks? Months?
- How do the times of sunrise and sunset change over a week? Over several weeks? Months?
2. Observing a student gnomon’s shadow during a field trip outside during a sunny class session
Go outside twice during a class session on a sunny day to document how the sun seems to move across the sky. If possible, include an observation at solar noon, when the Sun appears to be at its highest angular altitude in the sky. DO NOT LOOK AT THE SUN!
-
- Early in the session, choose one member of your group to stand so that the student’s shadow falls upon the pavement. The student serves as the gnomon for this observation. A gnomon is a vertical object (stick, post, person) perpendicular to the ground whose shadow can be interpreted in terms of its length and the direction to which it is pointing. Other group members use chalk to draw the outline of this gnomon’s shadow on the pavement.
- Draw an outline of the student’s feet so that the student can stand in the same way in the same spot near the end of class as shown in Fig. 5.9.
- Measure the height H of the student gnomon and the length L of the shadow. Record the date and time of these measurements.
- How do you think the student’s shadow will change by the end of class?
- Shorter or longer or the same length?
- Pointing further to the right? left? or in the same direction?
- Why do you think that?
- Mark on the pavement where you think the tip of the person’s shadow head will fall by the end of class.
- Why do you think the tip of the shadow will fall there by the end of class? Use the video function of a camera or cell phone to record a group member briefly explaining the reasoning for the group’s prediction for where the tip of the shadow’s head will be on the pavement by the end of class.
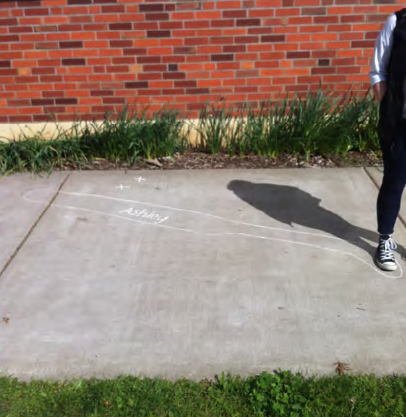
Fig. 5.9 Documenting changes in a group member’s shadow on a sunny day near the beginning and end of class.
- When back inside the classroom, make a sketch showing the Sun, student gnomon, shadow, and sunlight.
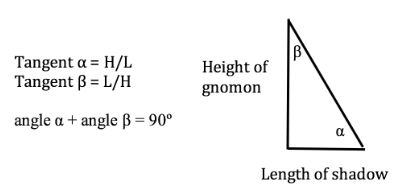
- Also draw a careful ray diagram with straight lines representing the student gnomon, shadow, and ray of light from the Sun. Be sure to draw the lines representing the gnomon and shadow at right angles as shown in Fig. 5.10.
- What was the angular altitude of the Sun, Angle α (alpha), at the moment that you measured the height of the student gnomon and length of the shadow?
Use a protractor to measure the Sun’s angular altitude, Angle α (alpha), on the ray diagram.
Calculate the tangent (H/L) of Angle α, then find Angle α in a trigonometry table or use a calculator that has trig functions such as arctan or tan-1 (the angle for which the tangent is the number calculated by dividing H by L). Compare this estimate for Angle α with the estimate made with the protractor on the ray diagram. Which is the better method for estimating Angle α? Why?
- Near the end of class, go outside again to observe where the tip of the student gnomon’s shadow head is now. Mark the tip of the shadow and measure the shadow’s new length. Record the new shadow length and time.
- Make a sketch or take a photo of the gnomon and marked tips of the shadows of the gnomon’s head.
- Interpret the change in position of the tip of the student’s shadow head in terms of how the Sun appears to have moved across the sky during the time period between observations. DO NOT LOOK DIRECTLY AT THE SUN!
- During the next class session: how did the Sun’s angular altitude, Angle α, change during these observations?
- What is the connection between how long the student’s shadow is and how high the Sun seems to be in the sky?
- If it was possible to measure the length of the gnomon’s shadow at solar noon, what was the Sun’s maximum angular altitude, Angle α, on this date?
- Discuss as a whole group, each small group’s observations and interpretations.
- Formulate a central idea that articulates findings from this exploration of how the Sun seems to move across the sky during the day.
3. Observing a post gnomon’s shadow outside during a sunny day
Go on a field trip outside early in a class session on a sunny day to observe the tip of a shadow cast by a post. DO NOT LOOK DIRECTLY AT THE SUN!
- Mark the tip regularly throughout the class session, perhaps every 15 minutes, and if feasible throughout the day.
- Interpret the change in position of the tip of the shadow in terms of how the Sun appears to have moved across the sky during the time period between observations.
DO NOT LOOK DIRECTLY AT THE SUN!
- Discuss the observations and possible interpretations.
- Formulate a central idea that articulates findings from this exploration of how the Sun seems to move across the sky during the day.
4. Observing a paper clip or nail gnomon’s shadow on a sunny day.
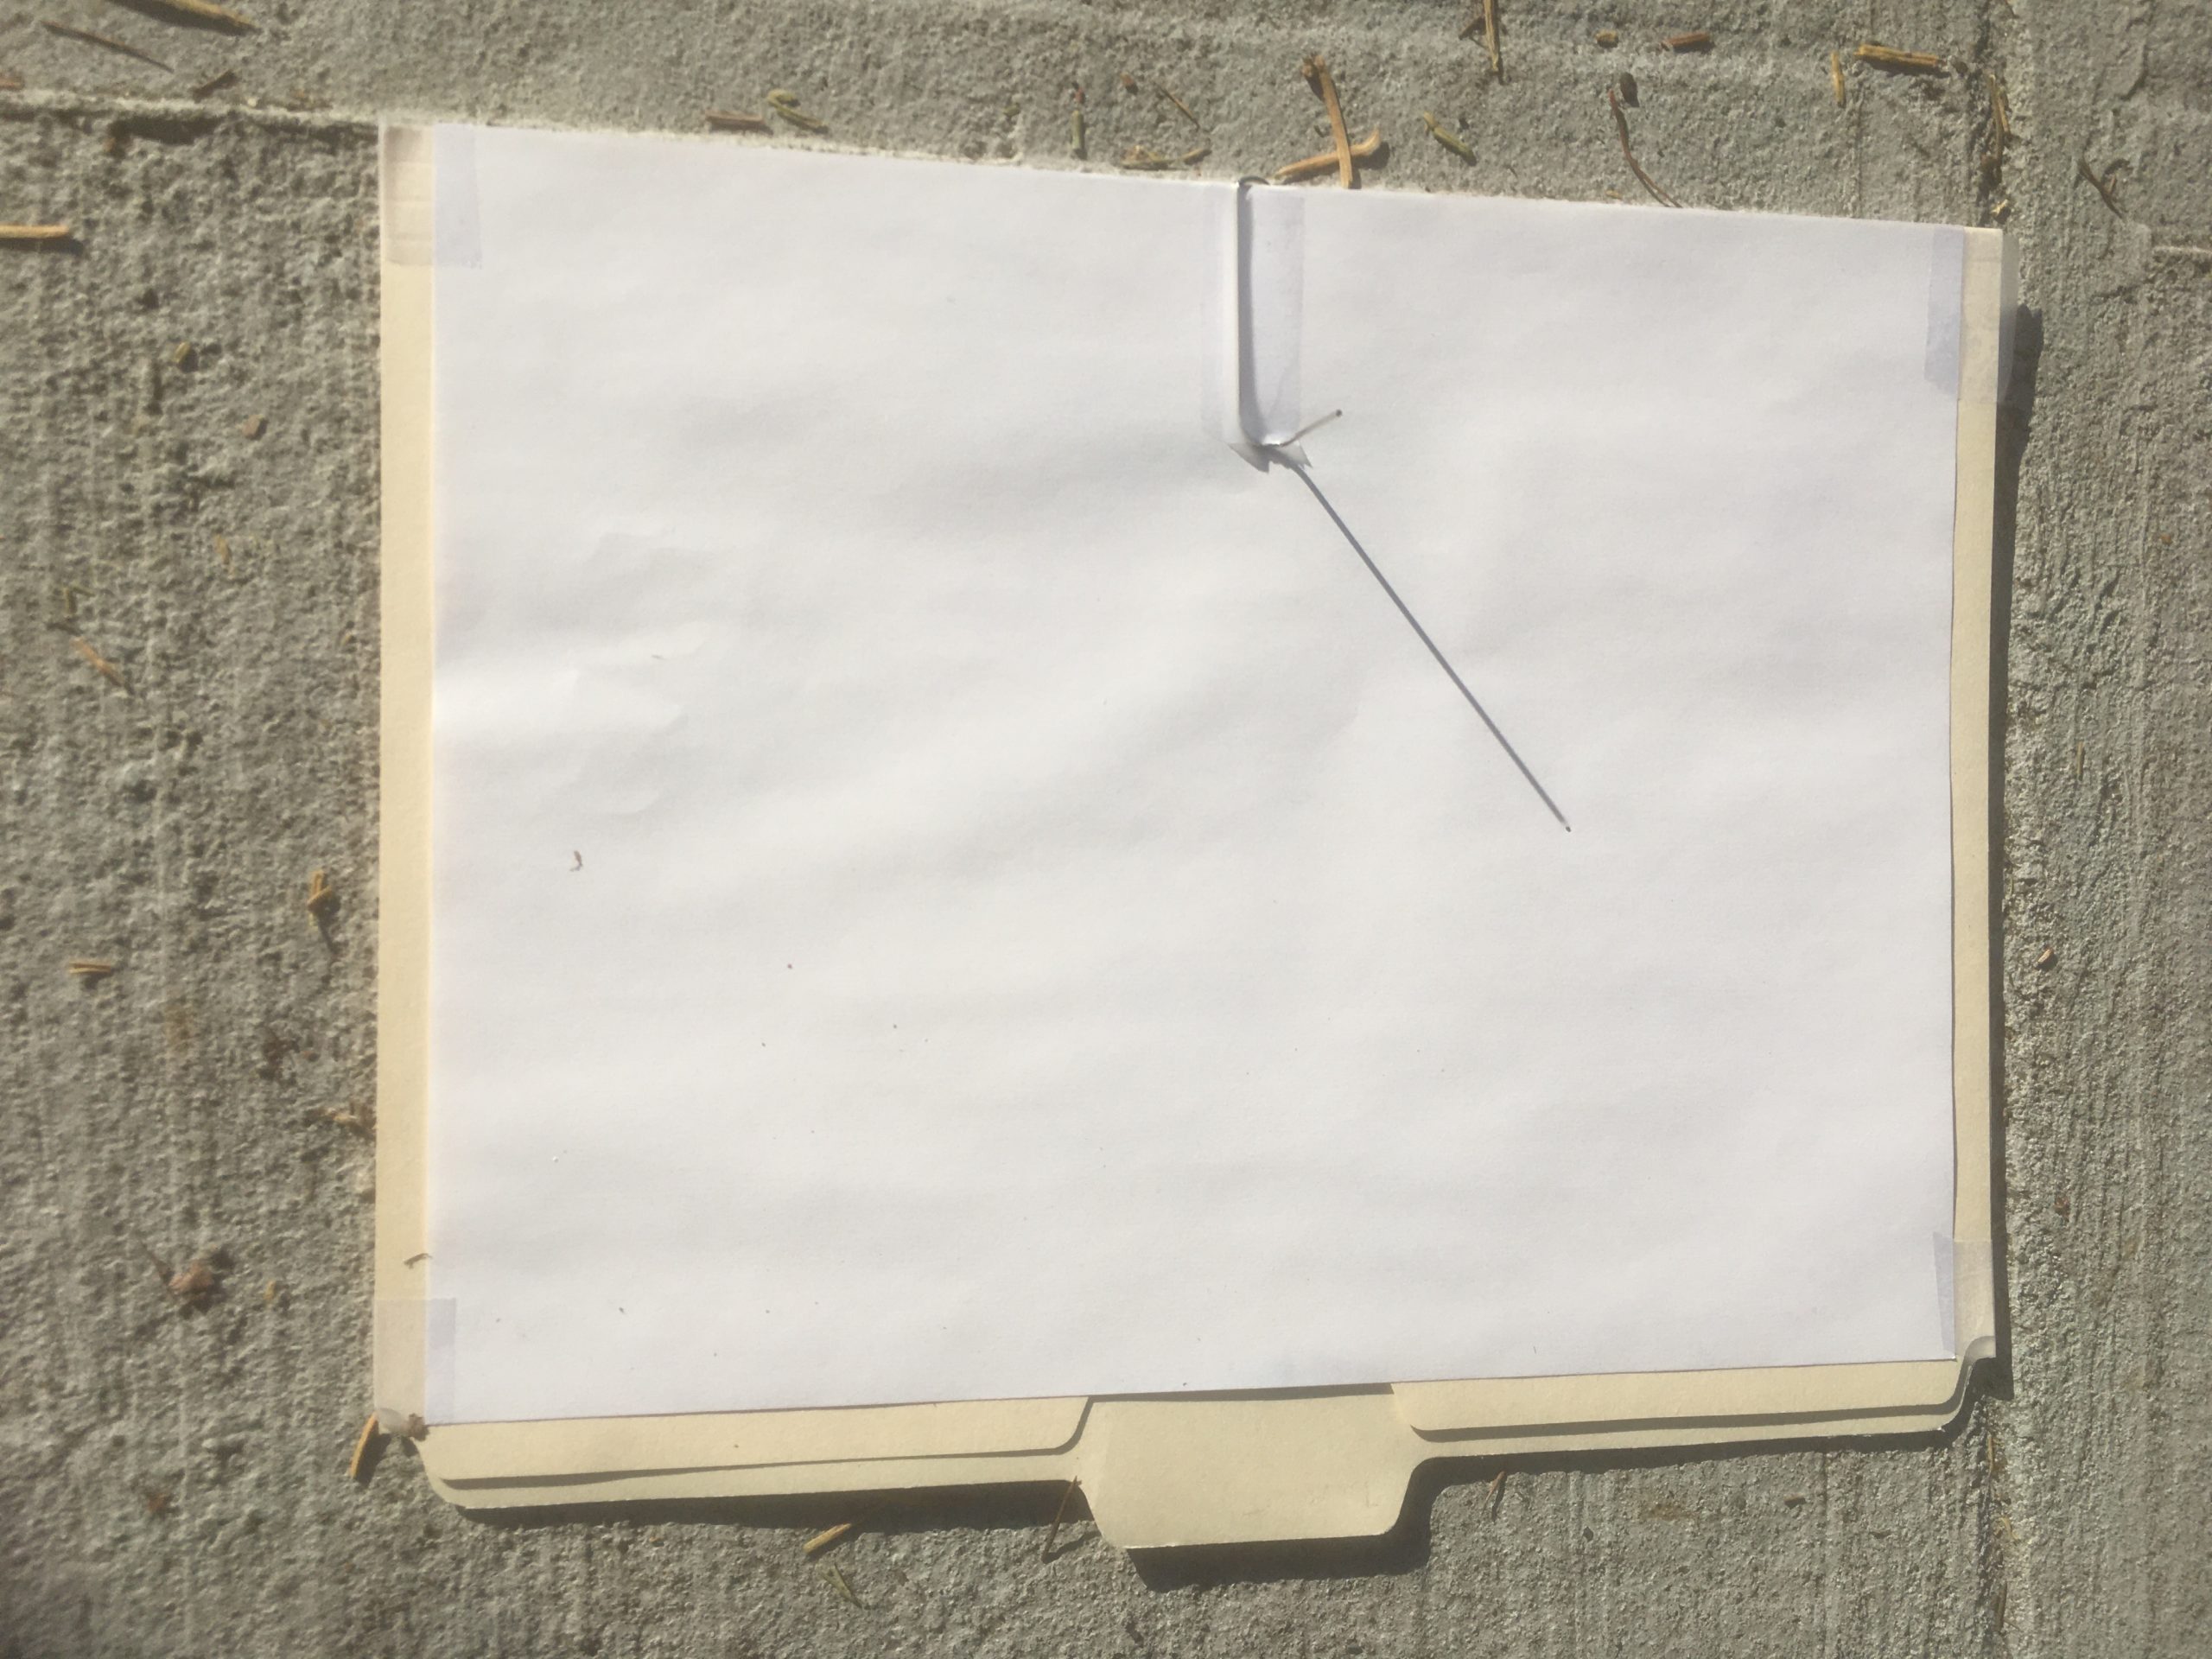
Another option is to make an apparatus for a portable shadow plot for each group as shown in Fig. 5.11.
Equipment: Tape the four edges of a piece of paper to the outside of a manila folder or cardboard. Bend a large paper clip so that a long leg is bent perpendicular to the rest of the clip. The long leg is the gnomon. Slip the paper clip on to the middle back edge of the manila folder or cardboard so that the bent long leg is vertical. Tape the clip in place.
Or pound a nail through a thick piece of cardboard or board so that it is perpendicular to the plane of the board.
- If feasible, instructor starts shadow plot observations for each group as early in a sunny day as feasible.
- On a fieldtrip outside, students gather around a suitable sidewalk crack or wall that forms an East/West line. DO NOT LOOK DIRECTLY AT THE SUN! The instructor demonstrates what to do:
- Line up a shadow plot apparatus with the east/west crack in sidewalk or on the wall
- Invite a student to mark the tip of the shadow of the gnomon and label it with the date and time
- Each small group:
- A member from each group marks the tip of the gnomon’s shadow on the group’s shadow plot and labels with the time.
- Other members of each group mark the tip of the gnomon’s shadow on the group’s shadow plot in given time intervals (such as 15 minutes) and just before all go back inside
- Members of each group decide when each will briefly leave class and take their portable gnomon outside to mark the tip of the shadow at given time intervals until the end of class.
- All go outside near the end of class to make last shadow plot observations.
- Interpret the change in position of the tip of the gnomon’s shadow in terms of how the Sun appears to have moved across the sky during the time period of observations.
- If feasible, instructor continues shadow plot observations for the groups’ portable gnomons until the end of the day.
- During the next session, discuss as a whole group each small group’s observations and interpretations.
- Formulate a central idea that articulates findings from this exploration of how the Sun seems to move across the sky during the day.
- If feasible, make shadow plots near the beginning and end of a course and consider differences in shadow plots made at different times, particularly if observations have been made near an equinox and near a solstice. Try to identify the moment of “shortest shadow,” which is known as solar noon and to compare the Sun’s maximum angular altitude, Angle α, at different times during the term.
5. Example of student work about how the Sun seems to move across the sky.
Observing the Sun via shadows. I recorded changes in the shadows cast by the Sun by recording a shadow plot with a paperclip as the gnomon and by recording a shadow plot with a person as the gnomon. Figure (5.12) shows the shadow plot with a paper clip gnomon. Figure (5.13) shows a group member’s shadow near the beginning and end of class.
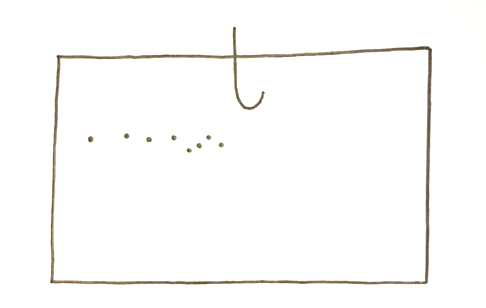
For the shadow plot with the paper gnomon, as seen in Figure (5.12), we had a piece of white paper with a paper clip attached to it on the center of one of the long sides of the paper. We placed the piece of paper with the paperclip facing towards us on the sidewalk so that the corner of the paper was lined up to lines in the sidewalk. We then marked a dot where the shadow of the paperclip ended on the paper every 15 minutes, starting at the beginning of class and going until the end of class. I observed that the dots on the paper started on the left and moved closer to the center of the paper as time went on. I also observed that the dots began to get closer together as time went on.
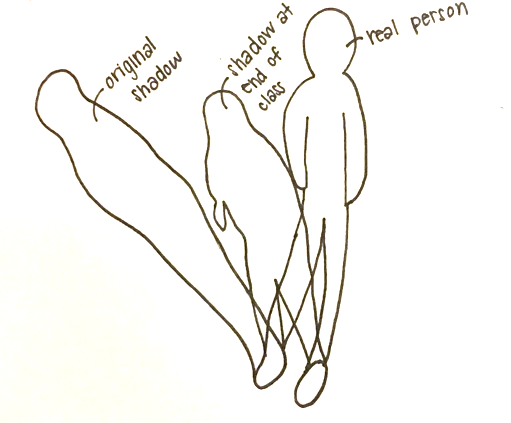
For the shadow plot with the person as the gnomon, as seen in Figure (5.13), I traced a group member’s shadow at the beginning of class. Then at the end of class, my group member stood in the same exact spot and I observed where the new shadow was. I observed that the new shadow was shorter, less skinny, and was turned more to the right than the original shadow.
Physics student, Spring 2016
This class met in the morning, so the student’s original shadow was drawn about 10 am. The class ended just before noon. Where we live, the Sun is in the southern sky at noon, so this student’s long morning shadow became shorter in length and shifted in direction toward North. One way to find North if lost is to observe the shadow of a vertical stick during a sunny day and identify the direction the shortest shadow is pointing. (See: https://adventure.howstuffworks.com/survival/wilderness/true-north2.htm ) .
- If feasible, compare shadow plots made near the equinoxes (March or September) with those made near the solstices (June or December).
Question 5.9 How big is the Sun?
If one glances at the sky when the Sun and Moon are both visible, an easy comparison to make is that the Sun and Moon appear to be about the same size. DO NOT LOOK DIRECTLY AT THE SUN!
To estimate the actual size of the Sun, however, we used pinhole phenomena in Unit 1, VI. If not undertaken in earlier class sessions, on a sunny day make the observations outlined for Question 1.16 to estimate the diameter of the Sun.
To estimate the diameter of the Sun: As shown in Fig. 1.21 (repeated), this involves making a pinhole in a sheet of aluminum foil held tight in a cardboard frame; making a cardboard screen covered with a sheet of white paper, using a meter stick to separate the pinhole and the screen, tracing the projection of the sun through the pinhole on the screen, and measuring the diameter of the projection.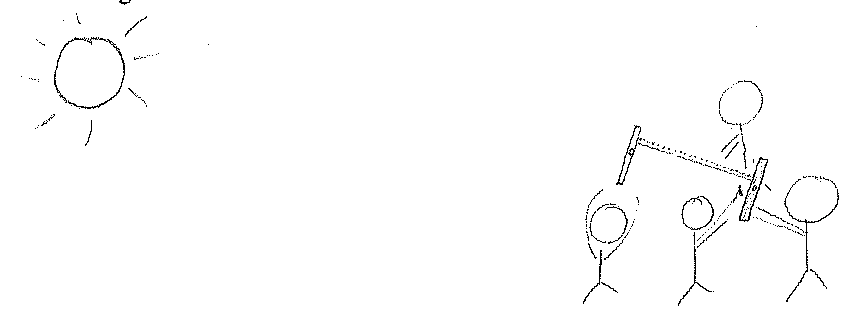
Use the mathematics that describes pinhole phenomena to estimate the Sun’s diameter:
\[\begin{split}\frac{W}{D} & = \frac{w}{d} \\ \frac{\text{Width (diameter) of the sun}}{\text{Distance of the sun from the pinhole}} & = \frac{\text{width (diameter) of the projection}}{\text{distance of projection from the pinhole}}\end{split}\]
Solve for the width (diameter) of the Sun, measure the width (diameter) of the Sun’s projection when one meter away from a pinhole, and assume the Sun is about 100,000,000 miles from the Earth. (Note that it is not necessary to convert meters to miles to calculate this estimate.)
C. Generating questions about the Moon and designing ways to explore these questions
Question 5.10 What questions about the Moon do you want to explore?
How will you do that?
After making a few observations of the Moon, generate some questions about the Moon that you might explore:
- With your group members, generate some questions about the Moon that you could explore together during the next few days by looking at the Moon in the sky rather than by reading books or searching the Internet.
- Decide with your group members on the most interesting of these questions.
- Design your exploration. Who will do what? When? Where? How? Why?
- Record on a large white board your question and your design for exploring this question.
- Plan and briefly practice how each member of the group will participate in stating the question and describing your design for exploring this question.
- Share your question and your plans with the whole group.
- At the beginning of each class session, share with your group members the observations you have made and enjoy seeing theirs. Talk with one another about how your findings inform your question and revise the question, the procedures, and/or the findings as needed.
- During and near the end of this observation period, create with your group members some progress reports:
- What tentative claims, if any, can you make now?
- What evidence, if any, can you present to support those claims?
- What rationale explains how the evidence supports those claims?
- What still needs to be explored?
- What have you learned about learning from this exploration so far?
- Complete your summary of your group’s question, observations, and interpretations before reading an example of a group’s initial question and findings about the Moon. Also read nuances about asking questions, making observations, and reporting findings.
1. Examples of a group’s initial questions and findings about the Moon
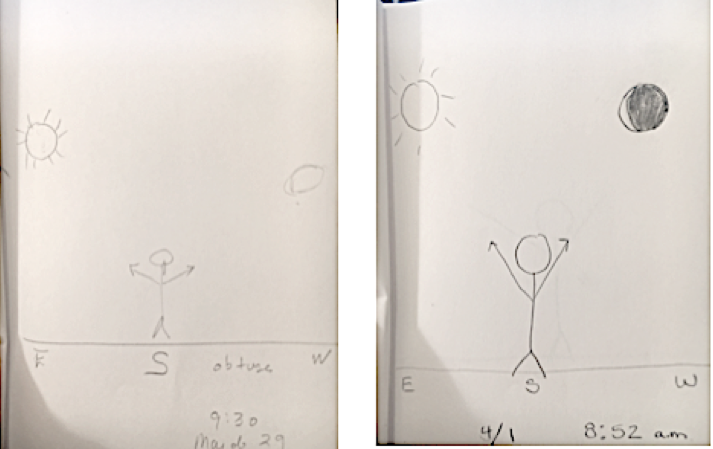
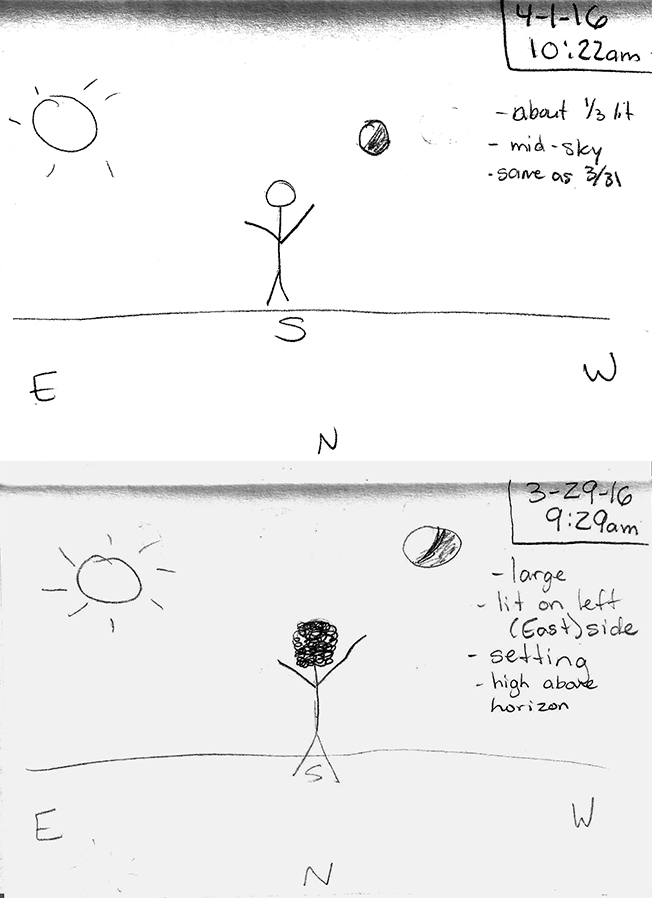
A student reported the following after the first week of looking for the Moon and comparing observations on March 29 at 9:30 am and April 1 at 8:52 am as shown in Fig. 5.14.
An initial question that came to mind when making observations was, does the angle between the sun and the moon change at all?
As we can see from the first few observations…the angle present in the first observation is obtuse while angle measure of the third is more acute. This shows that the angle has gotten smaller since the day of our first observation.
Physic student, Spring 2016
Another student’s sky journal observations were slightly different for the same days as shown in Fig. 5.15.
Physics student, Spring 2016
This student reported the following questions and conclusions from this first week of observing:
When we first saw the moon during class, it was large and was about half-lit on the left, the side the sun was on, and pretty high above the horizon. Some questions I had on that first day were: Will the moon always be lit on the side the sun is closest to? Will the lit part of the moon be bigger or smaller? Will the moon be in a different place tomorrow, next week, and/or next month?
I have already found the answers to some of these initial questions through my observations of the moon, and thus claims about the moon. First, I have found that the moon, when visible, is lit on the side closest to the sun. Therefore, I can make the claim that the moon is lit by the sun. Second, I have found the lit part of the moon does change size, and it appeared to be a little smaller each day. I have yet to find a powerful idea for this observation, as I am unsure of what causes the shaded part of the moon. Is it a shadow from the earth, or just that part of the moon is facing away from the sun? The third question was answered as well, as the moon was in a slightly different location each day, with the angle of my arms getting smaller. This has led me to make the claim that the moon is always moving.
Another physics student, Spring 2016
2. Nuances about asking questions, making observations, and reporting findings
Both students made the same claim verbally that the angle formed by pointing one arm at the Sun and the other arm at the Moon got smaller between March 29 and April 1. The angle shown by the first student for March 29 is clearly obtuse, however, whereas the angle shown by the second student for this date looks like a right angle. The angle shown by the first student for April 1 is clearly acute whereas the angle shown by the second student for this date still looks like a right angle. The sketch of the Moon shown by the first student for March 29 is more than half lit on the left and shows only the lit portion, whereas the second student stated that the moon was “about half lit on the left” and sketched both the lit and the inferred dark portions of the Moon. This student noted on the sky journal that the Moon appeared to be about one third lit for the later observation.
Compared across all members of the class, these early observations typically differ in the angles drawn for the arms, shapes drawn for the lit portion of the Moon, and placement of the sketch of the Moon in the sky as well as questions asked and claims made. It is important for group members to have time in class to compare their sky journal observations, to become aware of differences in both sketching and thinking. By discussing such differences among themselves, the students typically become more accurate and detailed when making their observations.
Students often come up with questions, experimental designs for making observations, and interpretations of findings that need refinement. Note that scientists do this as well; part of doing science is realizing the need to revise what one is asking, to enhance how one is making observations, and/or to reconsider initial interpretations of the data obtained. Therefore, we do not step in to warn about possible problems in making observations nor comment on interpretations that reflect inaccurate initial drawings.
The intent of this open-ended process is for students to experience both overcoming the pitfalls and enjoying the pleasures characteristic of doing science. A plan to make observations at a time when the Moon will not be visible, for example, will delay gathering data about how the Moon appears, but likely will prompt a new question about when the Moon can be seen. A plan to look for the Moon at 6 p.m. seems reasonable, until one has gone out to look and not seen the Moon even though the sky is clear. This may be because the Moon is not yet above the horizon or it may be that the Moon is above the horizon but the lit portion of the Moon is not visible to the viewer. When students report such a finding, we encourage them to be careful in their language, to state they that “did not see the Moon” rather than that “the Moon was not there.”
If students see the Moon but record what they saw later, rather than while looking at the Moon, they may not sketch the shape of the lit portion accurately. We do not comment if we see a sketch of a Moon lit on the right, however, when we know the Moon was lit on the left in the sky; we also do not comment if a sketch of a Moon that is more than half lit looks like a cookie with a bite out of it ![]() instead of like a football
instead of like a football ![]() . Group members likely will question those observations and prompt a commitment to draw what one is seeing while looking at the Moon rather than drawing later while trying to remember what one saw.
. Group members likely will question those observations and prompt a commitment to draw what one is seeing while looking at the Moon rather than drawing later while trying to remember what one saw.
We also initially do not impose vocabulary on observations such as the traditional names for the various phases of the Moon. The descriptive term half-lit Moon is acceptable and delays the issue of why such a Moon is called a Quarter Moon until the students have enough knowledge from watching the Moon to understand the appropriateness of this designation.
Our experience has been that when students look for the Moon consistently and make observations with only their own concerns about whether these are correctly drawn and labeled, their observations gradually become more accurate without needing critique from an instructor. They also often begin to experience the fun of puzzling about what they are seeing, talking with colleagues about their puzzlements, and making predictions about what will happen next.
- Continue looking up at the sky whenever you are outside.
- Whenever you see the Moon, record what you see in your sky journal.
- Make predictions for what happens next:
- When would be a good time to look for the Moon next?
- What shape do you think the lit portion of the Moon will be the next time you see the Moon?
- What type of angle do you think will be formed by pointing at the Sun and the Moon when both are visible? (Acute? Right? Obtuse? Straight?)
Question 5.12 What new question do you and your group members have about the Moon?
- If you have formed new groups, compare observations in your sky journals and listen carefully to the experiences of your new group members as they have been making observations of the Moon.
- Are there any differences in your observations that need resolving?
- Are there any similarities that can be articulated as new claims that need confirming?
- Generate a new question about the Moon with your group members.
The question should be something you can explore by looking at the Moon in the sky rather than by reading books or searching the Internet.
- Design a way to conduct your exploration. Who will do what? When? How? Why?
- Record your question and your experimental design for exploring this question on a large white board.
- Plan and briefly practice how each member of the group will participate in stating the question and describing your design for exploring this question.
- Share your group’s question and experimental design with the rest of the class.
- Refine your group’s question and design in any ways suggested by hearing other groups’ plans if appropriate.
- Continue looking up at the sky whenever you are outside.
- When would be a good time to look for the Moon?
- What shape do you think the lit portion of the Moon will be the next time you see the Moon?
- What type of angle do you think will be formed by pointing at the Sun and the Moon when both are visible? (Acute? Right? Obtuse? Straight?)
- Whenever you see the Moon, record what you see in your sky journal.
- Continue sharing your observations with your group members and discussing how these observations confirm or do not confirm your tentative claims about the Sun and the Moon in answer to your group’s new question. Revise question and design as needed.
- Write a clear summary of your group’s answer so far to your group’s new question.
- Present the question and evidence, identifying the observations by date, time, and description
- State clearly how this evidence supports or does not support the claims made.
- Also if the new evidence is relevant, confirm or disconfirm the claims made earlier about your first group’s question.
- Prepare to share your group’s new question and interpretations with the whole group. Rehearse with each member of your group participating in some way in presenting the question, procedures, observations, and claims based on the observations.
- Make the presentation as a group and invite questions about any aspects of the question, procedures, observations and claims.
Question 5.13 How does the Moon seem to move across the sky during several hours? during several days?
- When you can see the Moon and expect it to be visible for several hours, record the position of the Moon in the sky at least twice separated by one or more hours.
- How does the Moon seem to move across the sky during several hours?
- On a series of days when the sky is likely to be clear, record the position of the Moon in the sky and its shape at the same time during each of several days.
- How does the Moon seem to move across the sky during several days?
- Support each claim with photos of sky journal entries and discussion of the relevant aspects of these entries.
D. Reviewing observations so far, making predictions, and generating questions
Question 5.14 What have you learned about the Moon from your observations so far? What do you think will happen next?
- Look through your observations in your sky journal. Summarize what you have learned about the Moon so far about:
- changes in the shape of the lit portion of the Moon you have seen
- changes in the angle formed by pointing one arm at the Sun and one arm at the Moon
- changes in the location of the Moon in the sky
- changes in times when the Moon is visible
- Predict what you think will happen next.
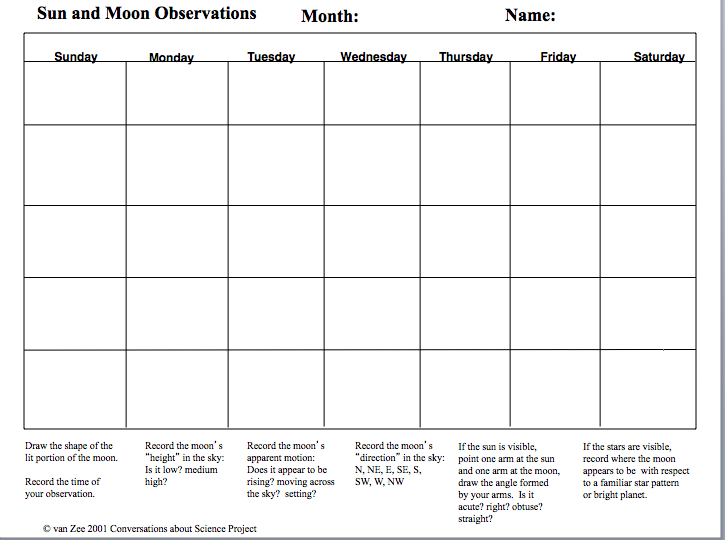
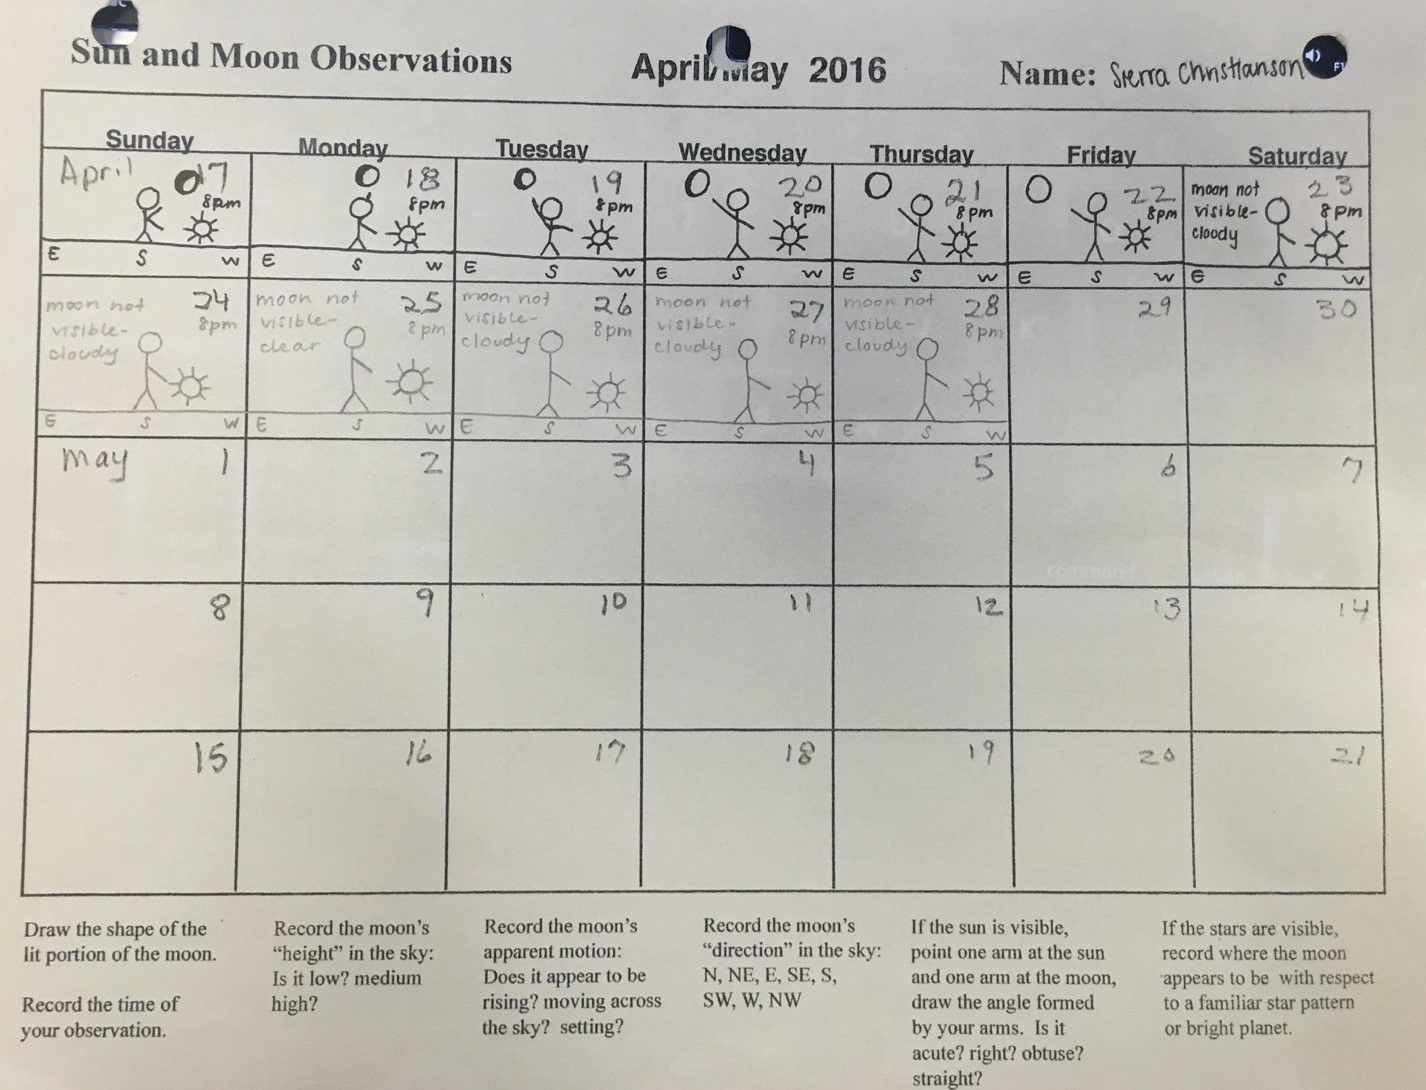
- When your sky journal is full, shift to keeping track of the Sun and the Moon with a regular monthly calendar as shown in Figure 5.16. Fill in the name of the month and number the days.
- As indicated near the bottom of the calendar, for each date that you see the Moon:
- Draw the shape of the lit portion of the moon
- Record the time of your observation, including a.m. or p.m.
- Record the moon’s “height” in the sky: is it low? Medium? High?
- Record the Moon’s apparent motion: does it appear to be rising? Moving across the sky? Setting?
- Record the Moon’s direction in the sky: N, NE, E, SE, S, SW, W, NW
- If the Sun is visible, point one arm at the Sun and one arm at the Moon, draw the angle formed by your arms. Is it acute? Right? Obtuse? Straight?
- Draw the Sun if visible
- If the stars or planets are visible, record where the Moon appears to be with respect to a familiar star pattern or bright planet
- Begin to use the traditional names for the various shapes of the lit portion of the Moon: crescent when less than half lit, quarter when half lit although this nomenclature may be puzzling, gibbous when more than half lit, full when fully lit. Also consider whether the phases are waxing, becoming more lit, or waning, becoming less lit.
- After summarizing your findings so far look at an example of student work and read about nuances in observing the Moon.
1. Example of student work summarizing initial findings about the Sun and the Moon
A student summarized initial findings about the Sun and the Moon as follows:
Continuing to observe the Moon. Figure (5.17) is my next set of observations from my sky calendar.

Stating current question and findings. The question that I am now exploring with my small group members is, how does the appearance of the moon change in regards to how it is lit and shaded? My role in this exploration is looking for and observing the moon every evening at 8 p.m., which is right before sunset. My procedure is to look for the moon wherever I happen to be at 8 p.m., and then record what I see on my sky calendar. I am finding that the lit part on the right side of the moon increased until the moon was full, which can be seen in my observations above. Since April 17, the lit part on the right side of the moon has been gradually increasing until the moon became full, which I observed on April 22.
Confirming or disconfirming earlier findings . One of my previous claims was that the angle between the sun and the moon changes. These new observations support this claim because the angle between the sun and the moon has been increasing. In just these new observations, a right angle is seen on April 17, an obtuse angle is seen on April 18-20, and a straight angle is seen on April 21-22. This shows that the angle between the sun and the moon is changing.
Another previous claim is that the curve of the line separating the bright and the shadowed parts of the moon changes shape. This claim is supported by this next set of observations because the arch of the line is continually changing as the moon becomes more lit, as seen in the observations in Figure (5.17). Another previous claim is that the side of the moon that is lit up changes. This is also supported by my new observations because in previous observations, the lit part was on the left side of the moon, but in these observations, the lit part is on the right side of the moon.
One last previous claim was that there is a period of time when the entire moon is shadowed. These new observations do not support this claim because I had no observation above in which the entire moon was shadowed.
Summarizing patterns in what we have been seeing. I am c omparing four weeks of data.
Summarizing changes in the shape of the Moon so far. At the beginning of the term, the left part of the moon was lit, as seen on March 29. The lit part on the left side of the moon continued to decrease until the entire moon was shaded. Then, I could see the moon again on April 9, when the lit part of the moon was now on the right side. The lit part on the right side of the moon continued to increase until there was a full moon that was seen on April 22. So, it seems as though the moon is partially lit, the lit part decreases until the entire moon is shaded, then the other side of the moon is partially lit, and finally, the lit part increases until the entire moon is lit.
Summarizing changes in the angle formed by pointing one arm at the Sun and one arm at the Moon so far. At the beginning of the term, the angle between the sun and the moon was an acute angle, as seen on March 30. As the term went on, the angle increased. It became a right angle on April 17, an obtuse angle on April 18, and a straight angle on April 21.
Summarizing changes in the location of the Moon in the sky. The moon appears to move only slightly on the same day over several hours. I first looked at 8 p.m., then 9 p.m., then 10 p.m. on April 18. The moon seemed to slowly get higher up in the sky as time went on, but only slightly.
I have observed the moon at 8 p.m. over several days. The moon appears to be moving more and more east in the sky. The observations above from April 17-April 22 show that the moon is gradually moving from the west to the east when observed at 8 p.m. each night.
Summarizing changes in the times when the Moon is visible so far. At the beginning of the term, the moon was visible in the morning. On March 29, I saw the moon at 9:29 a.m. and on March 30, I saw the moon at 7:42 a.m. As the term went on, I could no longer see the moon in the morning, such as when I looked on April 3 at 9:39 a.m. and did not see the moon. I began to look right before sunset and I could see the moon. On April 15, I could see the moon at 8:00 p.m. So, at the beginning of the term, the moon was visible in the morning and now it is visible in the evening and at night.
Making predictions.I predict that the angle between the sun and the moon will become acute again because the angle started as acute, became right, became obtuse, and then became straight. So, I think that the cycle will continue and that the angle formed will be acute again. I think that the moon will be more towards the west in the sky at 8 p.m. The moon moved more and more east in the sky each day at 8 p.m., so I think that it will start to move more west again. I also predict that the right side of the moon will start to become shaded and that the shaded part of the moon will continue to increase, since that is what I saw happen to the shaded part of the moon during the first week of the term.
Physics student, Spring 2016
2. Nuances about observing the Moon
After observing the Moon for several weeks, most of the students begin to notice and comment upon details that puzzle them. Several, for example, likely will have noticed already the intriguing phenomena raised in Question 5.13, of the Moon seeming to move across the sky from east to west during several hours but from west to east during several days. At this point in the exploration, this becomes a whole class rather than small group question, with the emphasis on everyone verifying these observations.
This intent is made explicit, that when something quite surprising arises, it is helpful to have multiple observations of the effect by different groups to be sure that the surprising effect is replicable. Therefore, all students should have observations of their own that the Moon seems to move east to west over several hours but from west to east over several days. In order to understand why this puzzling behavior of the Moon occurs, the students first need to develop central ideas about the Moon based on all the observations they have been gathering, then use these central ideas to develop an explanation. These summaries are tentative interpretations of observations to date. After another set of observations where patterns seem to begin repeating, students will have enough data to make some strong claims about the Sun and the Moon.
E. Identifying patterns based on evidence
Question 5.15 What pattern have you observed in the changing shape of the Moon?
- Compare your observations with your group members’ observations.
- When you group has agreed on the pattern of changes in the shape of the lit portion of the moon, draw the shapes on a large white board in order as they appeared in the sky.Draw the outline of a shape with a black marker; let the white of whiteboard be the filler that represents the lit portion.
- Write the traditional name of each shape underneath. These are called the phases of the Moon. A traditional order is to list them as new (not seen), waxing crescent, 1st quarter, waxing gibbous, full, waning gibbous, 3rd quarter, and waning crescent.
- What is the shape of the lit portion associated with each phase of the Moon?
- What is the pattern of how the shape of the lit portion of the Moon seems to change?
Question 5.16 What pattern have you observed in the angle formed by pointing arms at the Sun and Moon when both are visible?
- Under each phase, draw stick figures with arms forming the kind of angle observed.
(Acute? Right? Obtuse? Straight?)
- What is the pattern of how this angle seems to change?
Question 5.17 How are the changing shape of the Moon and the changing angle related?
- Based on the evidence of your observations, make and support a central idea about the way the shape of the lit portion of the Moon seems to change during its phases.
- Based on the evidence of your observations, make and support a central idea about the way the angle formed by pointing at both the Sun and the Moon seems to change.
- Based on the evidence of your observations, make and support a central idea about the connection between the shape of the lit portion of the Moon and the angle formed by pointing at both the Sun and the Moon.
Question 5.18 What pattern have you observed in the relation of the lit side of the Moon and the location of the Sun?
- Based on the evidence of your observations, make and support a central idea about the relation between the lit side of the Moon and the position of the Sun in the sky.
F. Making predictions for when a phase of the Moon will rise and set
Question 5.19 How can you predict when a phase of the Moon will rise, transit, and set?
It is a lot easier to observe the Moon systematically if one can predict when and where to look for the Moon in the sky.
1. Creating a Sun clock and using it to predict when the Moon will rise, transit, and set
One way to make predictions for rising and setting times for the Moon is to use the angle that the Moon seems to make with the Sun as seen from Earth. To do so, one needs to identify specific positions of the Sun with particular times.
- Create a sun clock as shown in Fig. 5.18 by drawing a circle with a horizontal diameter.
- If observing in the northern hemisphere, label the left end of the diameter East and the right end West.
- Also label the left end of the diameter as “rising position for the Sun”
- Label the top of the circle “transiting position for the Sun”
- Also label the right end of the diameter as “setting position for the Sun”
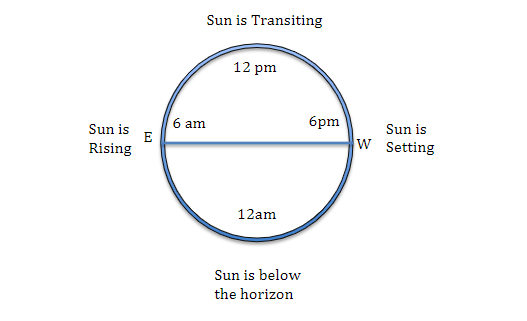
The arc of the circle above the diameter from East (rising position) to top of the circle (transiting position) to West (setting position) represents day, when the Sun is above the horizon. In this model of a sun clock, as shown in Fig. 5.18, we are envisioning the Sun moving along the top half of the circle, rising in the East, moving high across the sky, and setting in the West all in a clockwise direction as seen from the northern hemisphere or counterclockwise as seen from the southern hemisphere.
The arc of the circle below the diameter from West (setting position) to bottom of the circle to East (rising position) represents night, when the Sun is not visible. In this model of a sun clock, we are envisioning the Sun continuing to move along the bottom half of the circle, setting in the west, moving along the bottom of the circle during the night, and rising in the east. We are not claiming that the Sun actually does this, only that we can envision such a model.
- Ignore daylight saving time and assume times appropriate for equinoxes (late March, late September) when the Sun rises at about 6 a.m., is high in the sky (transiting) at about noon, and sets at about 6 p.m. Label the sun clock with these times for the Sun at these positions. Assume the position of the Sun at the bottom of the circle would be at midnight, 12:00 a.m. Also indicate about where the Sun would be at intermediate times, such as 9 a.m., 3 p.m., 9 p.m., and 3 a.m. Note that this sun clock represents a way of envisioning where the Sun seems to be located in the sky (or not in the sky) over a 24-hour period.
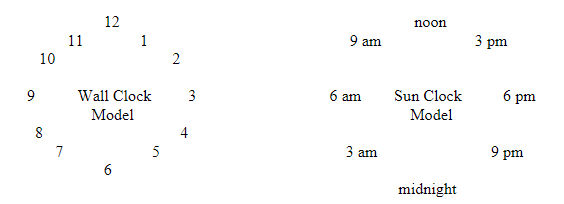
- How is this 24-hour sun clock similar to the traditional 12-hour clock one sometimes sees on walls and watches? How is it different?
- Now use the sun clock to predict rising, transiting, and setting times for each phase of the Moon. Start with a phase for which an easy angle is formed by pointing at the Sun and the Moon. Start, for example, with a First Quarter Moon. When does a first quarter Moon rise? Transit? Set?
- Based on your observations, what angle is formed by your arms when pointing at the Sun and a First Quarter Moon?
- To predict the rising time for a First Quarter Moon, act out with your arms where the Sun and the Moon would be in the sky:
Stand up and orient yourself to face South, if you live in the northern hemisphere (or North if you live in the southern hemisphere). Point an arm to the East toward an imagined rising First Quarter Moon. - Where would the Sun be? Would the Sun be “ahead” of the Moon, already visible in the sky? Or would the Sun be “behind” the Moon, not yet visible? Point your arms toward an imagined Moon and Sun with your arms forming a right angle.
- To use the sun clock, look at what time a Sun would be at the place where you are pointing. This is an estimate of the time when a First Quarter Moon is rising.
- To predict when a First Quarter Moon is high in the sky and easy to see, when it is transiting, point your “Moon” arm up toward an imagined First Quarter Moon and your “Sun” arm toward an imagined Sun with your arms forming a right angle.
- To use the sun clock, look at what time a Sun would be at the place where your “Sun” arm is pointing. What time is the Sun at this position on the sun clock? This is an estimate of the time when a First Quarter Moon is transiting.
- To predict when a First Quarter Moon is setting, point your “Moon” arm toward an imagined First Quarter Moon setting and your “Sun” arm toward an imagined Sun with your arms forming a right angle. To use the sun clock, look at what time a Sun would be at the place where your “Sun” arm is pointing. What time is the Sun at this position on the sun clock? This is an estimate of the time when a First Quarter Moon is setting.
- Summarize when a First Quarter Moon is visible while rising, moving high across the sky, and setting. When is a good time to look for one, to see one high in the sky?
- You now have a tool for predicting when and where to look for the Moon during any phase.
Use this tool to predict rising, transiting, and setting times for all the phases of the Moon: new moon, waxing crescent, first quarter, waxing gibbous, full, waning gibbous, third quarter, and waning crescent. - Organize your predictions in a table such as Table V.1
| TABLE V.1 Summarizing findings about the phases of the Moon | ||||||||
|---|---|---|---|---|---|---|---|---|
| Shape | ||||||||
| Name | New | Waxing crescent | First quarter | Waxing gibbous | Full | Waning gibbous | Third quarter | Waning crescent |
| Stick Figure | ||||||||
| Angle | 0 | 0 <acute<90 | 90 | 90<obtuse<180 | 180 | 180>obtuse>90 or 180<obtuse<270 | 90 or 270 | 90>acute>0 or 270<acute<360 |
| Waxing/ Waning | ||||||||
| Rising | ||||||||
| Transiting (High) | ||||||||
| Setting | ||||||||
- On each stick figure, label which hand is pointing to the Moon, which to the Sun.
- During which phases is the Sun to the East of the Moon? To the West of the Moon?
- During which phases does the Moon seem to chase the Sun across the sky?
- During which phases does the Sun seem to chase the Moon across the sky?
- When are the waxing phases mostly visible? The waning phases?
- State the predictions for each phase:
-
- When can each phase be seen rising, moving high across the sky, and setting?
- Indicate which phases seem to occur over a period of time as the angle sweeps through a range of values.
- Indicate which phases seem to occur just at an instant as the angle seems to have a particular value.
Table V.1 summarizes findings to date and provides detailed information to guide further explorations. Requiring considerable waving of the arms as students generate predictions for rising, transiting, and setting times, this session has been dubbed Moon Dance 1.
Table V.2 summarizes the central ideas about the Sun and the Moon inferred from these observations.
| TABLE V.2 Central Ideas about the Sun and the Moon | |||
|---|---|---|---|
| Sketch of set up | Evidence | Central Ideas | Vocabulary |
| The shape of the lit portion of the Moon that we see from Earth changes in a regular pattern. | |||
| The angle formed by pointing one arm at the Moon and one arm at the Sun changes in a regular pattern related to the changing shape of the lit portion of the Moon that we see. | |||
| The lit side of the Moon is always on the same side as the Sun. | |||
| The angle formed by pointing one arm at the Sun and one arm at the Moon is useful for predicting when and where to look for the Moon. | |||
| The Moon is visible at different times depending upon its phase. | |||
Complete your responses to questions 5.15-5.19 and Tables V.1 and V.2. Then summarize what you have learned before looking at an example of student work estimating rising, transiting, and setting times for a 1st quarter Moon as well as an example summary of central ideas about the Sun and the Moon.
2. Example of student work illustrating how to predict rising, transiting, and setting times for a first quarter Moon.
To be able to determine where the moon will be at specific times, one can develop and utilize a ‘sun clock’. The sun clock is able to ‘tell time’ based on where the sun seems to be in the sky (or below the horizon) over 24 hours. For example, if you were looking for a 1st quarter moon, we know the angle between the sun and the moon is 90 degrees and the moon is lit on the right. Therefore, by putting your right arm towards the sun, 90 degrees behind that is where the moon will be. Therefore, the 1st quarter moon will rise at 12 pm, will be high in the sky at 6 pm, and will be setting at midnight as shown in the figure (5.20).
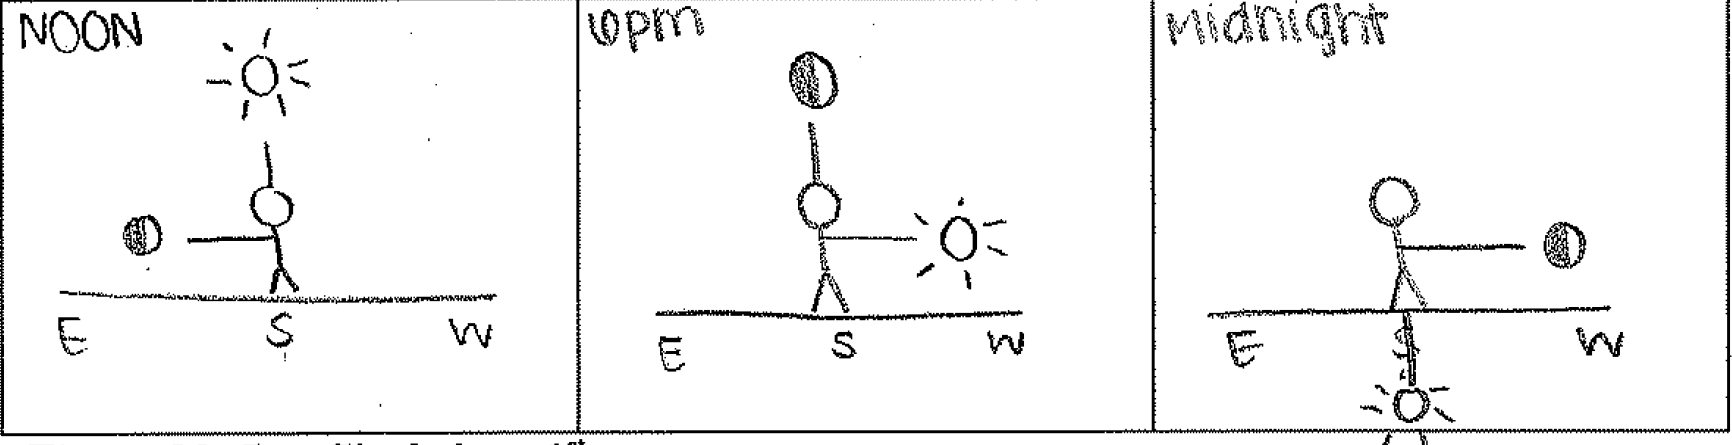
Physics student, Fall 2013
3. Example of student work summarizing central ideas about the Moon
A student summarized central ideas about the Moon as shown below:
Continuing to observe the Moon. Figure (5.21) presents my observations from my sky calendar so far.
During the week of April 17, I looked for the moon at 8pm, which is right before sunset. The lit part of the moon was on the right and it continued to increase until there was a full moon on April 22. The angle between the sun and the moon continued to increase, changing from an obtuse angle into a straight angle. When there was a full moon, the angle between the sun and the moon was a straight angle. Since then, I have not been able to see the moon due to it being cloudy.
Developing Central Ideas Based on Evidence
This section will discuss ideas about the moon, as well as the evidence that supports those ideas. (Figure 5.22) is a chart made in class. Each row of this table presents a different idea. Those ideas will be discussed below.
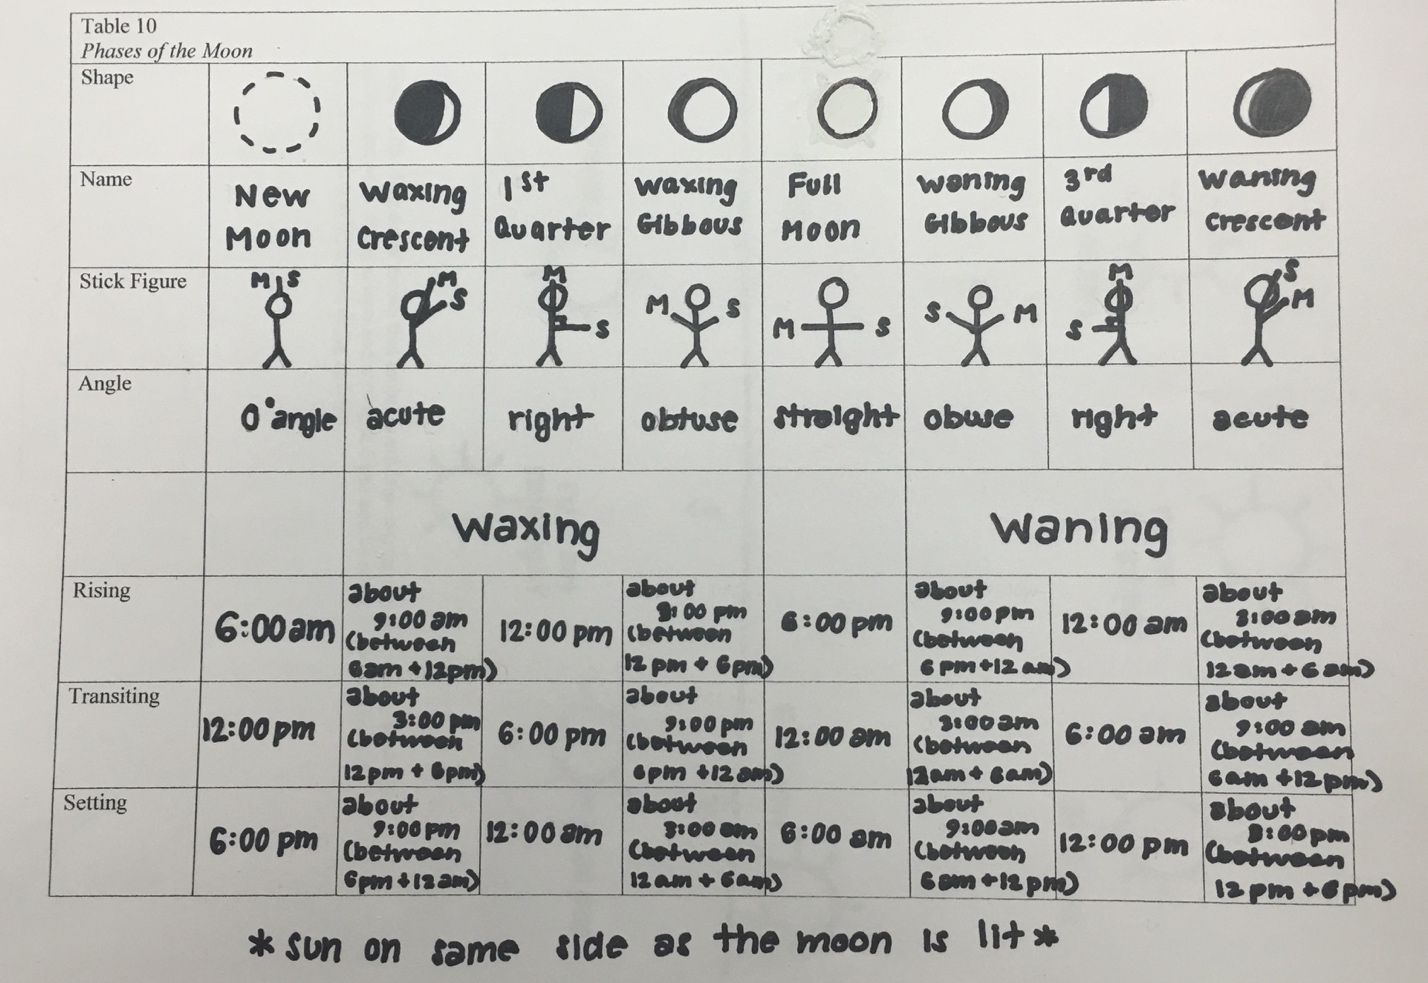
The shape of the lit portion of the Moon that we see from Earth changes in a regular pattern. There are 8 different phases of the moon. In the New Moon phase, the moon is completely shaded, so there is no lit portion of the moon that we see.
In the Waxing Crescent phase, there is a growing small portion, (say about ¼), on the right side of the moon that is lit.
In the First Quarter phase, the right half of the moon is lit.
In the Waxing Gibbous phase, there is a growing big portion, (say about ¾), on the right side of the moon that is lit.
In the Full Moon phase, the entire moon is lit.
In the Waning Gibbous phase, there is a decreasing big portion, (say about ¾), on the left side of the moon that is lit.
In the Third Quarter phase, the left half of the moon is lit.
In the Waning Crescent phase, there is a decreasing small portion, (say about ¼), on the left side of the moon that is lit.
A general description of the pattern observed is that the moon is completely shaded and then the right side of the moon slowly becomes more and more lit until the entire moon is lit. After the entire moon is lit, the right side of the moon slowly becomes more and more shaded until the entire moon is shaded again.
The angle formed by pointing one arm at the Moon and one arm at the Sun changes in a regular pattern related to the changing shape of the lit portion of the Moon that we see. The stick figures in the chart above have one arm pointing at the moon and one arm pointing at the sun. The arms make an appropriate angle for each phase. There is a different figure for each of the phases.
In the New Moon phase, there is a 0° angle between the moon and the sun.
In the Waxing Crescent phase, there is an acute angle between the moon and the sun.
In the First Quarter phase, there is a right angle between the moon and the sun.
In the Waxing Gibbous phase, there is an obtuse angle between the moon and the sun.
In the Full Moon phase, there is a straight angle between the moon and the sun.
In the Waning Gibbous phase, there is an obtuse angle between the sun and the moon.
In the Third Quarter phase, there is a right angle between the sun and the moon.
In the Waning Crescent phase, there is an acute angle between the sun and the moon.
A general description of the pattern observed between this angle and the lit portion of the moon we see is that the greater the lit portion of the moon, the greater the angle between the sun and the moon. The smaller the lit portion of the moon, the smaller the angle between the sun and the moon.
The lit side of the Moon is always on the same side as the Sun. There are several observations that support this claim. On March 29 at 9:30 am, I observed that the sun was on the left side of the moon and the lit part of the moon was on the left.
On April 2 at 9:15 am, I observed that the sun was on the left side of the moon and the lit part of the moon was on the left.
On April 11 at 7:45 am, I observed that the sun was on the right side of the moon and the lit part of the moon was on the right.
On April 19, at 8:00 pm, I observed that the sun was on the right side of the moon and the lit part of the moon was on the right.
A summary of this pattern is that when the sun is on the right side of the moon, the right side of the moon is lit and when the sun is on the left side of the moon, the left side on the moon is lit.
The angle formed by pointing one arm at the Moon and one arm at the Sun is useful for predicting when and where to look for the Moon. Figure (5.23) is a model of a sun clock.
This sun clock can be used to generate predictions for rising, transiting (high in the sky), and setting times for various phases of the moon as shown in Table (V.2). We can use the sun to tell approximately what time it is. The suns above the horizon represent where we see the sun at certain times and the suns below the horizon represent where we can envision the sun being located at certain times. This allows us to use the sun as a 24-hour clock.
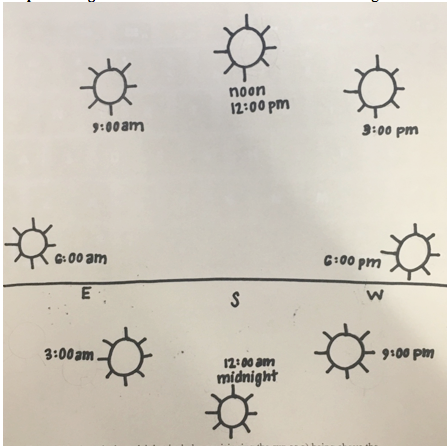
Since the moon rises on the East side of the horizon, in the same position of the sun at 6 am on the sun clock, we can use the angle between the sun and the moon to predict about the time that the moon rises. For example, during a First Quarter phase, there is a right angle between the sun and the moon, with the sun on the right side of the moon. So, looking at the sun clock, you look at what time the sun makes a right angle with the 6 am time, with the sun on the right side of the moon. The sun makes a right angle with the 6 am time at the 12 pm time, so during a First Quarter phase, the moon rises at 12 pm.
During a Waning Crescent phase, there is an acute angle between the sun and the moon, with the sun on the left side of the moon. So, looking at the sun clock, you look at what time the sun makes an acute angle with the 6 am time, with the sun on the left side of the moon. The sun makes an acute angle with the 6 am time at about 3am, so during a Waning Crescent phase, the moon rises at about 3 am, or sometime between 12 am and 6 am.
Since the moon transits high in the sky, in the same position of the sun at 12 pm on the sun clock, we can use the angle between the sun and the moon to predict about the time that the moon transits. For example, during a Full Moon, there is a straight angle between the sun and the moon, with the sun on the right side of the moon. So, looking at the sun clock, you look at what time the sun makes a straight angle with the 12 pm time, with the sun on the right side of the moon. The sun makes a straight angle with the 12 pm time at the 12 am time, so during a Full Moon, the moon transits at 12 am.
During a Waning Gibbous moon, there is an obtuse angle between the sun and the moon, with the sun on the left side of the moon. So, looking at the sun clock, you look at what time the sun makes an obtuse angle with the 12 pm time, with the sun on the left side of the moon. The sun makes an obtuse angle with the 12 pm time at about 3 am, so during a Waning Gibbous moon, the moon transits at about 3 am, or between 12 am and 6 am.
Since the moon sets on the West side of the horizon, in the same position of the sun at 6 pm on the sun clock, we can use the angle between the sun and the moon to predict about the time that the moon sets. For example, during a Waning Crescent phase, there is an acute angle between the sun and the moon, with the sun on the left side of the moon. So, looking at the sun clock, you look at what time the sun makes an acute angle with the 6 pm time, with the sun on the left side of where the moon is. The sun makes an acute angle with the 6 pm time at about the 3 pm time, so during a Waning Crescent phase, the moon sets at about 3 pm, or between 12 pm and 6 pm.
During a New Moon phase, there is a 0° angle between the sun and the moon. So, looking at the sun clock, the moon and the sun will be in the same location in the sky. This means that during a New Moon phase, the new moon sets at 6 pm.
The Moon is visible at different times, depending on its phase. Waxing moons are mostly visible during the day and some of the night, from about 9:00 am to 3:00 am, depending on whether it is a Waxing Crescent or a Waxing Gibbous moon. Full moons are mostly visible from the evening to the early morning, from about 6:00 pm to 6:00 am.
Waning moons are mostly visible during the night and morning, from about 9:00 pm to 3:00 pm, depending on whether it is a Waning Gibbous or a Waning Crescent moon. Based on my observations, there was a Third Quarter moon on March 31 at 9:32 am. There was a New Moon from April 5 until around April 8, at least the Moon was not visible although the sky was clear. There was a First Quarter moon on April 15 at 8 pm. There was a Full Moon on April 22 at 8 pm. It has been too cloudy for me to see the moon recently, but I predict that there was a Third Quarter moon recently in the past day or two. Through my observations, I learned that a full cycle takes about a month. Next, I predict that the shaded part of the moon will continue to increase until there is a new moon.
My observations can support the claims mentioned in (Fig. 5.22). I observed a new moon around April 7 when I looked for the moon in the morning and in the night and it was not visible, even though the sky was clear.
I observed a Waxing Crescent moon on April 11 at 7:45 pm and the angle between the sun and the moon was acute.
I observed a First Quarter moon on April 15 at 8:00 pm and the angle between the sun and the moon was right.
I observed a Waxing Gibbous moon on April 18 at 8:00 pm and the angle between the sun and the moon was obtuse.
I observed a full moon on April 22 at 8:00 pm and the angle between the sun and the moon was straight.
I observed a Third Quarter moon on March 31 at 9:32 am and the angle between the sun and the moon was right.
I observed a Waning Crescent moon on April 2 at 9:15 am and the angle between the sun and the moon was acute.
I have not yet observed a Waning Gibbous moon. According to my observations, there should have been one recently, but it has been cloudy the past week, which made it so I couldn’t see the moon. I should try to observe the Waning Gibbous moon a few days after the next full moon, between around9:00 pm and 9:00 am.
Physics student, Spring 2016
Also consider the durations of the various phases of the Moon, their connections to the format of calendars, and ways in which this process of developing ideas about the phases of the Moon, based on evidence, has modeled the nature of science.
Question 5.20 What is the duration of each phase of the Moon?
- There are eight phases of the Moon. Do the phases occur at a particular instant or over a period of time?
- New: an instant, when angle = 0 degrees
- Waxing crescent: during an increasing acute angle between 0º and 90º, about a week
- First quarter, an instant, when angle = 90 degrees
- Waxing gibbous, during an increasing obtuse angle between 90º and 180º, about a week
- Full, an instant, when angle = 180 degrees
- Waning gibbous, during a decreasing obtuse angle between 180º and 90º (or increasing between 180º and 270º), about a week
- Third quarter, an instant, when angle = 90º (or 270º).
- Waning crescent, during a decreasing acute angle (or increasing between 270º and 360º), about a week
- The phases begin to repeat in about 29.5 days. Why do we have “weeks” in our calendar? “months”? (See https://www.timeanddate.com/calendar/days/7-days-week.html )
Question 5.21 What aspects of the nature of science have students experienced so far?
Table V.1 summarizes observations and interpretations based on a full cycle of the Moon’s phases. The students generated and explored their own questions as well as issues guided by the instructor and course curriculum. The process was incremental, with on-going daily observations, brief discussions during many class sessions, homework assignments to report new data and interpretations, and a culminating session in which small groups developed central ideas about the Sun and the Moon based on the accumulated evidence. The students then used a model of the relation between the Sun and the Moon as seen from Earth to make predictions for rising, transiting, and setting times for each phase of the Moon.
This was a long process, at least five weeks with considerable time and effort. Was it worth it? There are computer programs that students can use to simulate the entire sequence of the Moon’s changing phases within a much shorter time period by gathering data from the computer rather than from the sky. From our perspective, when weather permits, engaging students in actually looking for the Moon in the sky over this extended time period is preferable. This process models the nature of science in sharpening skills in recording observations accurately, generating questions of interest based on these observations, looking for patterns in the data, discussing various interpretations, and using those to make predictions of when and where to see the moon to maximize the likelihood of observing the phenomena being studied.
The central ideas about the Sun and the Moon, based on observational evidence, provide the basis for the next step: developing explanatory models for three interconnected phenomena: day and night, the phases of the moon, and the Earth’s seasons. This extended experience throughout the term is intended to foster deeper understandings of the Sun/Earth/Moon system as well as of the nature of science and perhaps a greater sense of satisfaction whenever the students see the Moon throughout their lives.