5.5: V. Using Central Ideas to Develop an Explanatory Model for the Phases of the Moon
- Page ID
- 15146
\( \newcommand{\vecs}[1]{\overset { \scriptstyle \rightharpoonup} {\mathbf{#1}} } \)
\( \newcommand{\vecd}[1]{\overset{-\!-\!\rightharpoonup}{\vphantom{a}\smash {#1}}} \)
\( \newcommand{\id}{\mathrm{id}}\) \( \newcommand{\Span}{\mathrm{span}}\)
( \newcommand{\kernel}{\mathrm{null}\,}\) \( \newcommand{\range}{\mathrm{range}\,}\)
\( \newcommand{\RealPart}{\mathrm{Re}}\) \( \newcommand{\ImaginaryPart}{\mathrm{Im}}\)
\( \newcommand{\Argument}{\mathrm{Arg}}\) \( \newcommand{\norm}[1]{\| #1 \|}\)
\( \newcommand{\inner}[2]{\langle #1, #2 \rangle}\)
\( \newcommand{\Span}{\mathrm{span}}\)
\( \newcommand{\id}{\mathrm{id}}\)
\( \newcommand{\Span}{\mathrm{span}}\)
\( \newcommand{\kernel}{\mathrm{null}\,}\)
\( \newcommand{\range}{\mathrm{range}\,}\)
\( \newcommand{\RealPart}{\mathrm{Re}}\)
\( \newcommand{\ImaginaryPart}{\mathrm{Im}}\)
\( \newcommand{\Argument}{\mathrm{Arg}}\)
\( \newcommand{\norm}[1]{\| #1 \|}\)
\( \newcommand{\inner}[2]{\langle #1, #2 \rangle}\)
\( \newcommand{\Span}{\mathrm{span}}\) \( \newcommand{\AA}{\unicode[.8,0]{x212B}}\)
\( \newcommand{\vectorA}[1]{\vec{#1}} % arrow\)
\( \newcommand{\vectorAt}[1]{\vec{\text{#1}}} % arrow\)
\( \newcommand{\vectorB}[1]{\overset { \scriptstyle \rightharpoonup} {\mathbf{#1}} } \)
\( \newcommand{\vectorC}[1]{\textbf{#1}} \)
\( \newcommand{\vectorD}[1]{\overrightarrow{#1}} \)
\( \newcommand{\vectorDt}[1]{\overrightarrow{\text{#1}}} \)
\( \newcommand{\vectE}[1]{\overset{-\!-\!\rightharpoonup}{\vphantom{a}\smash{\mathbf {#1}}}} \)
\( \newcommand{\vecs}[1]{\overset { \scriptstyle \rightharpoonup} {\mathbf{#1}} } \)
\( \newcommand{\vecd}[1]{\overset{-\!-\!\rightharpoonup}{\vphantom{a}\smash {#1}}} \)
\(\newcommand{\avec}{\mathbf a}\) \(\newcommand{\bvec}{\mathbf b}\) \(\newcommand{\cvec}{\mathbf c}\) \(\newcommand{\dvec}{\mathbf d}\) \(\newcommand{\dtil}{\widetilde{\mathbf d}}\) \(\newcommand{\evec}{\mathbf e}\) \(\newcommand{\fvec}{\mathbf f}\) \(\newcommand{\nvec}{\mathbf n}\) \(\newcommand{\pvec}{\mathbf p}\) \(\newcommand{\qvec}{\mathbf q}\) \(\newcommand{\svec}{\mathbf s}\) \(\newcommand{\tvec}{\mathbf t}\) \(\newcommand{\uvec}{\mathbf u}\) \(\newcommand{\vvec}{\mathbf v}\) \(\newcommand{\wvec}{\mathbf w}\) \(\newcommand{\xvec}{\mathbf x}\) \(\newcommand{\yvec}{\mathbf y}\) \(\newcommand{\zvec}{\mathbf z}\) \(\newcommand{\rvec}{\mathbf r}\) \(\newcommand{\mvec}{\mathbf m}\) \(\newcommand{\zerovec}{\mathbf 0}\) \(\newcommand{\onevec}{\mathbf 1}\) \(\newcommand{\real}{\mathbb R}\) \(\newcommand{\twovec}[2]{\left[\begin{array}{r}#1 \\ #2 \end{array}\right]}\) \(\newcommand{\ctwovec}[2]{\left[\begin{array}{c}#1 \\ #2 \end{array}\right]}\) \(\newcommand{\threevec}[3]{\left[\begin{array}{r}#1 \\ #2 \\ #3 \end{array}\right]}\) \(\newcommand{\cthreevec}[3]{\left[\begin{array}{c}#1 \\ #2 \\ #3 \end{array}\right]}\) \(\newcommand{\fourvec}[4]{\left[\begin{array}{r}#1 \\ #2 \\ #3 \\ #4 \end{array}\right]}\) \(\newcommand{\cfourvec}[4]{\left[\begin{array}{c}#1 \\ #2 \\ #3 \\ #4 \end{array}\right]}\) \(\newcommand{\fivevec}[5]{\left[\begin{array}{r}#1 \\ #2 \\ #3 \\ #4 \\ #5 \\ \end{array}\right]}\) \(\newcommand{\cfivevec}[5]{\left[\begin{array}{c}#1 \\ #2 \\ #3 \\ #4 \\ #5 \\ \end{array}\right]}\) \(\newcommand{\mattwo}[4]{\left[\begin{array}{rr}#1 \amp #2 \\ #3 \amp #4 \\ \end{array}\right]}\) \(\newcommand{\laspan}[1]{\text{Span}\{#1\}}\) \(\newcommand{\bcal}{\cal B}\) \(\newcommand{\ccal}{\cal C}\) \(\newcommand{\scal}{\cal S}\) \(\newcommand{\wcal}{\cal W}\) \(\newcommand{\ecal}{\cal E}\) \(\newcommand{\coords}[2]{\left\{#1\right\}_{#2}}\) \(\newcommand{\gray}[1]{\color{gray}{#1}}\) \(\newcommand{\lgray}[1]{\color{lightgray}{#1}}\) \(\newcommand{\rank}{\operatorname{rank}}\) \(\newcommand{\row}{\text{Row}}\) \(\newcommand{\col}{\text{Col}}\) \(\renewcommand{\row}{\text{Row}}\) \(\newcommand{\nul}{\text{Nul}}\) \(\newcommand{\var}{\text{Var}}\) \(\newcommand{\corr}{\text{corr}}\) \(\newcommand{\len}[1]{\left|#1\right|}\) \(\newcommand{\bbar}{\overline{\bvec}}\) \(\newcommand{\bhat}{\widehat{\bvec}}\) \(\newcommand{\bperp}{\bvec^\perp}\) \(\newcommand{\xhat}{\widehat{\xvec}}\) \(\newcommand{\vhat}{\widehat{\vvec}}\) \(\newcommand{\uhat}{\widehat{\uvec}}\) \(\newcommand{\what}{\widehat{\wvec}}\) \(\newcommand{\Sighat}{\widehat{\Sigma}}\) \(\newcommand{\lt}{<}\) \(\newcommand{\gt}{>}\) \(\newcommand{\amp}{&}\) \(\definecolor{fillinmathshade}{gray}{0.9}\)42
V. Using Central Ideas to Develop an Explanatory Model for the Phases of the Moon
Emily van Zee and Elizabeth Gire
As noted in II.B.4, Joseph’s Moon, even very young children are aware of the Moon and able to communicate what they are observing. That the Moon often is visible during the day is a surprise to many adults. After starting to notice the Moon during the day, many also become puzzled that the Moon sometimes seems to chase the Sun across the sky but sometimes the Sun seems to chase the Moon. Also intriguing after more systematic observation is the paradox that the Moon seems to move like the Sun, from east to west over several hours, but in the opposite direction, from west to east, over several days.
These are examples of the increasing complexity typical of scientific endeavors, in which more detailed observations prompt deeper pondering and questioning. This section explains these observations in the context of developing an explanatory model for the Moon’s changing phases. We then consider how the Moon appears to us here on Earth compared to how the Moon would appear if we could look down upon the Moon, Earth, and Sun from above the solar system. The section also discusses the causes of solar and lunar eclipses and concludes with exploring Internet resources about the Moon to share with a friend or family member.
Question 5.23 Why does the Moon seem to have different shapes at different times?
This section begins with a review of relevant central ideas, next presents a report on a child’s insights about the Sun and the Moon, and then proceeds with developing an explanation for the Moon’s changing phases as seen from here on Earth.
A. Reviewing central ideas about the relationship between the Sun and the Moon
What central ideas developed so far describe the relationship between the Sun and the Moon?
- The Sun is always on the same side as the lit side of the Moon.
- The shape of the lit portion of the Moon that we see from Earth changes in a regular pattern:
Where we live in the northern hemisphere, the shape of the lit portion of the Moon grows from a crescent lit on the right (waxing crescent), to half lit on the right (first quarter), to more than half lit on the right (waxing gibbous), to fully lit; then decreases to more than half lit on the left (waning gibbous), half lit on the left (third quarter), to a crescent lit on the left (waning crescent), to no moon visible (new moon). In the southern hemisphere, the shape of the lit portion of the Moon changes in a similar pattern but from lit on the left (waxing phases) to lit on the right (waning phases).
- The angle formed by pointing one arm at the Moon and one arm at the Sun changes in a regular pattern related to the changing shape of the lit portion of the Moon that we see:
As the lit side of the Moon seems to get bigger, the angle gets bigger until the Moon is fully lit and the angle is a straight angle; as the lit side of the Moon seems to get smaller until not visible, the angle gets smaller until the angle is zero.
B. Building upon a child’s insights about the phases of the Moon
Andy diSessa (1986) described an experience that he had one day as a child. He was tossing a ball up and catching it when he happened to notice both the moon and the ball as he looked up in the sky. When he tossed the ball straight up so that it was high enough to seem to be near the moon, he suddenly realized, “I was seeing the phase of my little tennis ball/moon and that it was the same as the phase of the real moon!” If feasible, we try to schedule modeling the phases of the moon on a sunny day when students can replicate this experience by seeing the lighted side of a ball next to the moon they are seeing in the sky. (We provide balls on sticks that the students hold in their hands rather than tossing their balls.)
diSessa, A. (1986). “Artificial worlds and real experience.” Instructional Science, 14, 207-227. (p. 213).
C. Developing an explanatory model for the phases of the Moon
As a first step in explaining the changing phases of the Moon, consider the following:
- What is the source of the light that shines on the Earth from the Moon?
- What phase is the Moon in today?
- What do you expect to see in the next few days?
- If outside, DO NOT LOOK DIRECTLY AT THE SUN!
If inside, stand well away from a lamp without a shade in a dark room. - How can you hold up your ball so that the lit portion of the ball looks like the current lit portion of the Moon in the sky?
- How can you move your ball to see on the ball here on Earth all of the phases of the Moon that you have been observing in the sky?
- For example, hold the ball up so that the Sun (or the lamp) is shining on the ball to light the ball as a waxing crescent ball.
What is the angle formed by pointing one arm at the Sun (or lamp) and the other arm holding out the ball? - What phase will the Moon have next?
- How can you move the ball to match a first quarter Moon?
What is the angle for arms pointing at the Sun and first quarter Moon? - How can you move the ball to match a waxing gibbous Moon?
What is the angle for arms pointing at the Sun and a waxing gibbous Moon? - How can you move the ball to match a full Moon?
What is the angle for arms pointing at the Sun and a full Moon?
To avoid a lunar eclipse hold the ball a little above your shadow. - How can you move the ball to get it to look like a waning gibbous Moon?
What is the angle for arms pointing at the Sun and a waning gibbous Moon? - How can you move the ball to get it to look like a third quarter Moon?
What is the angle for arms pointing at the Sun and a third quarter Moon? - How can you move the ball to get it to look like a waning crescent Moon?
What is the angle for arms pointing at the Sun and a waning crescent Moon? - How can you move the ball to get it to “look” like a new Moon?
What is the angle for arms pointing at the Sun and a new Moon?
To avoid a solar eclipse hold the ball a little above your view of the lamp.
- For example, hold the ball up so that the Sun (or the lamp) is shining on the ball to light the ball as a waxing crescent ball.
- How have you moved the ball to replicate seeing on the ball the same pattern of changing phases here on Earth that you have observed on the Moon in the sky?
- What can you infer is the cause of the changing phases of the Moon?
- Make a series of sketches that illustrate how you used the Sun (or a lamp without a shade as a model of the Sun), a ball on a stick, and yourself to model the phases of the Moon.
This explanatory model for the phases of the Moon can be summarized as:
The phases of the Moon are caused by the Moon revolving around the Earth.
- Take the perspective of looking down on this Sun/Earth/Moon system from above:
- Model this in a dark room lit by a lamp with no shade.
- Hold one hand out in front of your body, thumb up, so you are looking down on the thumb from above. Let the thumb represent the Earth.
- Hold a ball in the other hand to represent the Moon. Move the ball around your thumb while looking down on both.
- For each phase, look at the side of the ball that is facing toward the lamp. How is it lit?
- For each phase, look at the side of the ball that is facing away from the lamp. How is it lit?
- What does this imply about the shaded side of a phase of the Moon as seen from Earth?
Complete entries in Table V.4. Then write a summary of what you have learned before reading an example of student work about developing an explanatory model for the phases of the Moon.
| TABLE V.4 Developing an Explanatory Model for the Phases of the Moon | |||
|---|---|---|---|
| Sketch of set up | Evidence | Central Ideas | Relevant Vocabulary |
| Light from the Sun is reflected from the Moon toward the Earth | |||
| https://starchild.gsfc.nasa.gov/docs/ StarChild/questions/phases.html |
The phases of the Moon are caused by the Moon revolving counterclockwise around the Earth about once a month as seen from our location in the northern hemisphere. | ||
| The side of the Moon facing the Sun is always fully lit. | |||
| The shaded side of a phase of the Moon is the shadow of the Moon on itself. It is not the shadow of the Earth. | |||
1. Examples of student work developing an explanatory model of the phases of the Moon
The Sun is the source of light from the Moon on the Earth. Through our knowledge that the Moon does not appear to be fully lit, based on our observations, we can infer that this light is not coming from the Moon but from another source.
We can also surmise that from these observations we see the lit portion of the Moon to be always on the same side as the Sun, so the Moon’s light is coming from the Sun.
We infer that light rays from the Sun are bouncing off the Moon in all directions from the surface of the Moon that is facing the Sun; some of these light rays travel in the direction of Earth when some of the lit part of the Moon’s surface is facing Earth.
The phases of the Moon are caused by the Moon revolving counter-clockwise around the Earth about once a month as seen from our location. Going to the roof of a building you can create a replication of what happens with the Earth, Sun and Moon. The Sun was the Sun and I was me standing on Earth and I used a physical model of the Moon (a ball) to represent the Moon.
By holding the ball directly in front of the sun, in front of my face, this represented new moon. (The ball blocked the light of the Sun from my eyes.)
By moving the ball to the left at an acute angle from the sun we were able to see the depiction of the waxing crescent moon on the ball.
We did this at each stage as we simulated a revolution of the ball around the “earth” to see all the phases of the moon until the ball was in front of us and the sun, creating a new moon once again.
This could also be done in a darkened room with a light from a lamp representing the Sun, but if you are doing this method you have to remember to back up across the room to get the right effect on the ball.
From these activities here on Earth we can infer that we see the changing phases of the Moon in the sky because the Moon is REVOLVING around the Earth.
Physics student, Fall 2014
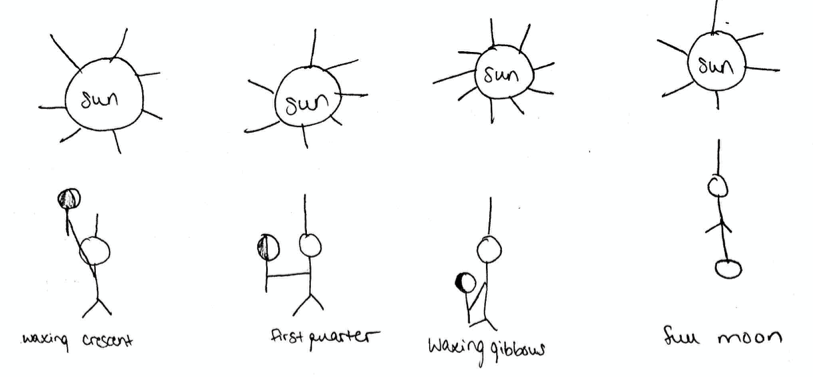
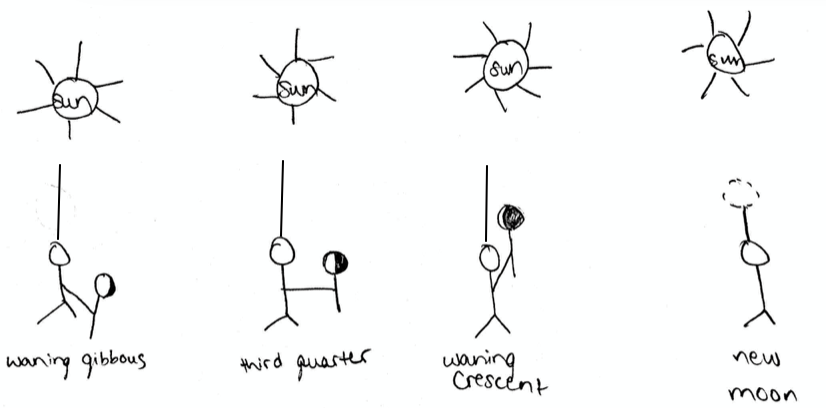
Another student included a set of diagrams that showed the Sun as well as a student holding a ball on a stick in such a way as to show the lit portion on the ball for each phase of the ball. The angles formed by pointing toward the Sun (in the sky or toward a lamp in a dark room) and holding out the ball were the same as observed in the sky for the phases when pointing one arm at the Sun and the other arm at the Moon.
As shown in Fig. 5.29, the student was able to create on the ball the phases seen as waxing crescent, first quarter, waxing gibbous, and full Moon in the sky.
As shown in Fig. 5.30, the student also was able to create on the ball the phases seen as waning gibbous, third quarter, waning crescent, and new Moon in the sky.
Physics student, Fall 2016
Figures 5.29 and 5.30 suggest why this process has been dubbed Moon Dance 2.
To model the phases of the Moon as seen from above the solar system, the students held out their thumbs and looked down as they moved their balls around their thumbs. This showed clearly that in all positions the side of the ball facing toward the lamp was always fully lit and that the side of the ball facing away from the lamp was always dark. A student reflected upon the experience of looking down on the ball as it revolved around the thumb as follows:
The side of the Moon facing the Sun is always fully lit. In class students were given a ball on a stick. This ball was small, approximately the size of a ping pong ball. Students were asked to picture their thumb as the earth, and to revolve the “moon” around our “earth”. While doing this a lamp was placed on one side of the room and turned on to represent the sun. As students revolved their moon around their earth they were able to see that in fact there is always half of the moon being lit, the portion that is pointing towards the sun. However, due to the position of the moon in reference to the earth we cannot always see this full lit portion.
The dark side of the moon is the shadow of the Moon on itself . Students learned in one of our early lessons that there are two types of shadows, there is a shadow cast by an object blocking light from traveling on its intended path, and there is a shadow formed on the back of the object that is blocking the light. The dark side of the moon is actually the shadow formed on the back of the object blocking the light, the moon.
Physics student, Fall 2015
When asked why the moon seems to have different shapes at different times, many people attribute the shaded side of a phase of the Moon to the shadow of the Earth. This may be because they associate shadows with situations in which light from a source is blocked by a barrier. In this case, however, the barrier is the Moon itself. This is similar to the shadow on the back side of a barrier placed between a lamp and a screen, as in Question 1.6 and Fig. 1.8 in Unit 1.
D. Explaining a paradox based on detailed observations of the Moon
- Discuss a paradox that has emerged from detailed observations of the Sun and Moon
- Present observations that indicate that the Moon seems to move from east to west during several hours.
- Also present observations that indicate that the Moon seems to move from west to east during several days.
- Explain this paradox using the explanatory models developed for day and night and for the phases of the Moon.
- What does this explanation imply about the status of the two models for day and night?
Complete entries in Table V.5. Then write a summary of what you have learned before reading an example of student work about developing an explanation of the paradox that the Moon seems to move from east to west during several hours but west to east during several days.
| TABLE V.5 Explaining a Paradox Based on Detailed Observations of the Moon | |||
|---|---|---|---|
| Sketch of set up | Evidence | Central Ideas | Relevant Vocabulary |
| The Moon seems to move east to west during several hours because the viewer on the surface of the Earth is moving, spinning by the Moon as the Earth rotates daily on its axis. | |||
| The Moon seems to move west to east during several days because the Moon actually IS moving as it revolves counterclockwise around the Earth as seen from our location in the northern hemisphere. | |||
1. Example of student work resolving the paradox about the apparent movements of the Moon
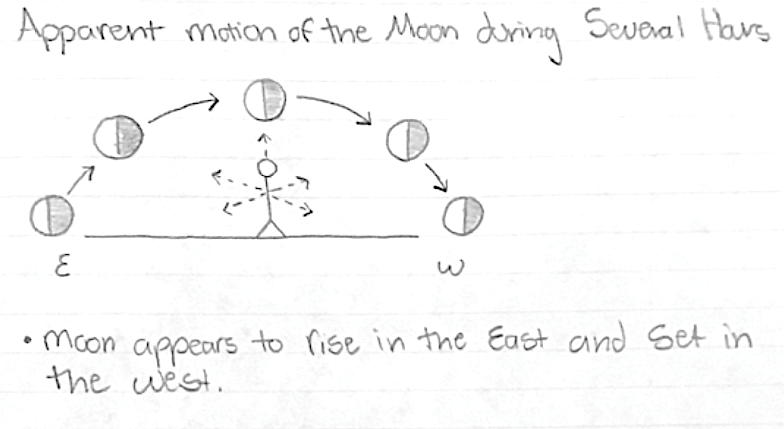
In figure (5.31) below, we were drawing a model for our observations of the sky over several hours. When we watch the sun and moon over several hours, the sun seems to rise in the east, move across the sky in an arc shape, and then set in the west. The moon seems to do the same by rising in the east, transitioning across the sky in an arc and setting in the west. This model makes it appear as if, for day and night, the planet Earth is stationary and the sun and moon are revolving around the earth each 24 hours. This model is easy for one to wrap the brain around, as it is what we initially observe, and it is in the language we learned to describe what we see, the sun rises, the sun sets. This model is challenged, however, by the second model, figure (5.32).
In figure (5.32), we were drawing a model for if one was to watch the sky over several days, observing at the same time each day. In this model, the moon seemed to move from west to east, contrary to the first model. If someone were to look at the moon over many days at 6 pm, where we live they would see a waxing crescent moon low in the southwestern sky, then a first quarter moon high in the southern sky, followed by a waxing gibbous moon midway up in the southeastern sky, and finally a full moon rising in the east. This model makes it seem as if the moon is revolving around the earth from west to east over about two weeks.
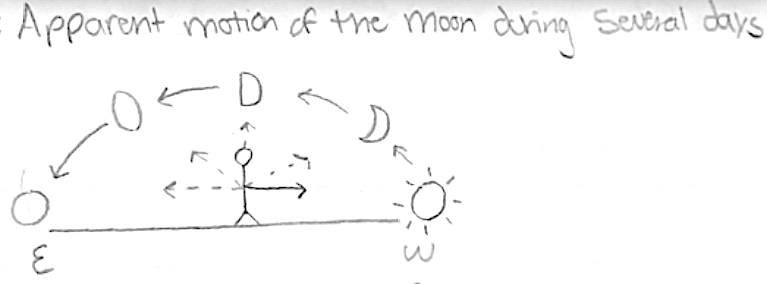
These two models pose a paradoxical situation where the moon both seems to be moving across the sky from east to west, and west to east. How can this be? Well it is important to understand that, although we can more easily accept the stationary Earth model in figure (5.31), that model does not make it the best. In order to explain this paradox, we need to be able to accept (the following).
The sun is still and it is the earth that is moving by rotating on its axis. If we remain in the same location on the earth as it first rotates by the sun, the sun seems to rise in the east. As (our location on) the earth rotates directly by the sun, the sun seems to be moving high across the sky, around noon. Finally, as (our location on) the earth spins all the way past the sun, the sun seems to set, and the daylight ends. When our location on Earth rotates away from the sun, it becomes night.
The same happens with the moon. The earth’s first rotation by the moon shows the moon appearing to rise. As (our location on) the earth spins directly by the moon, the moon seems to be transitioning across the sky in an arc. As (our location on) the earth finally spins all the way past the moon, the moon seems to be setting. This model is a way to defend the apparent daily east to west motion of both the sun and moon due to the earth’s daily rotation on its axis.
In class, we used ping pong balls on a stick to represent the moon and a lamp to represent the sun…With the ball on the stick physical model representing the moon we replicated the changing phases of the moon. By moving the ball in an orbit around our heads, we could see the waxing crescent ball, first quarter ball, waxing gibbous ball, full ball, waning gibbous ball, third quarter ball, waning crescent ball, and new ball.
From these models, we can infer that the moon is moving from west to east over about two weeks, caused by the moon revolving around the earth. We also could see that the fixed sun, rotating earth model was the truer model. The apparent east to west movement during the day is only due to the earth spinning on its axis. That is how we have explained this paradoxical situation.
Physics student, Fall 2016
Note the difference in meaning between the two words describing the motions involved here:
REVOLVE: one object moves around another; the Moon REVOLVES around Earth roughly once a month (29.5 days)
ROTATE: spinning on an axis; the Earth ROTATES once daily
2. Acting out the explanation of this paradox
Playing the roles of an observer on Earth, of the Moon, and of the Sun in the paradox can help build understandings of what the paradox is and how it can be explained:
- Where should the “Moon” person stand with respect to the “Sun” person and the “Earth” person in order to model the current phase of the Moon?
- For a first quarter Moon, for example, the “Moon” person should stand so that the “Earth” person can form a right angle by pointing arms at the “Sun” person holding the flashlight and at the “Moon” person holding the ball. As shown in Fig. 5.3, this could model a rising first quarter Moon .
-
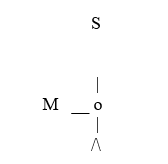
FIG. 5.33 Modeling a rising first quarter Moon as seen when the transiting Sun is high in the southern sky at our location in the northern hemisphere. - These positions model an observer at our location who is looking at a rising first quarter Moon and pointing arms at the Sun and the Moon, where the arms form a right angle. What time is it when the first quarter Moon is in the rising position?
- How can you model the apparent east to west daily motion of the Moon? There are two models:
- One model is the Fixed Earth, Revolving Sun model. What would the “Earth Person” do to act out this model? What would the “Sun” person do? What would the “Moon” person do?
- The “Earth” person would just stand there, for example, while watching the “Sun” person and the “Moon” person moving quickly in a circle around the “Earth” one time. Which way would they move: clockwise or counterclockwise?
-
- The other model is the Fixed Sun, Rotating Earth model. What would the “Sun” person do to act out this model? What would the “Earth” person do? What would the “Moon” person do?
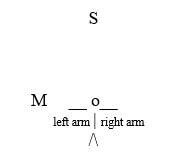
- The “Sun” person would just stand there, for example, as would the “Moon” person for now. The “Earth” person would model a rotating Earth. How would the “Earth” person do that? .
-
- As shown in Fig. 5.34, the “Earth” person could start by modeling what happens when the first quarter Moon appears to be rising. Instead of using arms at right angles to point at the Moon and the Sun, the “Earth” person would hold both arms stretched out to the side to represent the horizon. One arm would represent looking east, the other arm would represent looking west. Wherever the “Earth” person faces would represent looking high in the sky (south in the northern hemisphere, north in the southern hemisphere).
- In this starting position, the “Earth” person would be pointing the “looking east” arm at the “Moon” person while facing the “Sun” person. This would model a first quarter Moon rising in the east while chasing a transiting Sun high in the sky at noon.
- After rotating a quarter turn, the “Earth” person would be facing the “Moon” person while pointing the “looking west” arm at the “Sun” person. This would model a first quarter Moon transiting high in the sky while chasing a setting Sun at about 6 p.m.
- After rotating another quarter turn, the “Earth” person would be pointing the “looking west” arm at the “Moon” person while facing away from the “Sun” person. This would model a first quarter Moon setting in a dark sky with the Sun not in sight at about midnight.
- After rotating another quarter turn, the “Earth” person would be pointing the ‘looking east” arm at the “Sun” person while facing away from the “Moon” person. This would model a rising Sun with the Moon not in sight at about 6 am.
- The next quarter rotation would return to the initial position modeling a rising first quarter Moon with a transiting Sun high in the sky at about noon.
- During one rotation by the “Earth” person, both the “Sun” person and the “Moon” person will appear to the “Earth” person as having risen, transmitted, and set even though neither moved at all.
- Practice both models, with each person playing each role, until all are confident about understanding both models for explaining the apparent east to west daily motion of the Moon.
Now consider what is happening during the apparent motion of the Moon from west to east over several days as illustrated in Fig. 5.32.
- How can you model the apparent west to east motion of the Moon over several days? There are two models:
- One model is the Fixed Earth, Revolving Sun model. What would the “Earth Person” do to act out this model? What would the “Sun” person do? What would the “Moon” person do?
- The “Earth” person would just stand there, watching while the “Sun” person and the “Moon” person move quickly in a circle around the “Earth” many times. If starting in the first quarter phase, for example, the “Moon” person would appear to be chasing the “Sun” person but slowing down, falling more and more “behind” the “Sun” person during each of the 7 cycles (days) until full Moon ; however, after the full Moon phase, the “Sun” person would appear to be chasing the “Moon” person, but speeding up, getting closer and closer to the “Moon” person during each of the next 7 cycles (days) until the 3rd quarter Moon. Such complicated slowing down and speeding up motions, with the Moon and Sun changing who seems to be chasing whom,seem problematic.
- The other model is the Fixed Sun, Rotating Earth model. What would the “Sun” person do to act out this model? What would the “Earth” person do? What would the “Moon” person do?
- The “Sun” person would just stand there, watching while the “Earth” person rotates in place with arms outstretched representing the rotating horizon. As the “Earth” person’s arm representing the eastern horizon swings by, the “Moon” person would seem to be rising.
- As the “Earth” person’s face turns toward the “Moon” person, the “Moon” person would seem to be transiting.
- As the “Earth” person’s arm representing the western horizon swings by, the “Moon” person would seem to be setting.
- As the “Earth” person turns away, the “Moon” person would seem to disappear from sight,
- As before, during one rotation of the “Earth” person, the “Moon” person would seem to be moving from east to west, rising in the east, transiting high in the sky, and setting in the west during each cycle.
- Now, however, the “Moon” person would also move, slowly revolving around the “Earth” person. The “Sun” person would continue to just stand in the same place.
- During the first 7 “Earth” person rotations, however, the “Moon” person would revolve to the full Moon position and after another 7 “Earth” person rotations, the “Moon” person would revolve to the 3rd quarter Moon position, which would appear to the “Earth” person as moving west to east as shown in Fig. 5.32.
- Such motions do not require the complexity of a Moon slowing down and a Sun speeding up while changing positions relative to each other. This model involves only an Earth spinning on its axis in a consistent way with a Moon revolving in its orbit around the Earth, also in a consistent way.
Be sure to shift roles so that all three members of the group play all three roles.
- Discuss with one another which model of the Sun, Earth, and Moon system makes the most sense in this situation: the Fixed Earth and Daily Revolution of the Sun and Moon around the Earth? Or the Fixed, Sun, Daily Rotating Earth, and Monthly Revolution of the Moon around the Earth?
- Summarize concisely what the paradox is and how it can be explained.
Students can conduct this activity without a ball if the “Moon” person’s face is regarded as representing the Moon. Another possibility is to have students stand as a group, far enough apart to model rotating Earths, while one student revolves around the group while holding a ball representing the Moon revolving around the Earth and while a lamp simply remains in place.
This complex process of acting out the explanation of the Moon apparently moving east to west over several hours, due to the daily rotation of the Earth, and actually moving west to east over several days, due to the revolution of the Moon around the Earth, has been dubbed Moon Dance 3.
E. Considering other aspects of the Moon’s motion
Several questions typically arise after students have experience observing the moon and explaining what they have seen. These include whether the moon rotates while it revolves and what the Moon’s phases look like from other places.
Question 5.25 Does the Moon rotate while it revolves around the Earth?
- Observe the features visible on the Moon that you see during each phase. (see: https://www.space.com/10610-moon-craters-skywatching-tips.html )
- Do the locations of particular craters seem to change? Is the crater named for Copernicus, for example, always in the same place on the Moon as seen from your location (midway somewhat to the left of the center as seen from our location)?
- Stand in pairs. One of you model the rotating Earth while the other models the revolving Moon as in Question 5.24. The person modeling the revolving Moon should keep facing the Earth during a complete revolution.
- Start in the new moon position. If the person modeling the revolving Moon always faces the person modeling the Earth, is the “Moon” rotating while revolving?
- In the new moon position, if the person modeling the revolving Moon is facing the person modeling the Earth, what part of the room is the “Moon” person seeing?
- In the 1st quarter position, if the person modeling the revolving Moon is facing the person modeling the Earth, what part of the room is the “Moon” person seeing now?
- In the full moon position, if the person modeling the revolving Moon is facing the person modeling the Earth, what part of the room is the “Moon” person seeing now?
- In the 3rd quarter position, if the person modeling the revolving moon is facing the person modeling the Earth, what part of the room is the “Moon” person seeing now?
- How many times does the person modeling the Moon rotate while revolving once around the person modeling the Earth?
Question 5.26 What do the phases of the Moon look like from other places on the Earth?
Equipment: Have available a globe representing the Earth.- Invite friends or relatives in other places to look for the Moon and alert you when they see it. Are they seeing what you are seeing? The same phase? Lit in the same way? At the same time?
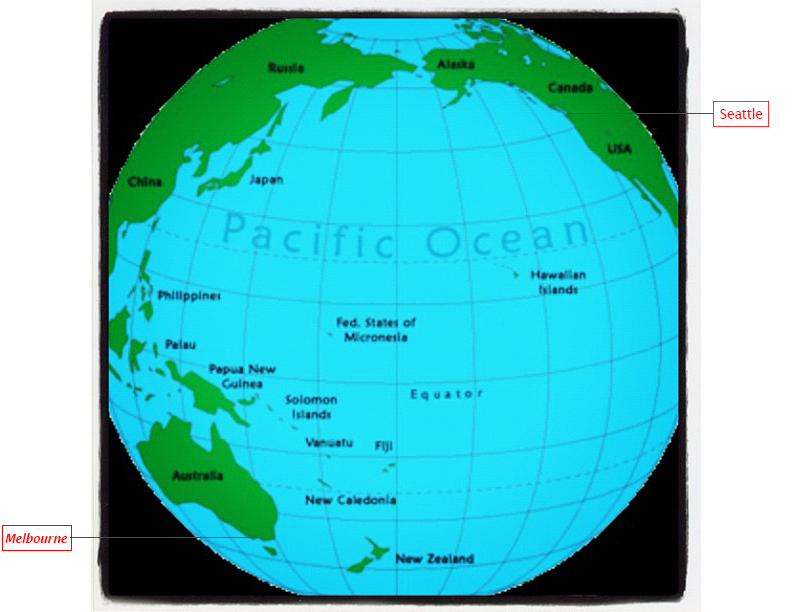
A first-grade teacher, Akiko Kurose, engaged her students in watching the Moon in Seattle. Stella (a pseudonym) continued watching the Moon while visiting Australia with her parents for about a month. The city of Melbourne in Australia is in the southern hemisphere, near the bottom of a typical globe of the Earth as shown in Fig. 5.35. The city of Seattle in the United States is in the northern hemisphere near the top of a typical globe of the Earth. A line around the middle of the globe represents the equator.
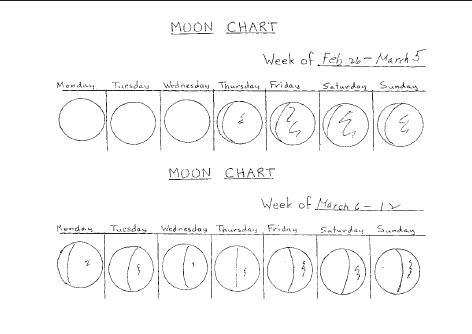
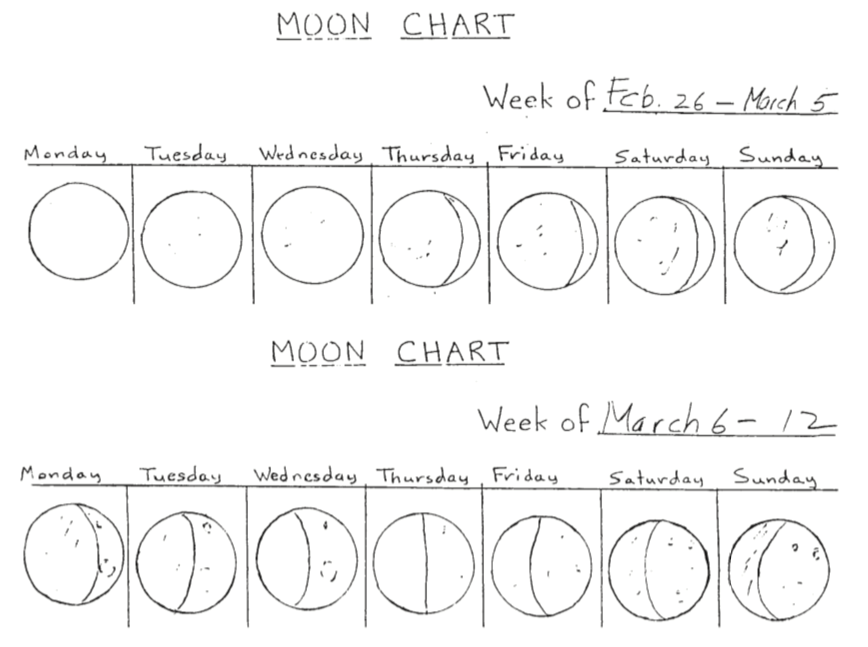
When Stella returned to Seattle, she and her classmates compared their observations of the waxing crescent Moon as shown in Figs. 5.36 and 5.37.
The teacher was participating in a study in which she routinely audiotaped conversations about science in her class. She reported the following:
…For discussion, we used a globe and a map on the floor. Australia is in the southern and Seattle in the northern hemisphere. Some of the children lay on the floor and realized that if they are upside down something lit on the right looks as if it is lit on the left:
Teacher: Stella, do you want to tell us about your observations in Australia?
Stella: The waxing crescent moon was facing the other way.
Teacher: The waxing crescent moon was facing the other way?
Why do you think it was facing the other way?
Stella: It was on the other side of the world.
The children and I found Australia and Seattle on a globe. Then Stella drew her observation on the board, a crescent moon curved on the left.
Student: It’s like the waning crescent.
Student: I thought it was like this! (The child turned upside down.)
Teacher: That’s right. When he lies down on the ground he sees it the opposite way.
Then we discussed how the waxing crescent moon would look in Canada.
Student: Right side up.
Teacher: What do you mean right side up?
Student: The way we see it.
Teacher: Do you mean the way we see it in Seattle?
Student: Uh, huh.
Teacher: In Australia, do you think they would think they’re upside down?
Student: No. Maybe. Stella thought so.
Teacher: For them, they would think that they’re right side up, wouldn’t they?
It’s just that they see it from a different perspective.
We also discussed how the moon would look in Florida and other places.
Student: My dad’s been to Brazil.
Teacher: How do you think you would see the moon there?
Remember where the equator is. Make a hypothesis.
Student: The way Stella saw it in Australia.
Teacher: The way that Stella saw it in Australia….
So it depends upon where you are on earth.
Student: How does it look if you’re on the equator?
This was a new and unexpected question, a fascinating one that none of us had thought about before. The teacher reflected upon this experience:
The children’s experiences in our daily moon gazings over a period of several months also nurture their abstract thinking and questioning skills…These experiences engender thoughts about the moon from different places, granting the students the gift of a global perspective. Engagement in this type of abstract thinking and questioning has become part of our class culture, in which virtually all of the children participate.
Akiko Kurose, “Eyes on science: Asking questions about the Moon on the playground, in class, and at home.” Inquiring into inquiry learning and teaching in science , edited by James Minstrell and Emily van Zee (American Association for the Advancement of Science, Washington, DC, 2000). (pp. 139-147). https://www.aaas.org/sites/default/files/s3fs-public/InquiryPart2.pdf
These children were very familiar with the Moon from on-going observations together on the playground when the moon was visible during the day and from observations with their families when the moon was visible in the afternoons and evenings or mornings before school. They also were familiar with global thinking from celebrating the multiple countries represented by students in the class, the daily opening activity in which they sang a song in several languages, the world map painted on the floor on which they could choose to sit on different countries, and the globe, which was a familiar reference tool in their explorations of literature and art.
F. Developing representations of the Sun/Earth/Moon system as seen from space
This course has emphasized the exploration of physical phenomena, development of central ideas based on evidence, and the use of these central ideas to develop explanatory models for intriguing phenomena. Through extensive observations and on-going discussions of the Moon and its relation to the Sun, students have produced detailed insights into when and where to look for each phase of the Moon, explained these changing phases, and resolved a complex paradox that emerged from detailed observations. All of this has been based upon the perspective of an observer here on Earth. This section turns toward developing a wider view.
Question 5.27 How are the Sun, Earth, and Moon arranged in space?
Moving one’s perspective from what one is seeing oneself to what one would see if one were somewhere else is a complex process. This section provides a report of a child’s spontaneous wonderings involving various perspectives and guides students in exploring how the Sun, Earth, and Moon are arranged in space.
1. Building upon a child’s spontaneous wonderings
Andy diSessa (1986) continued his story by reflecting upon multiple perspectives that he generated during his experience as a child in tossing a ball and seeing the same phases on both the ball and the moon. He remembered being impressed that even though the moon seemed to be far away, it was “on the scale set by the distance to the sun, just a next-door neighbor distance” to him and his ball. This realization led him to imagine himself “as a viewer far enough away to see the moon and ball as right next to one another in relation to the sun.” Then he began wondering about the Earth and concluded “It too must have the same illumination.” The next section takes up this issue of multiple perspectives, of exploring more explicitly about how things look from space.
diSessa, A. (1986). “Artifical worlds and real experience.”Instructional Science, 14, 207-227. (p. 213).
2. Exploring the arrangement of the Sun, Earth, and Moon in space
In order to make connections between how each of the Moon’s phases look on Earth and how they each look from space, we need to know how the Sun, Earth, and Moon are arranged in space. An easy phase to think about is a quarter Moon as shown in Fig. 5.38.
- What is the angle formed by pointing your arms at the Sun and a quarter moon?
- When we consider the Sun and a full Moon, how do their sizes compare? (DO NOT LOOK DIRECTLY AT THE SUN!
- How might the Sun, Earth, and Moon be arranged in space?
When solar eclipses occur, the Sun and full Moon appear to be about the same size. This suggests they might be roughly the same distance away from Earth as shown here:
M
S E
Or the Sun might be close to Earth and the Moon far away as shown here:
M
S E
Or the Sun may be far from Earth and the Moon close by as shown here:
M
S E
FIG. 5.38 Three possible arrangements for the Sun, Earth, and Moon in space.
- How can you decide which of these arrangements of the Sun, Earth, and Moon is the case?
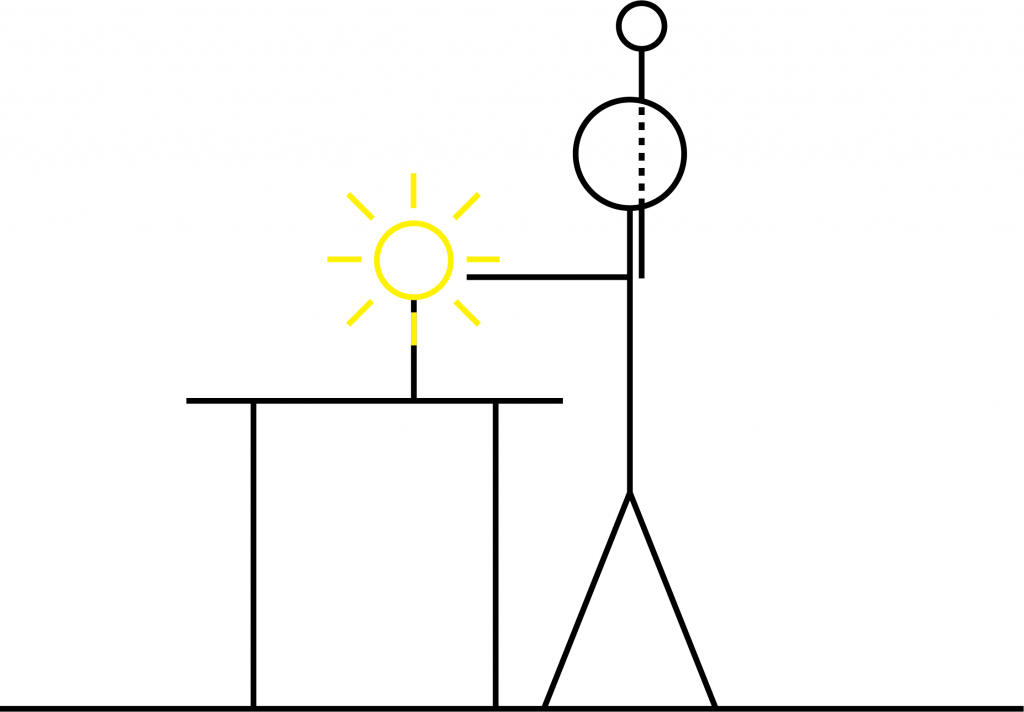
- Consider modeling here on Earth what you see in the sky during a quarter Moon:
- Stand next to a lamp without a shade but do not turn it on yet.
- Touch the lamp with one hand stretched out.
- Hold out the ball with the other hand stretched out so the ball and lamp are equally far away.
- Hold your arms at a right angle as shown in Fig. 5.39.
- How should the ball look when you turn on the lamp if the ball looks like a quarter moon?
- Turn on the light.
- What do you see?
- How can you move so the ball looks half lit when holding your arms at a right angle?
- What can you infer about the arrangement of the Sun, Earth, and Moon if you have to move far away from the lamp in order to see a half lit ball when your arms are forming a right angle when pointing at the lamp and holding out the ball?
Question 5.28 What are the relative sizes of the Sun and the Moon?
- If the Sun is very far away and the Moon is close by but they look about the same size in the sky, what are their relative sizes?
- Hold your thumb up and compare it to a round wall clock or some other object that looks roughly the same size as your thumb when viewed from a distance.
- Then walk close to the wall clock or other object and compare its size with your thumb.
- What can you infer about the relative sizes of the Sun and the Moon?
3. Example of student work discussing the arrangement and relative sizes of the Sun, and Moon.
The moon is close to the earth and the sun is far away. To model evidence of this statement we took a basketball in our right hand and held it out to the right side and took our left arm and held it out in front of us, creating a 90 degree angle. We started with a darkened room and a lamp directly in front of us, representing the sun, the basketball representing the moon and ourselves representing the Earth. We started about an arm’s length from the “sun” and knew from previous observation that if the sun and moon are 90 degrees apart that the “moon” should be half lit representing a quarter moon. However, the ball looked more than half lit when held equidistant from the lamp with arms at 90 degrees. So in order to accomplish this visual we had to walk backwards until only half of the “moon” was lit, which ended up being about halfway across the room. Based on the visual we had just given ourselves with this representation, we could then infer that the sun is far away from the moon and the earth is closer to the moon.
The moon is small and the sun is very large. When looking at the sun and moon in the sky it is very hard to tell which is bigger and which is smaller, or if they might be the same size. Based on the previous example, we inferred that the sun was far away from the earth and moon, so we recreated this same scenario in the classroom to demonstrate why we see what we see in the sky. Everyone was to look up at the clock in the classroom and hold their thumb up so it looked like they were visually next to each other. Then we were told to back up until our thumb and the clock appeared to be the same size, so everyone backed up and was almost all the way on the other side of the room before their thumb appeared to be the same size as the clock. We saw how far we were from it and then were told to walk up close to the clock and see how large the clock was as we got closer. It seemed huge at a short distance! With this simulation we have some information that allows us to infer why the sun may seem the same size, because it is so far away, but in reality is very large compared to the moon and earth.
Physics student, Fall 2014
Question 5.29 How does the view of the phases of the Moon from Earth compare with the view from above the solar system?
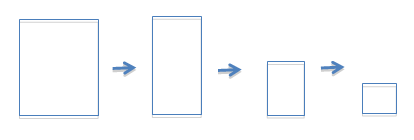
As shown in Fig. 5.40, fold the sheet in half lengthwise; next fold in half again, but top to bottom; finally fold in half one more time top to bottom. Then open the sheet to provide the multiple-box format for Table V.6 as shown in Fig. 5.41.
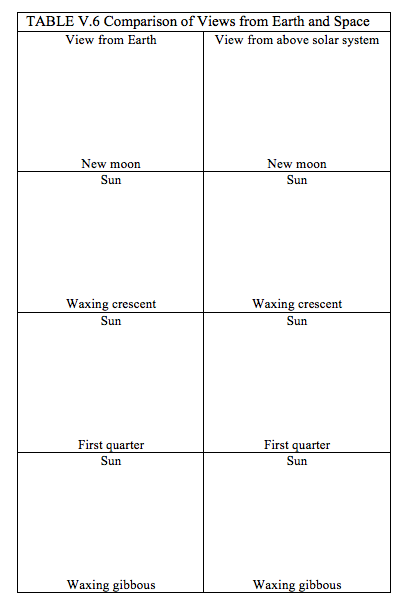
- Open the sheet. As indicated in Fig. 5.41, in the left column, sketch a phase of the Moon as seen from Earth. In the right column, sketch that phase of the Moon as would be seen from above the solar system.
- Observed view from Earth:
- Near the bottom of each box, draw a line to represent the horizon and label the cardinal directions.
- Place a stick figure (without arms) on the horizon.
- Center a small round circle at the top of a box to represent the Sun at noon.
- For each phase, add arms with one pointing at the Sun and the other pointing at the appropriate angle for the Moon for each phase.
- Sketch the Moon with about the same diameter of the circle representing the Sun and with the appropriate shape for each phase.
- Inferred view from above the solar system:
- Sketch a large curve at the top of the box to represent part of a large Sun.
- Sketch a small circle near the bottom of the box to represent the Earth.
- For each phase, sketch a smaller circle (about ¼ size of Earth) to represent the Moon; place this smaller circle near the circle representing the Earth, so that this Moon forms the appropriate angle with respect to the Earth and Sun for that phase.
- On the reverse side, sketch full, waning gibbous, third quarter, and waning crescent phases as seen from the Earth and from above the solar system.
- What determines the size and shape of the lit portion of the phase of the Moon we see?
Complete entries in Table V.7. Then write a summary of what you have learned before reading an example of student work about how the phases of the Moon would look when viewed from above the solar system.
| TABLE V.7 Additional insights about the phases of the moon | |||
|---|---|---|---|
| Sketch of set up | Evidence | Central Ideas | Relevant Vocabulary |
| What we see depends upon our perspective. | |||
| What we see from Earth is the portion of the lit side that is visible from Earth given the relative positions of the Sun, Earth, and Moon as the Moon revolves around the Earth. | |||
4. Example of student work about views of the Moon from Earth and above the solar system.
What we see depends upon our perspective. The table below (Figs. 5.42 and 5.43) presents how each phase of the moon is viewed from Earth, and the view of the solar system from above during that phase.
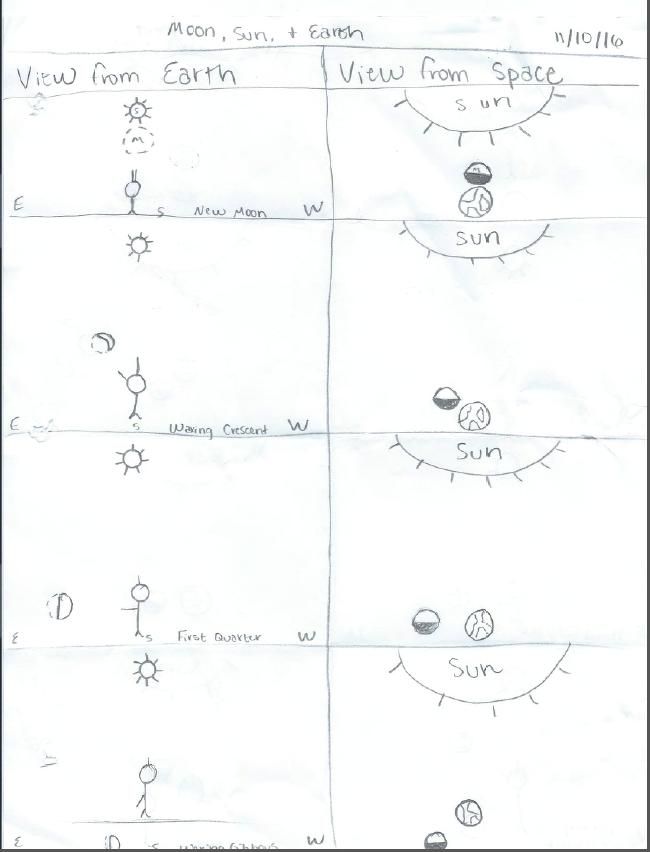
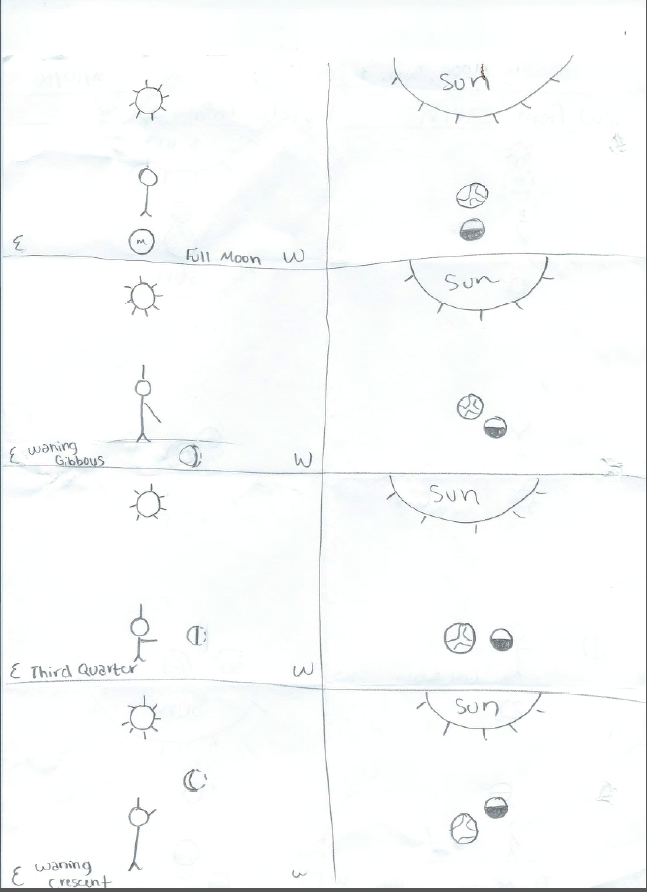
Physics student, Fall 2016
5. Nuances about viewing the phases of the Moon from above the solar system
The right columns of Figs. 5.42 and 5.43 show inferred views from above the solar system as the Moon revolves around the Earth. For the Moon, the side facing toward the Sun is always fully it. This is shown as half-lit in Figs. 5.42 and 5.43 because this is a view from above a fully lit sphere facing the Sun. The same would be the case for the Earth as well. The circle representing the Earth in Figs. 5.42 and 5.43 also should be shown as fully lit sphere facing the Sun (which looks half lit from above).
In the right columns of Figs. 5.42 and 5.43, the side of the Moon facing away from the Sun is not lit. This represents that the shaded side of a phase of the Moon is caused by the Moon’s shadow on itself. It is not the shadow of the Earth. This is similar to the shadow on the back side of a barrier placed between a lamp and a screen, as in Question 1.6 and Fig. 1.8 in Unit 1. The same would be the case for the Earth as well. The circle representing the Earth in the right columns of Figs. 5.42 and 5.43 also should be dark for the side facing away from the Sun.
In the right columns of Figs. 5.42 and 5.43, the relative sizes of the circles representing the Earth and Moon should show the Moon about ¼ the size of the Earth. This is an assertion by the instructor rather than a comparison resulting from an observation. The placement of the Moon should be a consistent distance close to the Earth and both Earth and Moon should be far from the Sun. The student has positioned the Moon correctly for the various phases and has been consistent in showing the Moon’s lit face toward the Sun and the dark side away from the Sun.
In the left columns of Figs. 5.42 and 5.43, the student has shown the size of the Sun and the Moon as roughly equal, as they appear from Earth. The shapes of the phases and angles formed by pointing at the Sun and Moon are basically correct. The phases that are not visible at noon are shown at the correct angle below the horizon.
Fig. 5.44 shows another way to illustrate what the phases of the moon would look like from above the solar system as well as on Earth.
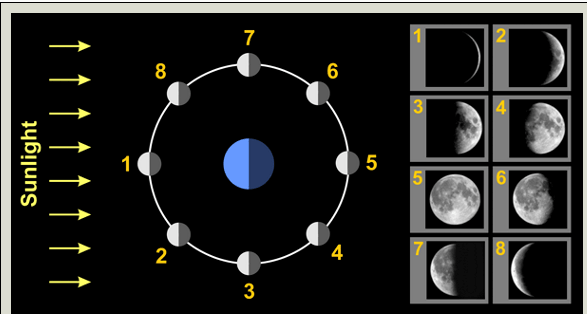
Sunlight is shown as coming from so far away that the rays traveling toward the Earth and Moon are parallel. The positions of the Moon in its revolution around the Earth are numbered, starting with new Moon. The views of the phases as seen from the northern hemisphere on Earth are shown separately in the adjacent table. This is helpful because the first quarter moon at position #3 is shown appropriately lit on the same side as the incoming sunlight, on the left as seen from above the solar system. This phase (#3) also is shown appropriately lit on the right in the table showing the phases as seen from the northern hemisphere on Earth.
In contrast, many diagrams of the Moon’s phases combine the views from Earth and from above the solar system into one diagram as in Fig. 5.45. In such diagrams, the moons representing the Moon in orbit are all lit the same way, facing the Sun. The moons representing waning phases as seen from Earth, however, are lit facing away from the Sun. Such combined diagrams can be very confusing for students who are just learning that the Sun is always on the same side as the lit side of the Moon.
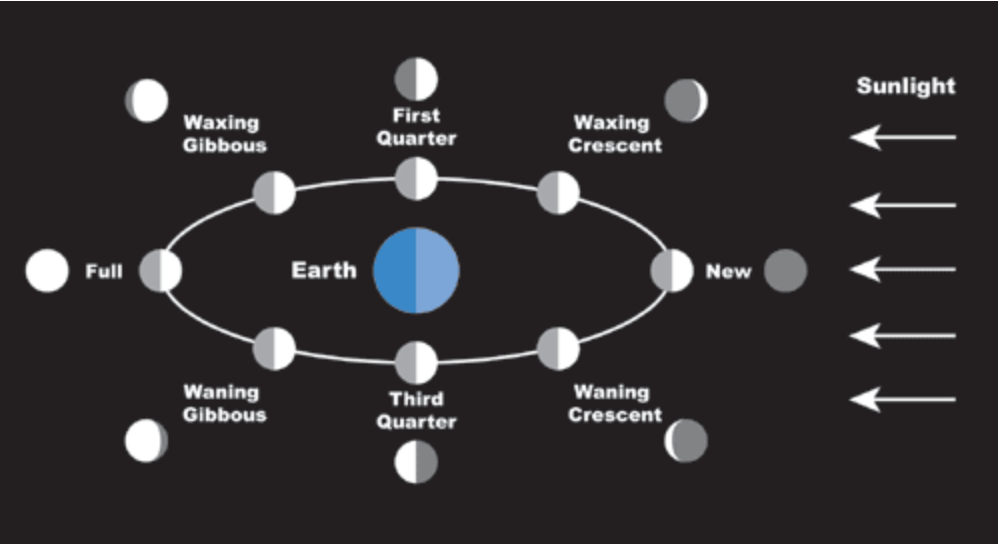
Figure 5.46 shows a diagram that illustrates how much of the lit side of the Moon can be seen from Earth and distinguishes between the dark side and the far side of the Moon.
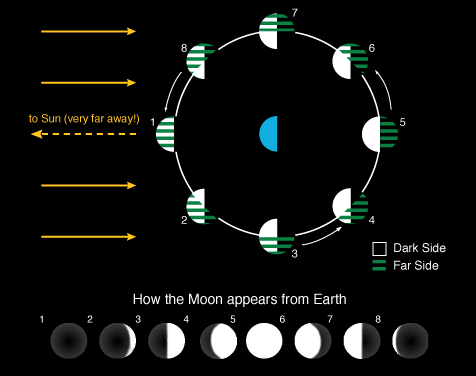
The dark sideof the Moon is the half of the moon that is not facing the Sun and is in the Moon’s own shadow; as the Moon revolves around the Earth, the dark side is always dark.
The front side of the Moon is the half of the moon that is facing the Sun and is always lit; as the Moon revolves around the Earth, the front side is always lit.
The far sideof the Moon is the half of the moon that is facing away from the Earth and is represented by the green stripes.
The near side of the Moon is the half of the moon that is facing the Earth, which is what we “see” from Earth:
- In the new moon position (#1), for example, the near side of the Moon is the same as the dark side of the Moon and is completely dark, which is why we cannot see the new moon in the sky even when the sky is clear. It looks like the Moon should be casting a shadow on the Earth, which it does during a solar eclipse. Usually, however, the Moon is a little above or below the direct line of sight and the Moon’s shadow misses the Earth.
- In the waxing crescent phase (#2), the near side of the Moon is partially lit and what we see from Earth is that partially lit side, which looks like a crescent.
- In the 1st quarter phase (#3), the near side of the Moon is half lit and that’s what we see from Earth.
- In the waxing gibbous phase (#4), the near side of the Moon is mostly lit, on the right side as seen from the northern hemisphere, on the left side as seen from the southern hemisphere.
- In the full phase (#5), the near side of the Moon is the same as the front side of the Moon and is fully lit as seen everywhere from Earth. The Earth looks like it is in the way and should be casting a shadow on the Moon, which it does during a lunar eclipse. Usually, however, the Moon is a little above or below the Earth’s shadow and not eclipsed.
- The waning phases are similar, with the near side facing the Earth now showing less and less of the lit side facing the Sun.
Envisioning what one would see from the perspective of standing on the Earth can be confusing when looking at such diagrams. If you envision yourself standing on the top half of the blue Earth (in the northern hemisphere) and looking outward from the Earth toward position #3 in the circle (which is lit on the left), for example, you would see the Moon half lit on the right as shown for phase #3 in the row below. If you envision yourself standing on the bottom half of the blue earth (in the southern hemisphere) and looking toward position #3, you would see the Moon half lit on the left as shown in the the circle.
Such diagrams reflect choices made by the artists who drew them. The artists drawing Figures 5.44 and 5.46, for example, drew rays from the Sun coming from the left whereas the artist for Figure 5.45 drew rays coming from the right. Figure 5.46 shows an Earth and moons of the same size whereas both Fig. 5.44 and Fig. 5.45 show moons about half the size of the Earth. The appropriate proportion would be a moon about 1/4 the diameter of an Earth. In addition, the artists drawing Figures 5.44 and 5.46 drew from the perspective of looking down from above the solar system with the Moon revolving around the Earth in a circular orbit whereas the artist drawing Figure 5.45 drew from the perspective of looking from the side so that the Moon’s almost circular orbit looks like an elongated ellipse. You can see this effect of a circular object looking like an elongated eclipse by looking down on a circular lid and then moving the lid up until you are looking directly at it from the side.
Question 5.30 Does the Moon revolve around the Earth in the clockwise or counter-clockwise direction?
- Compare the representations of the Moon’s revolution around the Earth in Figs. 5.29, 5.30, 5.32, 5.42 – 5.46. Are they consistent? If so, do they represent the Moon as revolving clockwise or counter-clockwise around the Earth?
- Suppose you are teaching students in Australia and choose to develop an explanation for the changing phases of the moon as discussed in section V.A.3 above. The students would need to move a ball around their heads so that the waxing phases look lit on the left and the waning phases look lit on the right. How should they move their balls? Clockwise or counter-clockwise?
G. Considering what happens when the Sun, Earth, and Moon are arranged in a line.
Question 5.31 What causes lunar and solar eclipses?
- How can you hold a ball to model a lunar eclipse?
- Stand away from the lamp. Hold the ball in the waxing gibbous Moon position. Move the ball into the full Moon position and on into the waning gibbous position so that the ball moves into and through the shadow of your head (representing the Earth).
-
- Use the central idea developed in Question 1.5 in Unit 1 to draw a ray diagram that illustrates the arrangement of the Sun, Moon, and Earth that causes a lunar eclipse. Indicate the umbra and penumbra parts of the Earth’s shadow. The umbra is the dark central shadow formed by the Earth blocking light from all areas of the Sun. Penumbra refers to the lighter shadow formed on either side of the umbra by the Earth blocking light from only one side of the Sun.
- How can you hold a ball to model a solar eclipse?
- Stand away from the lamp. Hold the ball in the waning crescent Moon position. Move the ball into the new Moon position and then into the waxing crescent position so that the shadow of the ball falls on a particular place on the “Earth” (your eyes in your head).
-
- Use the central idea developed in Question 1.5 in Unit 1 to draw a ray diagram that illustrates the arrangement of the Sun, Moon, and Earth that causes a solar eclipse.
- Check https://www.timeanddate.com/eclipse/next-lunar-eclipse.html and https://www.timeanddate.com/eclipse/next-solar-eclipse.html to see when the next eclipses are and whether any are within viewing distance for you. A total lunar eclipse is predicted to be visible in Corvallis OR on May 26, 2021, beginning at 1:47 am, being total at 4:28 am, and ending at 5:44 am for a total of 3 hours and 57 minutes. (See: https://www.timeanddate.com/eclipse/in/usa/corvallis .)
-
- Select an upcoming total lunar eclipse. Click on the areas that will be seeing totality. What is the typical length of time that people will be able to see the entire Moon eclipsed? Is the area on Earth where totality is visible wide or narrow?
-
- Select an upcoming total solar eclipse. Click on areas that will be seeing totality. What is the typical length of time that people will be able to see the entire Sun eclipsed? Is the area on Earth where totality is visible wide or narrow? If you are able to see a solar eclipse be sure to obtain and use appropriate safety protection for your eyes.
- How are solar and lunar eclipses similar? How are they different?
The reason that eclipses do not happen every month is that the Moon’s orbit is tilted about 5° as shown in Fig. 5.47.
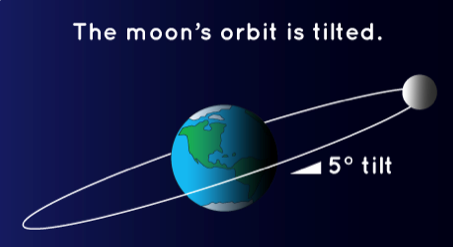
https://spaceplace.nasa.gov/eclipses/en/
Complete entries in Table V.8. Then write a summary of what you have learned before reading an example of student work about the causes of solar and lunar eclipses.
| TABLE V.8 Explaining eclipses of the Sun and Moon | |||
|---|---|---|---|
| Sketch of set up | Evidence | Central Ideas | Relevant Vocabulary |
| https://www.nasa.gov/audience /forstudents/5-8/features/nasa-knows/what-is-an-eclipse-58 |
Eclipses occur when the Moon is precisely in line with the Earth and the Sun. | ||
1. Example of student work about the causes of lunar and solar eclipses
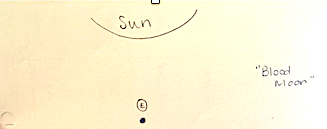
Eclipses occur when the Moon is precisely in line with the Earth and the Sun. Below (Figs. 5.48 and 5.49) I have inserted both a sketch of a lunar eclipse and a solar eclipse. We recently had a lunar eclipse back in September. In my sketch you can see that this is when the Sun, Moon and Earth are directly in front of each other, basically in a straight line. The Earth is between the Moon and the Sun; this is the Earth blocking the light rays from the Sun getting to the Moon. This is what created what people say was the “Blood Moon”. The moon was dark, but still had a slight outline of its shape. It was crazy to be able to see that, it was awesome!
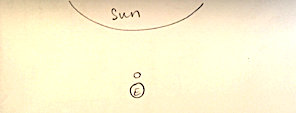
I was lucky enough to be able to see that in my lifetime and will actually get to see a solar eclipse as well. There is a prediction that this is going to be visible from Corvallis in August of 2017. A solar eclipse is when the Moon is between the Sun and the Earth. There is going to be a portion of the Earth that is going to see this at this time. This is because the Moon is blocking the Sun in that specific spot. This is crazy to think about because the last one happened back in 1991 when I was not even born yet.
Physics student, Fall 2014
H. Exploring Internet resources about the Moon with a friend or family member
- Put “phases of the moon” in your computer browser. View at least four websites that present a diagram and explanation about the phases of the moon. Select the diagram and explanation you like the best. Why do you like this one best?
- Invite a friend or family member to explore this website with you. If possible, invite someone of the age you want to teach. Then write a reflection upon your conversation:
- What does your friend/family member already know about the phases of the moon?
- Describe what your learner asked, said, did and found.
- What aspects of the website seemed to help this learner learn about the phases of the moon?
- What aspects of the website, if any, seemed to hinder learning?
- What have you learned about science learning and teaching from this experience?
1. Example of student work about engaging a friend or family member in learning about the phases of the Moon
For this assignment, I asked my family friend who is a 6th grade student about the moon. When I asked her what she already knew about the moon, she said things like “there are different shapes of the moon” and “I see it at night.” We looked at the website https://www.timeanddate.com/calendar/aboutmoonphases.html . I liked this site because it not only had a picture of all the moon phases which she seemed to somewhat know about, but also summaries for each phase as well as some pictures that show where the moon, sun and earth are at a certain phase.
G asked me why the moon spins in a circle around the earth. This was a hard question for me to answer because I can’t explain why it revolves in a circle, I can just explain what is happening as it revolves. I find that often times, my learners are asking me questions that I have trouble answering.
An aspect of the website that seemed to really help us learn was the variety of pictures that included the moon, sun and earth for different phases, This helped me to show and explain that at different phases the moon is in different places. However, there was lots of writing on the website. While this was helpful for me, this seemed to hinder G’s learning, as she didn’t have a desire to read it and it made the website appear more difficult/boring.
In regards to science learning and teaching. I have learned through this that there are going to be times where my students stump me. I am not always going to know all the answers, but that is okay, and it is part of science.
Physics student, Winter 2018
This is another example of the nature of science, that as one learns more and shares that knowledge with others, new questions often arise. Question 5.48 addresses the question that emerged during this conversation, what keeps the Moon revolving around the Earth in its orbit?
I. Pausing to review before taking the next step
Before undertaking the next step in an extended exploration, it can be helpful to review the understandings developed so far.
1. Reviewing two explanatory models for day and night
- What is the evidence supporting this explanatory model for day and night?
- What is the evidence supporting this explanatory model for day and night?
- How are these models useful?
2. Reviewing an explanatory model for the phases of the Moon
- Where is the Sun with respect to the phase of the Moon when both are visible in the sky?
- What are the phases of the moon observed?
- How are these phases related to the angle formed by pointing one arm at the Sun and the other arm at the Moon?
- What is the logic by which one can infer that the phases of the Moon are caused by the revolution of the Moon around the Earth?
- What causes lunar and solar eclipses?
Daily observations indicate that the Sun seems to rise in the east, move in an arc across the sky and set in the west. The Moon seems to move in the same way, rising in the east, moving in an arc across the sky, and setting in the west. These observations suggest that the Sun and the Moon revolve daily around the Earth. An alternative model, hard to envision, is that the Earth is rotating on its axis daily, that we, living on the surface of the Earth, are spinning on by the Sun and Moon rather than that the Sun and Moon are revolving around us on a fixed Earth.
On-going observations of the Moon indicate that the lit shape of the Moon changes in a regular way, increasing from crescent to half lit to more than half lit to full and then decreasing from more than half lit to half lit to crescent to not being visible even when the sky is clear. The Moon sometimes is visible during the day as well as at night. Sometimes the Moon is lit on the right and sometimes on the left but when both the Sun and the Moon are visible in the sky, the Sun is always on the same side of the Moon that is lit.
The angle formed by pointing one arm at the Sun and one arm at the Moon changes, from acute to right, to obtuse, to straight as the lit portion of the Moon increases on the right at our location and back from straight to obtuse to right to acute as the lit portion of the Moon decreases on the left at our location. Patterns identified in systematic observations of the relation between the lit portion of the Moon (its phase) and this angle are useful in predicting when each phase of the Moon will be rising, transiting, and setting. Such systematic observations lead to paradoxes, however, such as that sometimes the Moon seems to chase the Sun across the sky but sometimes the Sun seems to chase the Moon. Also the Moon seems to move from east to west, like the Sun, over several hours but in the opposite direction from west to east over several days.
If both the Sun and the Moon are visible in the sky and one holds up a ball near the Moon, one can see the Sun shining on the ball in the same way that the Sun is shining on the Moon. It is important NOT to look directly at the Sun in order to avoid damaging one’s eyes! The shape of the lit portion of the ball matches the shape of the lit portion of the Moon. The shape of the dark part of the ball matches the shape of the missing portion of the circular shape of a full Moon. The shadow forming the dark part of the ball is the ball’s own shadow as the front of the ball is blocking light from falling on the back of the ball. This suggests that the missing portion of the Moon is not visible because it is in the Moon’s own shadow, the front of the Moon blocking light from falling on the back of the Moon. The Earth’s shadow is not involved at all, although many people explain the Moon’s changing phases this way, probably because they associate objects with casting shadows on nearby surfaces rather than with objects blocking light from falling on the backs of the objects themselves.
To move the ball in a way that replicates the changing phases of the Moon one simply moves the ball around one’s head while taking care not to block the light falling on a “full” ball and to hold the ball in such a way that it does not block light falling directly in one’s eyes in the “new” ball position. This replication here on Earth of what one sees in the sky suggests that the cause of the changing phases of the Moon is that the Moon is revolving around the Earth, not daily, but rather during the many days that the phases are changing, in about a month.
The claim that the phases of the Moon are caused by the Moon revolving around the Earth during about a month is supported by its power in explaining two paradoxes. The Moon seems to be chasing the Sun daily across the sky in the waxing phases, when seen by those of us on a daily rotating Earth, as the Moon is revolving around the Earth through angles 0° to 180°. The Sun daily seems to be chasing the Moon when the Moon is continuing to revolve around the Earth through angles 180° to 360° (or from 180° back to 0 depending upon how one labels the angles). The Moon appears to be moving east to west over several hours because the Earth is rotating past it as the Earth rotates on its axis. The Moon appears to be moving west to east over several days because the Moon actually IS moving as it revolves around the Earth.
Eclipses occur when the Moon, Earth, and Sun are directly lined up in the full Moon (lunar eclipse) and new Moon (solar eclipse) positions. Eclipses do not occur every month because the Moon’s orbit is inclined about 5 degrees so usually the Moon is little above or a little below the direct line of sight from the Sun.
The practices involved in developing these understandings included questioning, observing, discussing, predicting, modeling, and interpreting findings. Of particular importance was identifying patterns, seeking ways to link cause and effect, and employing systems thinking.

