3.11: Line Construction
- Page ID
- 4773
\( \newcommand{\vecs}[1]{\overset { \scriptstyle \rightharpoonup} {\mathbf{#1}} } \)
\( \newcommand{\vecd}[1]{\overset{-\!-\!\rightharpoonup}{\vphantom{a}\smash {#1}}} \)
\( \newcommand{\dsum}{\displaystyle\sum\limits} \)
\( \newcommand{\dint}{\displaystyle\int\limits} \)
\( \newcommand{\dlim}{\displaystyle\lim\limits} \)
\( \newcommand{\id}{\mathrm{id}}\) \( \newcommand{\Span}{\mathrm{span}}\)
( \newcommand{\kernel}{\mathrm{null}\,}\) \( \newcommand{\range}{\mathrm{range}\,}\)
\( \newcommand{\RealPart}{\mathrm{Re}}\) \( \newcommand{\ImaginaryPart}{\mathrm{Im}}\)
\( \newcommand{\Argument}{\mathrm{Arg}}\) \( \newcommand{\norm}[1]{\| #1 \|}\)
\( \newcommand{\inner}[2]{\langle #1, #2 \rangle}\)
\( \newcommand{\Span}{\mathrm{span}}\)
\( \newcommand{\id}{\mathrm{id}}\)
\( \newcommand{\Span}{\mathrm{span}}\)
\( \newcommand{\kernel}{\mathrm{null}\,}\)
\( \newcommand{\range}{\mathrm{range}\,}\)
\( \newcommand{\RealPart}{\mathrm{Re}}\)
\( \newcommand{\ImaginaryPart}{\mathrm{Im}}\)
\( \newcommand{\Argument}{\mathrm{Arg}}\)
\( \newcommand{\norm}[1]{\| #1 \|}\)
\( \newcommand{\inner}[2]{\langle #1, #2 \rangle}\)
\( \newcommand{\Span}{\mathrm{span}}\) \( \newcommand{\AA}{\unicode[.8,0]{x212B}}\)
\( \newcommand{\vectorA}[1]{\vec{#1}} % arrow\)
\( \newcommand{\vectorAt}[1]{\vec{\text{#1}}} % arrow\)
\( \newcommand{\vectorB}[1]{\overset { \scriptstyle \rightharpoonup} {\mathbf{#1}} } \)
\( \newcommand{\vectorC}[1]{\textbf{#1}} \)
\( \newcommand{\vectorD}[1]{\overrightarrow{#1}} \)
\( \newcommand{\vectorDt}[1]{\overrightarrow{\text{#1}}} \)
\( \newcommand{\vectE}[1]{\overset{-\!-\!\rightharpoonup}{\vphantom{a}\smash{\mathbf {#1}}}} \)
\( \newcommand{\vecs}[1]{\overset { \scriptstyle \rightharpoonup} {\mathbf{#1}} } \)
\(\newcommand{\longvect}{\overrightarrow}\)
\( \newcommand{\vecd}[1]{\overset{-\!-\!\rightharpoonup}{\vphantom{a}\smash {#1}}} \)
\(\newcommand{\avec}{\mathbf a}\) \(\newcommand{\bvec}{\mathbf b}\) \(\newcommand{\cvec}{\mathbf c}\) \(\newcommand{\dvec}{\mathbf d}\) \(\newcommand{\dtil}{\widetilde{\mathbf d}}\) \(\newcommand{\evec}{\mathbf e}\) \(\newcommand{\fvec}{\mathbf f}\) \(\newcommand{\nvec}{\mathbf n}\) \(\newcommand{\pvec}{\mathbf p}\) \(\newcommand{\qvec}{\mathbf q}\) \(\newcommand{\svec}{\mathbf s}\) \(\newcommand{\tvec}{\mathbf t}\) \(\newcommand{\uvec}{\mathbf u}\) \(\newcommand{\vvec}{\mathbf v}\) \(\newcommand{\wvec}{\mathbf w}\) \(\newcommand{\xvec}{\mathbf x}\) \(\newcommand{\yvec}{\mathbf y}\) \(\newcommand{\zvec}{\mathbf z}\) \(\newcommand{\rvec}{\mathbf r}\) \(\newcommand{\mvec}{\mathbf m}\) \(\newcommand{\zerovec}{\mathbf 0}\) \(\newcommand{\onevec}{\mathbf 1}\) \(\newcommand{\real}{\mathbb R}\) \(\newcommand{\twovec}[2]{\left[\begin{array}{r}#1 \\ #2 \end{array}\right]}\) \(\newcommand{\ctwovec}[2]{\left[\begin{array}{c}#1 \\ #2 \end{array}\right]}\) \(\newcommand{\threevec}[3]{\left[\begin{array}{r}#1 \\ #2 \\ #3 \end{array}\right]}\) \(\newcommand{\cthreevec}[3]{\left[\begin{array}{c}#1 \\ #2 \\ #3 \end{array}\right]}\) \(\newcommand{\fourvec}[4]{\left[\begin{array}{r}#1 \\ #2 \\ #3 \\ #4 \end{array}\right]}\) \(\newcommand{\cfourvec}[4]{\left[\begin{array}{c}#1 \\ #2 \\ #3 \\ #4 \end{array}\right]}\) \(\newcommand{\fivevec}[5]{\left[\begin{array}{r}#1 \\ #2 \\ #3 \\ #4 \\ #5 \\ \end{array}\right]}\) \(\newcommand{\cfivevec}[5]{\left[\begin{array}{c}#1 \\ #2 \\ #3 \\ #4 \\ #5 \\ \end{array}\right]}\) \(\newcommand{\mattwo}[4]{\left[\begin{array}{rr}#1 \amp #2 \\ #3 \amp #4 \\ \end{array}\right]}\) \(\newcommand{\laspan}[1]{\text{Span}\{#1\}}\) \(\newcommand{\bcal}{\cal B}\) \(\newcommand{\ccal}{\cal C}\) \(\newcommand{\scal}{\cal S}\) \(\newcommand{\wcal}{\cal W}\) \(\newcommand{\ecal}{\cal E}\) \(\newcommand{\coords}[2]{\left\{#1\right\}_{#2}}\) \(\newcommand{\gray}[1]{\color{gray}{#1}}\) \(\newcommand{\lgray}[1]{\color{lightgray}{#1}}\) \(\newcommand{\rank}{\operatorname{rank}}\) \(\newcommand{\row}{\text{Row}}\) \(\newcommand{\col}{\text{Col}}\) \(\renewcommand{\row}{\text{Row}}\) \(\newcommand{\nul}{\text{Nul}}\) \(\newcommand{\var}{\text{Var}}\) \(\newcommand{\corr}{\text{corr}}\) \(\newcommand{\len}[1]{\left|#1\right|}\) \(\newcommand{\bbar}{\overline{\bvec}}\) \(\newcommand{\bhat}{\widehat{\bvec}}\) \(\newcommand{\bperp}{\bvec^\perp}\) \(\newcommand{\xhat}{\widehat{\xvec}}\) \(\newcommand{\vhat}{\widehat{\vvec}}\) \(\newcommand{\uhat}{\widehat{\uvec}}\) \(\newcommand{\what}{\widehat{\wvec}}\) \(\newcommand{\Sighat}{\widehat{\Sigma}}\) \(\newcommand{\lt}{<}\) \(\newcommand{\gt}{>}\) \(\newcommand{\amp}{&}\) \(\definecolor{fillinmathshade}{gray}{0.9}\)Create lines that do not intersect or intersect at a 90 degree angle using a compass and straightedge.
Parallel and Perpendicular Lines
Constructions are step-by-step processes used to create accurate geometric figures. To create a construction by hand, there are a few tools that you can use:
- Compass: A device that allows you to create a circle with a given radius. Not only can compasses help you to create circles, but also they can help you to copy distances.
- Straightedge: Anything that allows you to produce a straight line. A straightedge should not be able to measure distances. An index card works well as a straightedge. You can also use a ruler as a straightedge, as long as you only use it to draw straight lines and not to measure.
- Paper: When a geometric figure is on a piece of paper, the paper itself can be folded in order to construct new lines.
To construct parallel lines, remember that if corresponding angles are congruent then lines are parallel. This means that if you can copy an angle to create congruent corresponding angles, you can create parallel lines. This will be explored in Example A.
To construct perpendicular lines, remember that you already know how to construct a perpendicular bisector. You can use this method to construct a line perpendicular to another line through any given point.
Let's take a look at an example problem.
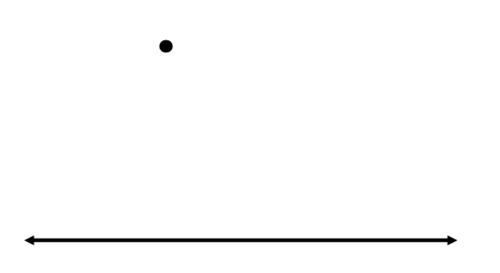
Use your straightedge to draw a line and a point like the one below. Then, construct a line through the point that is parallel to the original line.
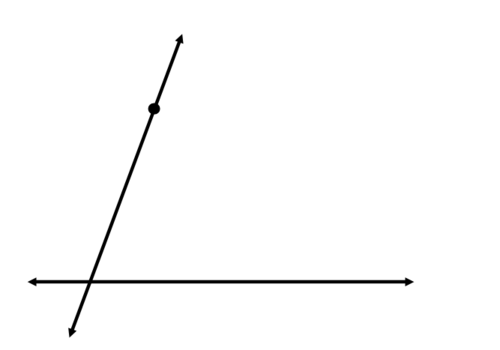
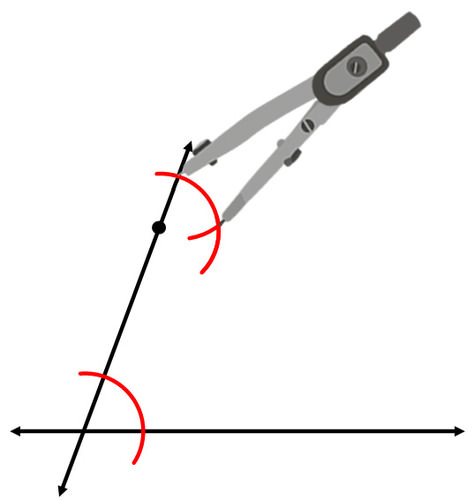
Start by using your straightedge to draw a line through the point that intersects the original line. This will become the transversal after you have constructed the parallel line.
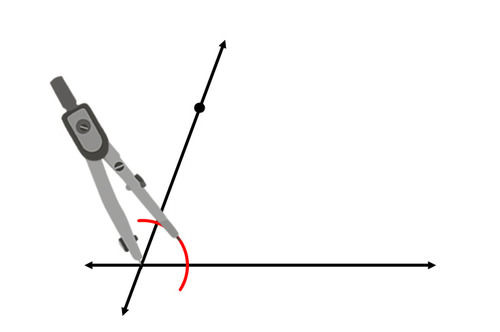
Now, your goal is to copy one of the four angles created at the intersection of the two lines. Draw an arc through the angle you will copy:
Draw an arc with the same radius in the corresponding location, with the original point as the vertex.
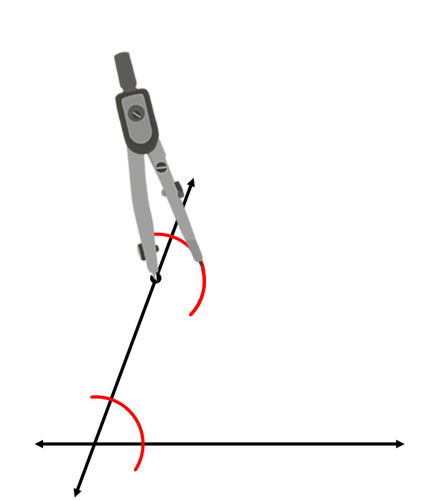
Continue to copy the angle by measuring its width and marking off the correct width for the new angle.
Use your straightedge to construct the parallel line.
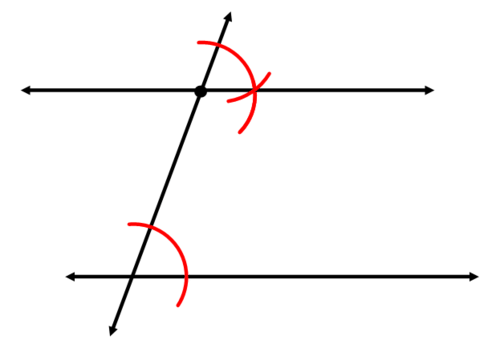
Now, let's explain why the two lines in the second example above are parallel.
If corresponding angles are congruent, then lines are parallel. In the second example above, an angle was copied. This created congruent angles. Because the copied angle was put in the location of the corresponding angle, the construction created congruent corresponding angles. Therefore, the two lines must be parallel.
Use your straightedge to draw a line and a point like the one below. Then, construct a line through the point that is perpendicular to the original line.

You already know how to construct the perpendicular bisector of a segment. First, find a segment whose perpendicular bisector will pass through the given point. Draw a partial circle centered at the point that passes through the given line two times.
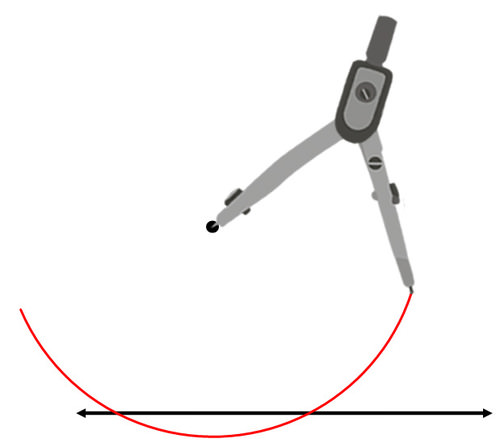
The segment that connects the two points of intersection is the segment you will construct a perpendicular bisector for:
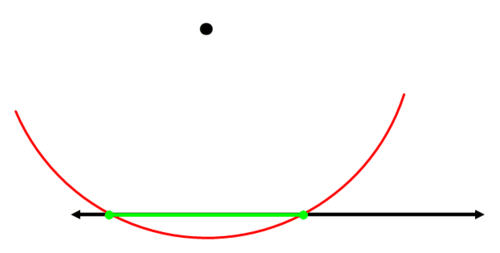
Construct the perpendicular bisector of the green segment:
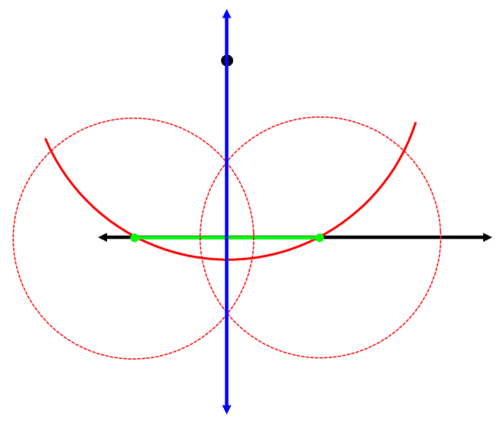
The blue line is perpendicular to the original line and passes through the original point.
Example \(\PageIndex{1}\)
Construct a triangle using a straightedge. Now construct the three altitudes of the triangle in order to find the orthocenter of the triangle.
Solution
Start with a generic triangle:
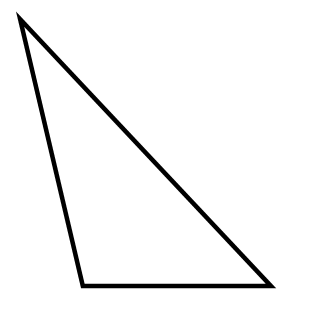
Construct a perpendicular line through each side that passes through the opposite vertex. It might be necessary to extend the length of some of the sides. The blue line below is the first altitude:
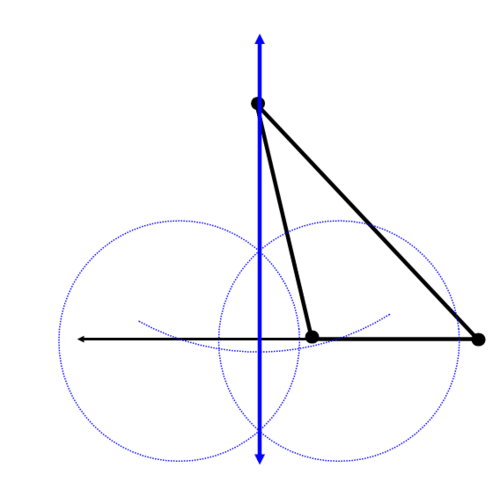
The red line is the second altitude:
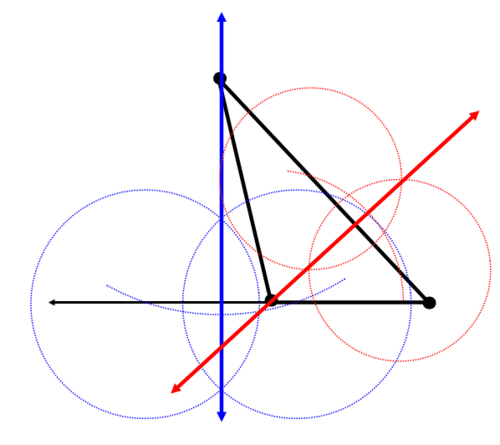
The green line is the third altitude:
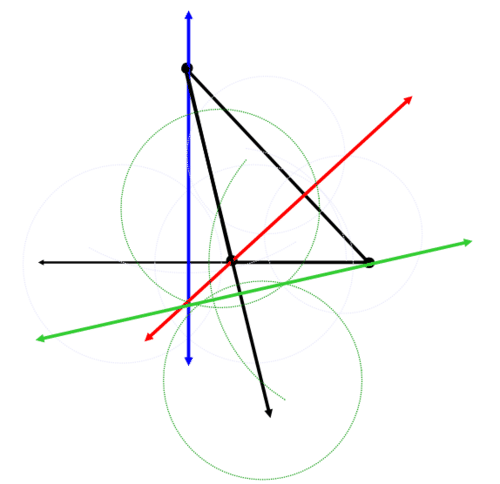
The blue, red, and green lines intersect in a point. This point is the orthocenter.
Example \(\PageIndex{2}\)
Draw a line segment. Construct a line parallel to the line segment.
Solution

Example \(\PageIndex{3}\)
Extend your construction from Example 2 to construct a parallelogram.
Solution
Extend your construction from Example 2 to construct a parallelogram.
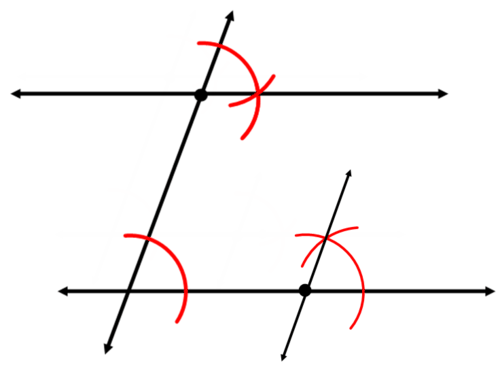
Extend the new parallel line. The quadrilateral formed is a parallelogram.
Example \(\PageIndex{4}\)
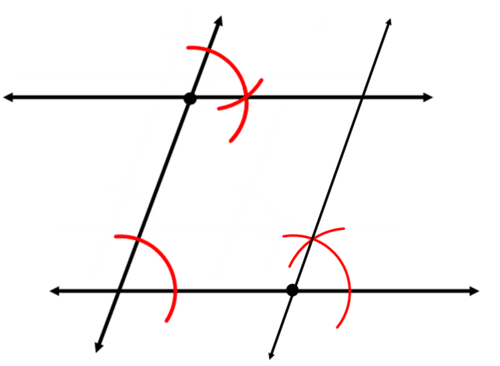
How can you be sure that your quadrilateral from Example 3 is a parallelogram?
Solution
A parallelogram is a quadrilateral with two pairs of parallel sides. The construction created two pairs of parallel lines, so the quadrilateral must be a parallelogram.
Review
Draw a line segment and a point.
1. Construct a line perpendicular to the line segment that passes through the point.
2. Construct a line parallel to the line segment that passes through the point.
3. Extend your construction to construct a rectangle. Explain what you did to construct the rectangle.
Draw another line segment and point.
4. Construct a line parallel to the line segment that passes through the point.
5. Extend your construction to construct a parallelogram. Explain what you did to construct the parallelogram.
Use a straightedge to draw a triangle.
6. Construct the altitudes of the triangle.
7. Find the point of intersection of the altitudes. What point is this?
8. Was your point of intersection inside or outside the triangle? If it was inside, create a new triangle that will cause the point of intersection to be outside the triangle. If it was outside, create a new triangle that will cause the point of intersection to be inside the triangle.
Draw another line segment and point.
9. Construct a line parallel to the line segment that passes through the point.
10. Extend your construction to construct a trapezoid. Explain what you did to construct the trapezoid.
Draw another line segment and point.
11. Construct a line perpendicular to the line segment that passes through the point.
12. Extend your construction to construct a square. Explain what you did to construct the square.
13. Justify why the shape you created in #12 must be a square.
14. Explain why the method for constructing parallel lines involves copying an angle.
15. Explain why the method for constructing perpendicular lines relies on the method for constructing a perpendicular bisector.
Vocabulary
| Term | Definition |
|---|---|
| altitude | An altitude of a triangle is a line segment from a vertex and is perpendicular to the opposite side. It is also called the height of a triangle. |
| Corresponding Angles | Corresponding angles are two angles that are in the same position with respect to the transversal, but on different lines. |
| Perpendicular lines | Perpendicular lines are lines that intersect at a 90∘ angle. |
| Vertex | A vertex is a point of intersection of the lines or rays that form an angle. |
| Orthocenter | The orthocenter is the point at which the three altitudes of a triangle meet. |

