1.11: Scientific Method
- Page ID
- 1381
\( \newcommand{\vecs}[1]{\overset { \scriptstyle \rightharpoonup} {\mathbf{#1}} } \)
\( \newcommand{\vecd}[1]{\overset{-\!-\!\rightharpoonup}{\vphantom{a}\smash {#1}}} \)
\( \newcommand{\dsum}{\displaystyle\sum\limits} \)
\( \newcommand{\dint}{\displaystyle\int\limits} \)
\( \newcommand{\dlim}{\displaystyle\lim\limits} \)
\( \newcommand{\id}{\mathrm{id}}\) \( \newcommand{\Span}{\mathrm{span}}\)
( \newcommand{\kernel}{\mathrm{null}\,}\) \( \newcommand{\range}{\mathrm{range}\,}\)
\( \newcommand{\RealPart}{\mathrm{Re}}\) \( \newcommand{\ImaginaryPart}{\mathrm{Im}}\)
\( \newcommand{\Argument}{\mathrm{Arg}}\) \( \newcommand{\norm}[1]{\| #1 \|}\)
\( \newcommand{\inner}[2]{\langle #1, #2 \rangle}\)
\( \newcommand{\Span}{\mathrm{span}}\)
\( \newcommand{\id}{\mathrm{id}}\)
\( \newcommand{\Span}{\mathrm{span}}\)
\( \newcommand{\kernel}{\mathrm{null}\,}\)
\( \newcommand{\range}{\mathrm{range}\,}\)
\( \newcommand{\RealPart}{\mathrm{Re}}\)
\( \newcommand{\ImaginaryPart}{\mathrm{Im}}\)
\( \newcommand{\Argument}{\mathrm{Arg}}\)
\( \newcommand{\norm}[1]{\| #1 \|}\)
\( \newcommand{\inner}[2]{\langle #1, #2 \rangle}\)
\( \newcommand{\Span}{\mathrm{span}}\) \( \newcommand{\AA}{\unicode[.8,0]{x212B}}\)
\( \newcommand{\vectorA}[1]{\vec{#1}} % arrow\)
\( \newcommand{\vectorAt}[1]{\vec{\text{#1}}} % arrow\)
\( \newcommand{\vectorB}[1]{\overset { \scriptstyle \rightharpoonup} {\mathbf{#1}} } \)
\( \newcommand{\vectorC}[1]{\textbf{#1}} \)
\( \newcommand{\vectorD}[1]{\overrightarrow{#1}} \)
\( \newcommand{\vectorDt}[1]{\overrightarrow{\text{#1}}} \)
\( \newcommand{\vectE}[1]{\overset{-\!-\!\rightharpoonup}{\vphantom{a}\smash{\mathbf {#1}}}} \)
\( \newcommand{\vecs}[1]{\overset { \scriptstyle \rightharpoonup} {\mathbf{#1}} } \)
\(\newcommand{\longvect}{\overrightarrow}\)
\( \newcommand{\vecd}[1]{\overset{-\!-\!\rightharpoonup}{\vphantom{a}\smash {#1}}} \)
\(\newcommand{\avec}{\mathbf a}\) \(\newcommand{\bvec}{\mathbf b}\) \(\newcommand{\cvec}{\mathbf c}\) \(\newcommand{\dvec}{\mathbf d}\) \(\newcommand{\dtil}{\widetilde{\mathbf d}}\) \(\newcommand{\evec}{\mathbf e}\) \(\newcommand{\fvec}{\mathbf f}\) \(\newcommand{\nvec}{\mathbf n}\) \(\newcommand{\pvec}{\mathbf p}\) \(\newcommand{\qvec}{\mathbf q}\) \(\newcommand{\svec}{\mathbf s}\) \(\newcommand{\tvec}{\mathbf t}\) \(\newcommand{\uvec}{\mathbf u}\) \(\newcommand{\vvec}{\mathbf v}\) \(\newcommand{\wvec}{\mathbf w}\) \(\newcommand{\xvec}{\mathbf x}\) \(\newcommand{\yvec}{\mathbf y}\) \(\newcommand{\zvec}{\mathbf z}\) \(\newcommand{\rvec}{\mathbf r}\) \(\newcommand{\mvec}{\mathbf m}\) \(\newcommand{\zerovec}{\mathbf 0}\) \(\newcommand{\onevec}{\mathbf 1}\) \(\newcommand{\real}{\mathbb R}\) \(\newcommand{\twovec}[2]{\left[\begin{array}{r}#1 \\ #2 \end{array}\right]}\) \(\newcommand{\ctwovec}[2]{\left[\begin{array}{c}#1 \\ #2 \end{array}\right]}\) \(\newcommand{\threevec}[3]{\left[\begin{array}{r}#1 \\ #2 \\ #3 \end{array}\right]}\) \(\newcommand{\cthreevec}[3]{\left[\begin{array}{c}#1 \\ #2 \\ #3 \end{array}\right]}\) \(\newcommand{\fourvec}[4]{\left[\begin{array}{r}#1 \\ #2 \\ #3 \\ #4 \end{array}\right]}\) \(\newcommand{\cfourvec}[4]{\left[\begin{array}{c}#1 \\ #2 \\ #3 \\ #4 \end{array}\right]}\) \(\newcommand{\fivevec}[5]{\left[\begin{array}{r}#1 \\ #2 \\ #3 \\ #4 \\ #5 \\ \end{array}\right]}\) \(\newcommand{\cfivevec}[5]{\left[\begin{array}{c}#1 \\ #2 \\ #3 \\ #4 \\ #5 \\ \end{array}\right]}\) \(\newcommand{\mattwo}[4]{\left[\begin{array}{rr}#1 \amp #2 \\ #3 \amp #4 \\ \end{array}\right]}\) \(\newcommand{\laspan}[1]{\text{Span}\{#1\}}\) \(\newcommand{\bcal}{\cal B}\) \(\newcommand{\ccal}{\cal C}\) \(\newcommand{\scal}{\cal S}\) \(\newcommand{\wcal}{\cal W}\) \(\newcommand{\ecal}{\cal E}\) \(\newcommand{\coords}[2]{\left\{#1\right\}_{#2}}\) \(\newcommand{\gray}[1]{\color{gray}{#1}}\) \(\newcommand{\lgray}[1]{\color{lightgray}{#1}}\) \(\newcommand{\rank}{\operatorname{rank}}\) \(\newcommand{\row}{\text{Row}}\) \(\newcommand{\col}{\text{Col}}\) \(\renewcommand{\row}{\text{Row}}\) \(\newcommand{\nul}{\text{Nul}}\) \(\newcommand{\var}{\text{Var}}\) \(\newcommand{\corr}{\text{corr}}\) \(\newcommand{\len}[1]{\left|#1\right|}\) \(\newcommand{\bbar}{\overline{\bvec}}\) \(\newcommand{\bhat}{\widehat{\bvec}}\) \(\newcommand{\bperp}{\bvec^\perp}\) \(\newcommand{\xhat}{\widehat{\xvec}}\) \(\newcommand{\vhat}{\widehat{\vvec}}\) \(\newcommand{\uhat}{\widehat{\uvec}}\) \(\newcommand{\what}{\widehat{\wvec}}\) \(\newcommand{\Sighat}{\widehat{\Sigma}}\) \(\newcommand{\lt}{<}\) \(\newcommand{\gt}{>}\) \(\newcommand{\amp}{&}\) \(\definecolor{fillinmathshade}{gray}{0.9}\)
Chances are you've heard of the scientific method. What exactly is the scientific method?
Is it a precise and exact way that all science must be done? Or is it a series of steps that most scientists generally follow, but may be modified for the benefit of an individual investigation?
The Scientific Method
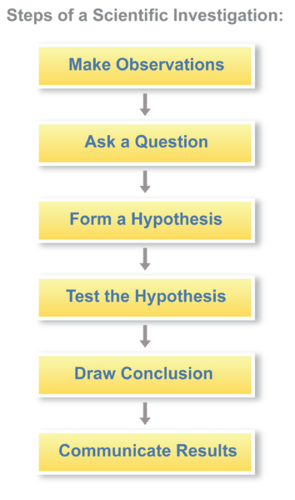
There are basic methods of gaining knowledge that are common to all of science. At the heart of science is the scientific investigation, which is done by following the scientific method. A scientific investigation is a plan for asking questions and testing possible answers. It generally follows the steps listed in Figure below.
 Steps of a Scientific Investigation. A scientific investigation typically has these steps. Scientists often develop their own steps they follow in a scientific investigation. Shown here is a simplification of how a scientific investigation is done.
Making Observations
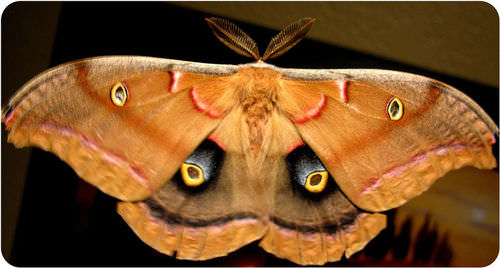
A scientific investigation typically begins with observations. You make observations all the time. Let’s say you take a walk in the woods and observe a moth, like the one in Figure below, resting on a tree trunk. You notice that the moth has spots on its wings that look like eyes. You think the eye spots make the moth look like the face of an owl.
 Does this moth remind you of an owl?
Asking a Question
Observations often lead to questions. For example, you might ask yourself why the moth has eye spots that make it look like an owl’s face. What reason might there be for this observation?
Forming a Hypothesis
The next step in a scientific investigation is forming a hypothesis. A hypothesis is a possible answer to a scientific question, but it isn’t just any answer. A hypothesis must be based on scientific knowledge, and it must be logical. A hypothesis also must be falsifiable. In other words, it must be possible to make observations that would disprove the hypothesis if it really is false. Assume you know that some birds eat moths and that owls prey on other birds. From this knowledge, you reason that eye spots scare away birds that might eat the moth. This is your hypothesis.
Testing the Hypothesis
To test a hypothesis, you first need to make a prediction based on the hypothesis. A prediction is a statement that tells what will happen under certain conditions. It can be expressed in the form: If A occurs, then B will happen. Based on your hypothesis, you might make this prediction: If a moth has eye spots on its wings, then birds will avoid eating it.
Next, you must gather evidence to test your prediction. Evidence is any type of data that may either agree or disagree with a prediction, so it may either support or disprove a hypothesis. Evidence may be gathered by an experiment. Assume that you gather evidence by making more observations of moths with eye spots. Perhaps you observe that birds really do avoid eating moths with eye spots. This evidence agrees with your prediction.
Drawing Conclusions
Evidence that agrees with your prediction supports your hypothesis. Does such evidence prove that your hypothesis is true? No; a hypothesis cannot be proven conclusively to be true. This is because you can never examine all of the possible evidence, and someday evidence might be found that disproves the hypothesis. Nonetheless, the more evidence that supports a hypothesis, the more likely the hypothesis is to be true.
Communicating Results
The last step in a scientific investigation is communicating what you have learned with others. This is a very important step because it allows others to test your hypothesis. If other researchers get the same results as yours, they add support to the hypothesis. However, if they get different results, they may disprove the hypothesis.
When scientists share their results, they should describe their methods and point out any possible problems with the investigation. For example, while you were observing moths, perhaps your presence scared birds away. This introduces an error into your investigation. You got the results you predicted (the birds avoided the moths while you were observing them), but not for the reason you hypothesized. Other researchers might be able to think of ways to avoid this error in future studies.
As you view The Scientific Method, focus on these concepts:
- the relationship between evidence, conclusions and theories,
- the "ground rules" of scientific research,
- the steps in a scientific procedure,
- the meaning of the "replication of results,"
- the meaning of "falsifiable," and
- the outcome when the scientific method is not followed.
Discovering the Scientific Method
A summary video of the scientific method, using the identification of DNA structure as an example, is shown in this video by MIT students:
KQED: Why I Do Science
Dan Costa, Ph.D. is a professor of Biology at the University of California, Santa Cruz, and has been studying marine life for well over 40 years. He is a leader in using satellite tags, time and depth recorders and other sophisticated electronic tags to gather information about the amazing depths to which elephant seals dive, their migration routes and how they use oceanographic features to hunt for prey as far as the international dateline and the Alaskan Aleutian Islands.
Science Friday: A Shot in the Dark: Alternative Uses for Squid Ink
Squid ink is commonly thought of as a defensive mechanism used by squids, but could there be other uses? In this video by Science Friday, Dr. Stephanie Bush talks about possible other functions of squid ink.
Science Friday: No Strain, No Gain: Filter Feeding Mantas
Mantas are an example of filter feeders that obtain food as they swim through the water. How do these filters work? In this video by Science Friday, Dr. Misty Paig-Tran discusses the mechanisms used by manta rays.
Summary
- At the heart of science is the scientific investigation, which is done by following the scientific method. A scientific investigation is a plan for asking questions and testing possible answers.
- A scientific investigation typically begins with observations. Observations often lead to questions.
- A hypothesis is a possible logical answer to a scientific question, based on scientific knowledge.
- A prediction is a statement that tells what will happen under certain conditions.
- Evidence is any type of data that may either agree or disagree with a prediction, so it may either support or disprove a hypothesis. Conclusions may be formed from evidence.
- The last step in a scientific investigation is the communication of results with others.
Review
- Outline the steps of a scientific investigation.
- What is a scientific hypothesis? What characteristics must a hypothesis have to be useful in science?
- Give an example of a scientific question that could be investigated with an experiment. Then give an example of a question that could not be investigated.
- Can a hypothesis be proven true? Why or why not?
- Why do scientists communicate their results?
| Image | Reference | Attributions |
 |
[Figure 1] | Credit: Flickr:OakleyOriginals;Cover Image. Oceanography, Volume 25, No. 3. Sept.2012 Source: http://www.flickr.com/photos/oakleyoriginals/4536342259/ License: CC BY 2.0 |
 |
[Figure 2] | Credit: Hana Zavadska;Brett and Sue Coulstock/Red Moon Sanctuary Source: CK-12 Foundation ; http://www.flickr.com/photos/redmoonsanctuary/7710449444/ License: CC BY-NC 3.0; CC BY 2.0 |
 |
[Figure 3] | Credit: Flickr:OakleyOriginals;Cover Image. Oceanography, Volume 25, No. 3. Sept.2012 Source: http://www.flickr.com/photos/oakleyoriginals/4536342259/ License: CC BY 2.0 |

