8.7: Geometry Software for Translations
- Page ID
- 6000
\( \newcommand{\vecs}[1]{\overset { \scriptstyle \rightharpoonup} {\mathbf{#1}} } \)
\( \newcommand{\vecd}[1]{\overset{-\!-\!\rightharpoonup}{\vphantom{a}\smash {#1}}} \)
\( \newcommand{\dsum}{\displaystyle\sum\limits} \)
\( \newcommand{\dint}{\displaystyle\int\limits} \)
\( \newcommand{\dlim}{\displaystyle\lim\limits} \)
\( \newcommand{\id}{\mathrm{id}}\) \( \newcommand{\Span}{\mathrm{span}}\)
( \newcommand{\kernel}{\mathrm{null}\,}\) \( \newcommand{\range}{\mathrm{range}\,}\)
\( \newcommand{\RealPart}{\mathrm{Re}}\) \( \newcommand{\ImaginaryPart}{\mathrm{Im}}\)
\( \newcommand{\Argument}{\mathrm{Arg}}\) \( \newcommand{\norm}[1]{\| #1 \|}\)
\( \newcommand{\inner}[2]{\langle #1, #2 \rangle}\)
\( \newcommand{\Span}{\mathrm{span}}\)
\( \newcommand{\id}{\mathrm{id}}\)
\( \newcommand{\Span}{\mathrm{span}}\)
\( \newcommand{\kernel}{\mathrm{null}\,}\)
\( \newcommand{\range}{\mathrm{range}\,}\)
\( \newcommand{\RealPart}{\mathrm{Re}}\)
\( \newcommand{\ImaginaryPart}{\mathrm{Im}}\)
\( \newcommand{\Argument}{\mathrm{Arg}}\)
\( \newcommand{\norm}[1]{\| #1 \|}\)
\( \newcommand{\inner}[2]{\langle #1, #2 \rangle}\)
\( \newcommand{\Span}{\mathrm{span}}\) \( \newcommand{\AA}{\unicode[.8,0]{x212B}}\)
\( \newcommand{\vectorA}[1]{\vec{#1}} % arrow\)
\( \newcommand{\vectorAt}[1]{\vec{\text{#1}}} % arrow\)
\( \newcommand{\vectorB}[1]{\overset { \scriptstyle \rightharpoonup} {\mathbf{#1}} } \)
\( \newcommand{\vectorC}[1]{\textbf{#1}} \)
\( \newcommand{\vectorD}[1]{\overrightarrow{#1}} \)
\( \newcommand{\vectorDt}[1]{\overrightarrow{\text{#1}}} \)
\( \newcommand{\vectE}[1]{\overset{-\!-\!\rightharpoonup}{\vphantom{a}\smash{\mathbf {#1}}}} \)
\( \newcommand{\vecs}[1]{\overset { \scriptstyle \rightharpoonup} {\mathbf{#1}} } \)
\(\newcommand{\longvect}{\overrightarrow}\)
\( \newcommand{\vecd}[1]{\overset{-\!-\!\rightharpoonup}{\vphantom{a}\smash {#1}}} \)
\(\newcommand{\avec}{\mathbf a}\) \(\newcommand{\bvec}{\mathbf b}\) \(\newcommand{\cvec}{\mathbf c}\) \(\newcommand{\dvec}{\mathbf d}\) \(\newcommand{\dtil}{\widetilde{\mathbf d}}\) \(\newcommand{\evec}{\mathbf e}\) \(\newcommand{\fvec}{\mathbf f}\) \(\newcommand{\nvec}{\mathbf n}\) \(\newcommand{\pvec}{\mathbf p}\) \(\newcommand{\qvec}{\mathbf q}\) \(\newcommand{\svec}{\mathbf s}\) \(\newcommand{\tvec}{\mathbf t}\) \(\newcommand{\uvec}{\mathbf u}\) \(\newcommand{\vvec}{\mathbf v}\) \(\newcommand{\wvec}{\mathbf w}\) \(\newcommand{\xvec}{\mathbf x}\) \(\newcommand{\yvec}{\mathbf y}\) \(\newcommand{\zvec}{\mathbf z}\) \(\newcommand{\rvec}{\mathbf r}\) \(\newcommand{\mvec}{\mathbf m}\) \(\newcommand{\zerovec}{\mathbf 0}\) \(\newcommand{\onevec}{\mathbf 1}\) \(\newcommand{\real}{\mathbb R}\) \(\newcommand{\twovec}[2]{\left[\begin{array}{r}#1 \\ #2 \end{array}\right]}\) \(\newcommand{\ctwovec}[2]{\left[\begin{array}{c}#1 \\ #2 \end{array}\right]}\) \(\newcommand{\threevec}[3]{\left[\begin{array}{r}#1 \\ #2 \\ #3 \end{array}\right]}\) \(\newcommand{\cthreevec}[3]{\left[\begin{array}{c}#1 \\ #2 \\ #3 \end{array}\right]}\) \(\newcommand{\fourvec}[4]{\left[\begin{array}{r}#1 \\ #2 \\ #3 \\ #4 \end{array}\right]}\) \(\newcommand{\cfourvec}[4]{\left[\begin{array}{c}#1 \\ #2 \\ #3 \\ #4 \end{array}\right]}\) \(\newcommand{\fivevec}[5]{\left[\begin{array}{r}#1 \\ #2 \\ #3 \\ #4 \\ #5 \\ \end{array}\right]}\) \(\newcommand{\cfivevec}[5]{\left[\begin{array}{c}#1 \\ #2 \\ #3 \\ #4 \\ #5 \\ \end{array}\right]}\) \(\newcommand{\mattwo}[4]{\left[\begin{array}{rr}#1 \amp #2 \\ #3 \amp #4 \\ \end{array}\right]}\) \(\newcommand{\laspan}[1]{\text{Span}\{#1\}}\) \(\newcommand{\bcal}{\cal B}\) \(\newcommand{\ccal}{\cal C}\) \(\newcommand{\scal}{\cal S}\) \(\newcommand{\wcal}{\cal W}\) \(\newcommand{\ecal}{\cal E}\) \(\newcommand{\coords}[2]{\left\{#1\right\}_{#2}}\) \(\newcommand{\gray}[1]{\color{gray}{#1}}\) \(\newcommand{\lgray}[1]{\color{lightgray}{#1}}\) \(\newcommand{\rank}{\operatorname{rank}}\) \(\newcommand{\row}{\text{Row}}\) \(\newcommand{\col}{\text{Col}}\) \(\renewcommand{\row}{\text{Row}}\) \(\newcommand{\nul}{\text{Nul}}\) \(\newcommand{\var}{\text{Var}}\) \(\newcommand{\corr}{\text{corr}}\) \(\newcommand{\len}[1]{\left|#1\right|}\) \(\newcommand{\bbar}{\overline{\bvec}}\) \(\newcommand{\bhat}{\widehat{\bvec}}\) \(\newcommand{\bperp}{\bvec^\perp}\) \(\newcommand{\xhat}{\widehat{\xvec}}\) \(\newcommand{\vhat}{\widehat{\vvec}}\) \(\newcommand{\uhat}{\widehat{\uvec}}\) \(\newcommand{\what}{\widehat{\wvec}}\) \(\newcommand{\Sighat}{\widehat{\Sigma}}\) \(\newcommand{\lt}{<}\) \(\newcommand{\gt}{>}\) \(\newcommand{\amp}{&}\) \(\definecolor{fillinmathshade}{gray}{0.9}\)Perform and analyze translations using Geogebra.
Geometry software has a translation function that makes it easy to translate an object along a vector. Can you perform a translation using geometry software without that function?
Translations
Recall that a translation is one example of a rigid transformation. A translation moves each point in a shape a specified distance in a specified direction as defined by a vector. Below, the parallelogram has been translated along vector \rightarrow{v}\) to create a new parallelogram (the image).
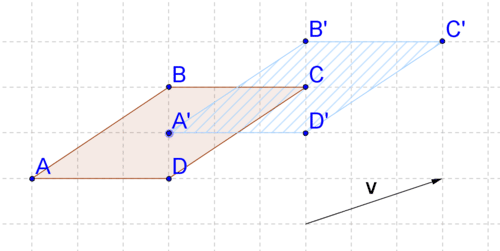
When you are working on a grid (or graph paper), performing translations is relatively easy. In the above translation, you can see that the vector moves each point one unit up and three units to the right. To perform the translation, just move each point that defines the parallelogram one unit up and three units to the right. But what if the grid is not there? Then, it is not as easy to describe the translation because there are no grid lines as a guide.
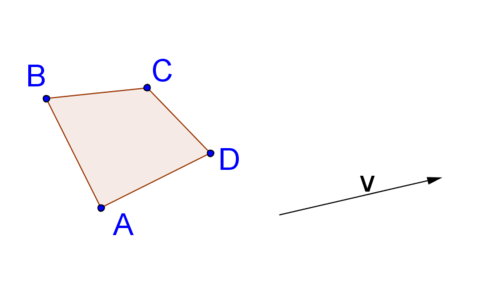
To perform a translation without a grid, you need to:
- Find lines parallel to the vector through each of the points that define the shape.
- Move the length of the vector along each of those lines.
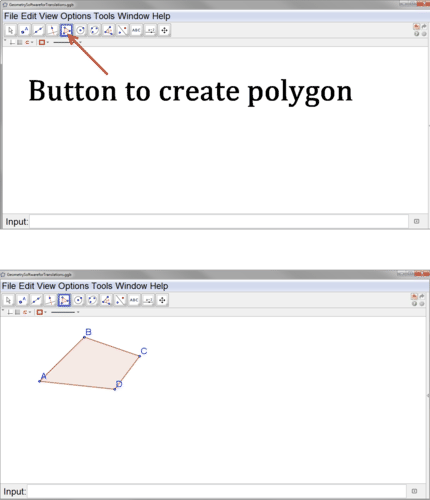
Doing this by hand requires careful construction of parallel lines and copying of line segments. Geometry software simplifies this process, because geometry software has a “translate” button. Geogebra is one example of geometry software that is free to download. To perform a translation in Geogebra, first create your polygon.
Next, create the vector that will define your translation. Below, a vector has been created from point \(G\) to point \(H\).
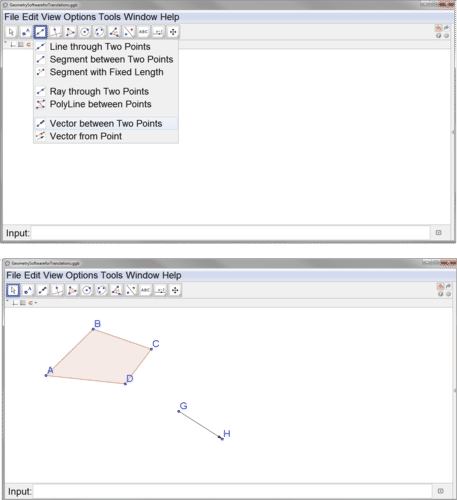
To perform the translation, select the translation button, then the polygon, and then the vector.
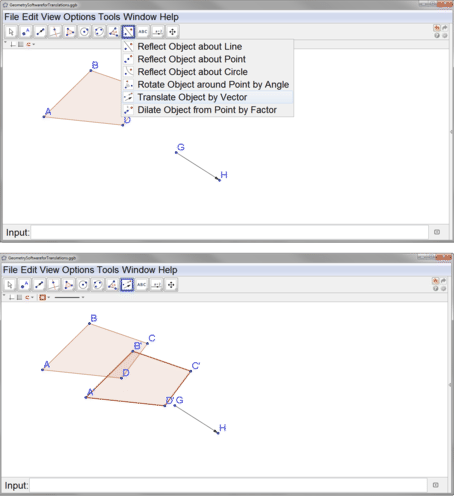
Note that the points defining the image are labeled with prime notation. Remember that the specific location of the vector does not matter. At this point you can drag the vector to another location and your translation will not change. You can also move points \(G\) or \(H\) to redefine the vector (or change your original polygon) and the location of your image will move accordingly.
Let's take a look at an example problem.
Show that the segment connecting \(A\) with \(A′\) is parallel to the vector connecting points \(G\) and \(H\).
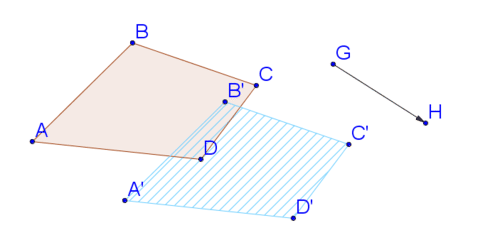
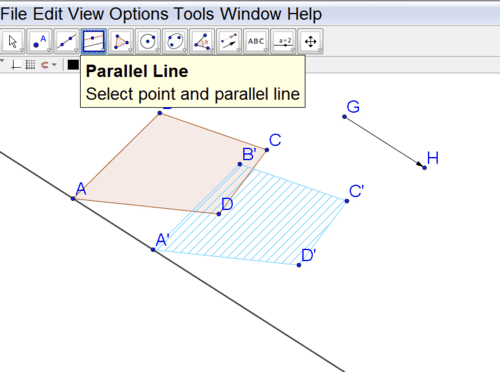
Use Geogebra to construct a line parallel to the vector through point \(A\). You can see that it also passes through \(A′\). This means the line segment connecting \(A\) with \(A′\) is parallel to the vector.
Translate the polygon without using the translate button.

You are going to use Geogebra to do the same steps you would do if you were translating by hand. First, construct lines parallel to the vector through each of the four points defining the quadrilateral, using the method from Example A.
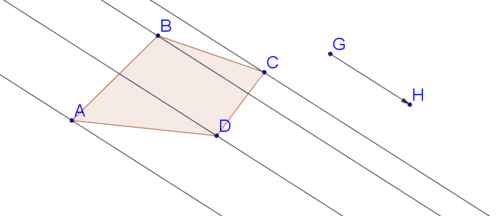
Next, copy the vector and paste it so that it starts at point \(A\). Repeat for points \(B\), \(C\), and \(D\). You might have to make sure that the copies of point \(H\) are not hidden.
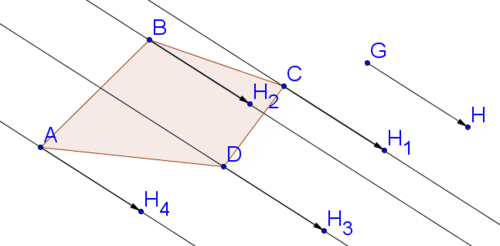
Form a polygon with the copies of point \(H\).
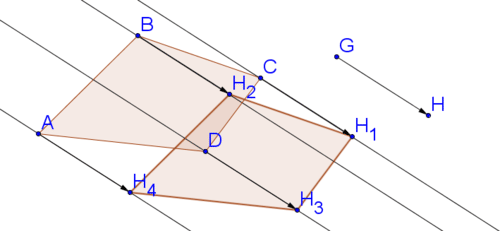
Now, let's compare and contrast the two methods for translating a polygon using Geogebra.
Using the translate button is faster, but performing the steps of constructing the parallel lines and copying the vectors also works and helps to show the connection between parallel lines, vectors, and translations. In both cases you can move the vector or the original shape after the translation has taken place and the image will change and move accordingly.
Example \(\PageIndex{1}\)
Earlier, you were asked can you perform a translation using geometry software without the function.
Solution
You can perform a translation using geometry software without the “translate” button by constructing parallel lines and copying and pasting the vector onto those lines.
Example \(\PageIndex{2}\)
Create your own polygon and vector in Geogebra.
Example \(\PageIndex{3}\)
Translate the polygon along the vector using the translate button.
Example \(\PageIndex{4}\)
Try translating the polygon along the vector without using the translate button by constructing parallel lines and copying and pasting the vector as shown in Example B. How can you verify that you have done this correctly?
Solution
Answers will vary depending on what polygon you construct. Look back at the guidance section for help using Geogebra. To check that you have performed the translation without the translate button correctly, just make sure that both images ended up in the same place.
Review
- Create a polygon in Geogebra.
- Create a vector that will move the polygon to the right.
- Translate the polygon along the vector from #2 using the translate button.
- Create another vector that will move the polygon up and to the left.
- Translate the polygon along the vector from #4 using the translate button.
- Create a third vector that will move the polygon straight down.
- Translate the polygon along the vector from #6 by constructing parallel lines and copying and pasting the vector.
- Check your work to #7 by using the translate button to translate the polygon along the vector from #6. How can you tell if you performed the translation correctly?
- Translations are rigid transformations which means that distance is preserved. Verify that distance has been preserved by using Geogebra to measure sides of your original polygon and their images. Select “distance or length” from one of the drop down menus. Then, click on each line segment that you want to measure to see its length.
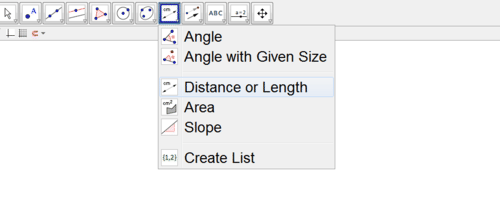
- Translations are rigid transformations which means that angles are preserved. Verify that angles have been preserved by using Geogebra to measure two corresponding angles. Select “angle” from the same drop down menu as in #9. Then, tell Geogebra what angle you want to measure by clicking on the three points you would use to name the angle. You must click on the points in clockwise order for it to measure the correct angle.
- Construct a circle in Geogebra.
- Create a vector that will move the circle to the right.
- Translate the circle along the vector from #12 using the translate button.
- Create another vector that will move the circle up and to the left.
- Translate the circle along the vector from #14 using the translate button.
- Explore how you might be able to translate the circle without using the translate button by creating parallel lines and copying and pasting the vector.
Review (Answers)
To see the Review answers, open this PDF file and look for section 2.3.
Vocabulary
| Term | Definition |
|---|---|
| Translation | A translation is a transformation that slides a figure on the coordinate plane without changing its shape, size, or orientation. |
| Rigid Transformation | A rigid transformation is a transformation that preserves distance and angles, it does not change the size or shape of the figure. |

